
How to read a chest X-Ray
A systematic approach to review areas
Introduction
A chest X-Ray is one of the most commonly requested imaging tests, but important findings are easy to miss. A consistent chest X-Ray interpretation system gives structure and discipline, especially when you are tired, under time pressure, or reviewing a film with multiple devices and artefacts.
The approach I use every day starts with the basics: confirm the correct patient and the right study. It sounds obvious, but reporting the wrong chest X-ray can still happen when lists are long or PACS retrieves a prior study by mistake.
Once you know you are looking at the right film, this guide will take you through a systematic chest X-Ray checklist: technical adequacy, lines and devices, lung apices, bones, mediastinum, lungs and soft tissues.
Mastering this process has helped improve both my accuracy and speed in chest X-Ray interpretation, and it should help you read films more safely, systematically and confidently.
Chest X-Ray review area video guide
We’ll go through the whole review system below but if you prefer you can watch this video guide on Chest X-Ray review areas:
Chest X-Ray anatomy reference
Before you jump into assessing your film, take a look at this annotated view of a PA (posterior-anterior) chest X-Ray looking at some of the basic anatomy.
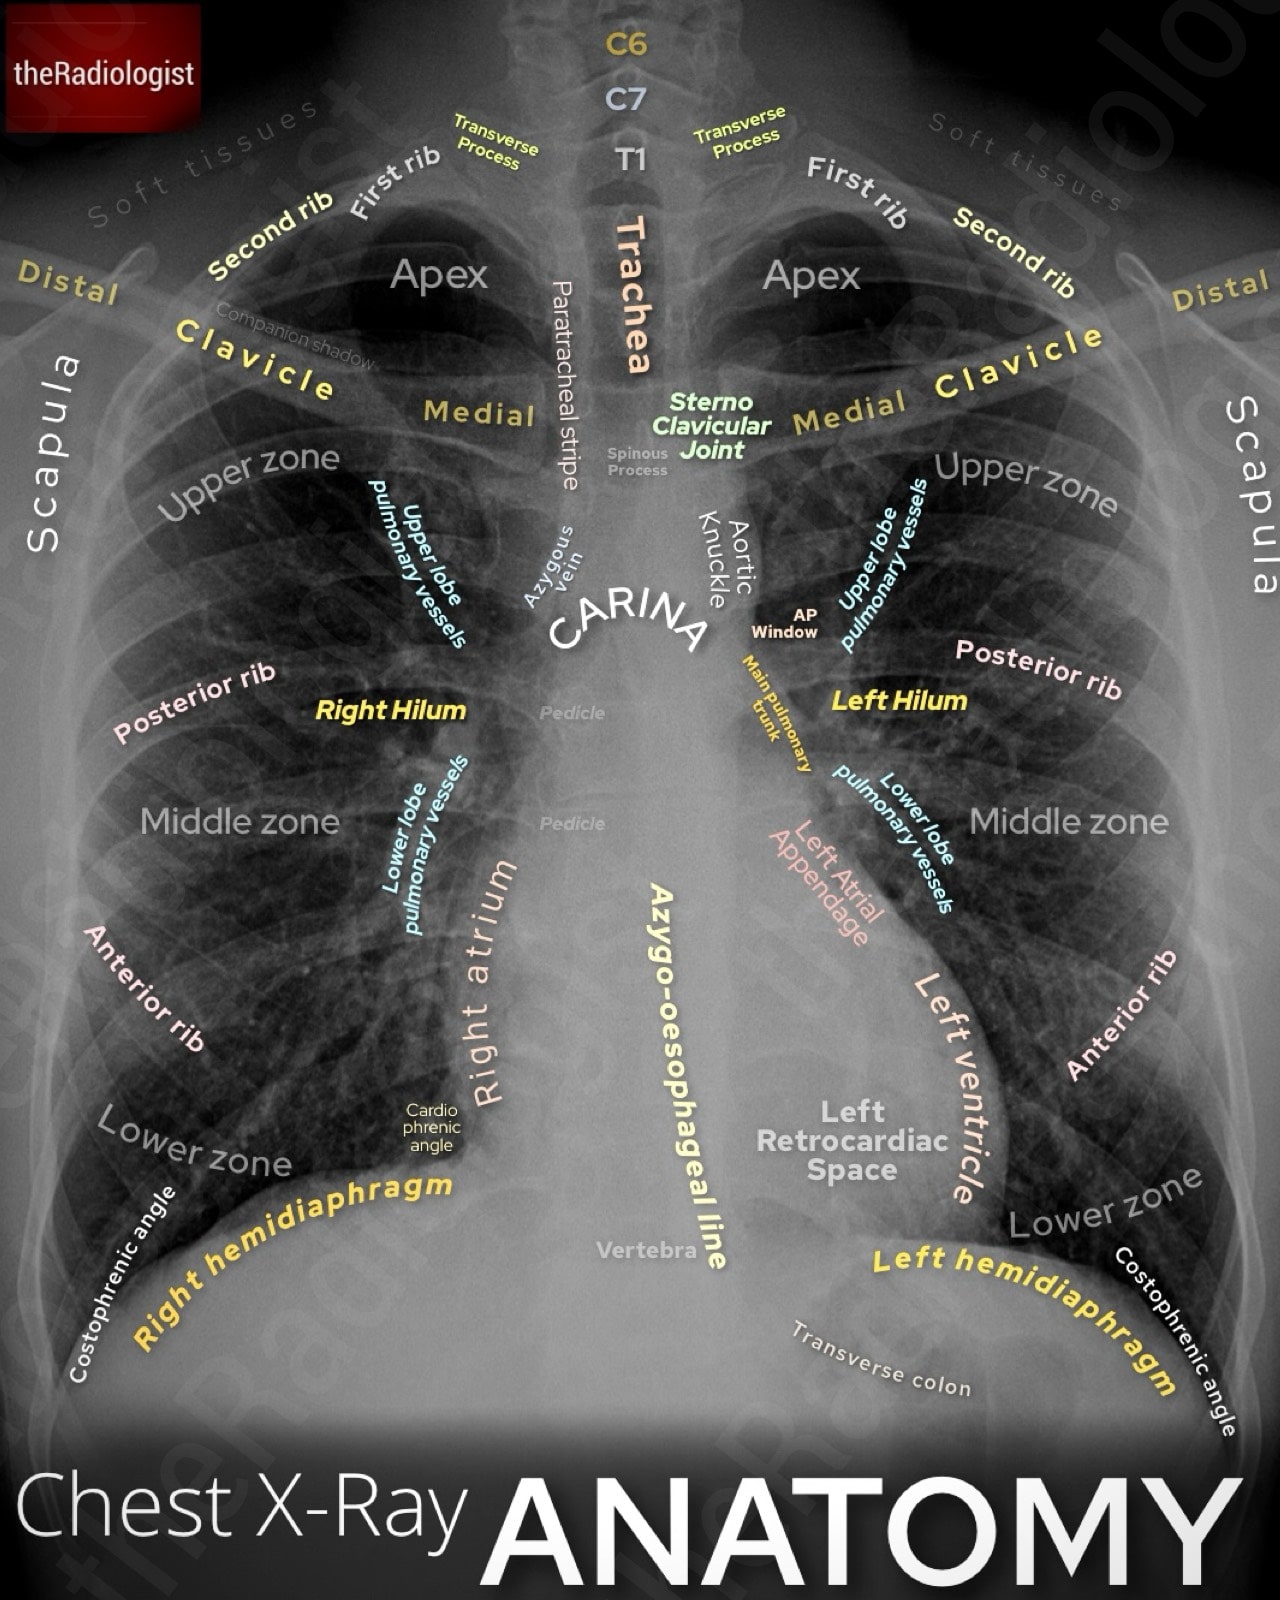
Annotated view of a PA adult chest X-Ray
Technical factors
Before you start looking for pathology, make sure the film itself is technically adequate.
This is essentially a chest X-Ray image quality checklist. The mnemonic I use to do this is RIPE-C.
R: Rotation
The first thing I check is rotation. Find the spinous processes and see how they line up with the inner ends of the clavicles. In a well-positioned film they should sit right in the middle. If the patient’s rotated, the mediastinum looks distorted, the heart size becomes unreliable, and one lung can look falsely more dense than the other just because it’s closer to the detector.

Assessing rotation: check to see the spinous processes are equidistant between the medial clavicles.
I: Inspiration
Next, take a look at inspiration.
How many ribs should be visible on a good inspiration chest X-ray?
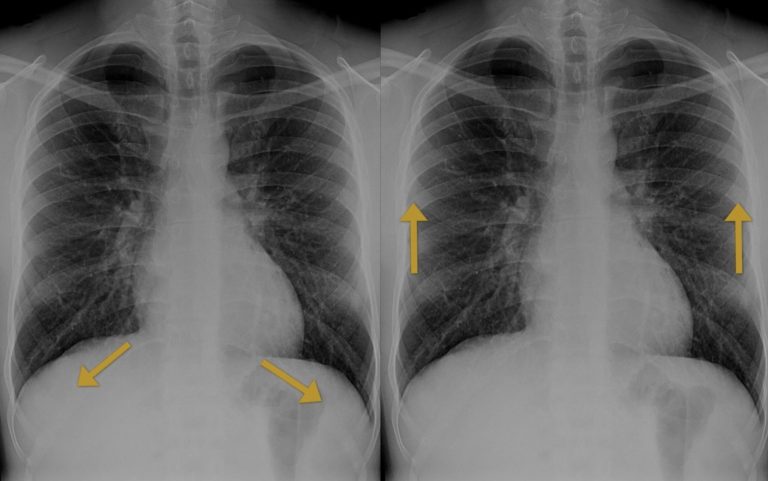
A good breath in usually means you can count six anterior ribs above the left hemidiaphragm in the mid clavicular line. Remember, posterior ribs run more horizontally, anterior ribs slope downwards. If the patient hasn’t taken a deep enough breath, the vessels get crowded and the lungs look falsely ‘whiter’, which can mimic consolidation. Sometimes it’s tricky to tell if it’s just a poor inspiration or genuinely reduced lung volumes: checking previous films can help.

Assessing inspiration: check to see there are six anterior ribs above the left hemidiaphragm in the mid clavicular line. A reduced inspiration can make the lungs appear falsely dense.
P: Projection
Projection is the next step.
Let’s think about PA versus AP positioning.
Standard chest films are PA (posterior-anterior), taken with the patient facing the cassette and the beam about 180 cm away. Those who can’t stand (eg sick inpatients) usually get AP (anterior-posterior) films, often at shorter distances. That magnifies the heart and mediastinum, so the cardiothoracic ratio is no longer reliable.
The best way to tell is if the film is labelled. If it isn’t, the scapulae can give you a clue: in PA views they’re pulled clear of the lung fields, but in AP they often sit over them.

Standard chest films are done as PA with a fixed distance from the source to cassette. AP films are done in those who cannot stand with a more variable distance. This means the cardiothoracic ratio is unreliable and mediastinum less well assessed.
E: Exposure
Exposure is also key. You should just about see the intervertebral disc spaces through the heart. If you can’t, you won’t be able to properly assess the retrocardiac area. Under-penetrated films can hide lower-zone consolidation, hiatus hernia, or oesophageal disease so it is important to recognise this.
C: Coverage
Finally, check coverage. A decent chest film should include the apices with the first ribs, the lateral chest walls, and both costophrenic angles. If any of those are cut off, you risk missing pathology such as a tiny apical pneumothorax or a small effusion.
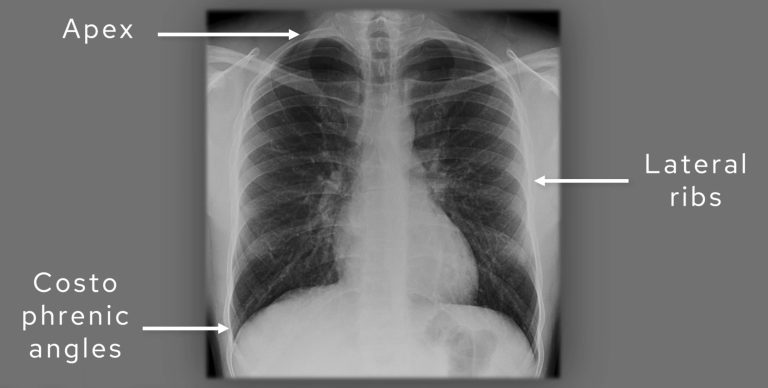
Assess coverage: check to see if the apices, lateral ribs and costophrenic angles are covered.
Let’s go through the different technical factors in this table:
| Mnemonic | Technical factor | Notes |
|---|---|---|
| R | Rotation | Check the spinous processes are equidistant from the medial clavicles. |
| I | Inspiration | Look for 6 anterior ribs above the left hemidiaphragm in the mid clavicular line. |
| P | Projection | Either PA (standard projection) or AP (in patients who cannot stand). Cannot measure cardiothoracic ratio on AP films. |
| E | Exposure | Check you can see the vertebrae through the heart. |
| C | Coverage | Ensure the film has covered the lung apices, lateral ribs and costophrenic angles. |
MEMORY AID
Use the mnemonic RIPE-C to go through the important technical factors when assessing the adequacy of a chest X-Ray.
Rotation, Inspiration, Projection, Exposure and Coverage.
Technical factors video guide
We go through assessing the technical adequacy of a chest X-Ray in more detail in this video below:
Tubes, lines and foreign bodies
Once the film is confirmed as technically adequate, I always look for anything ‘extra’ on the film that shouldn’t be there including tubes, lines and any potential foreign bodies.
It is important to be able to explain anything like this that you see on a film – don’t miss a foreign body! There have been times that people have continuously walked past a foreign body that has been present on consecutive X-Rays as they assumed it was a device that should be there.
Nasogastric (NG) tube placement
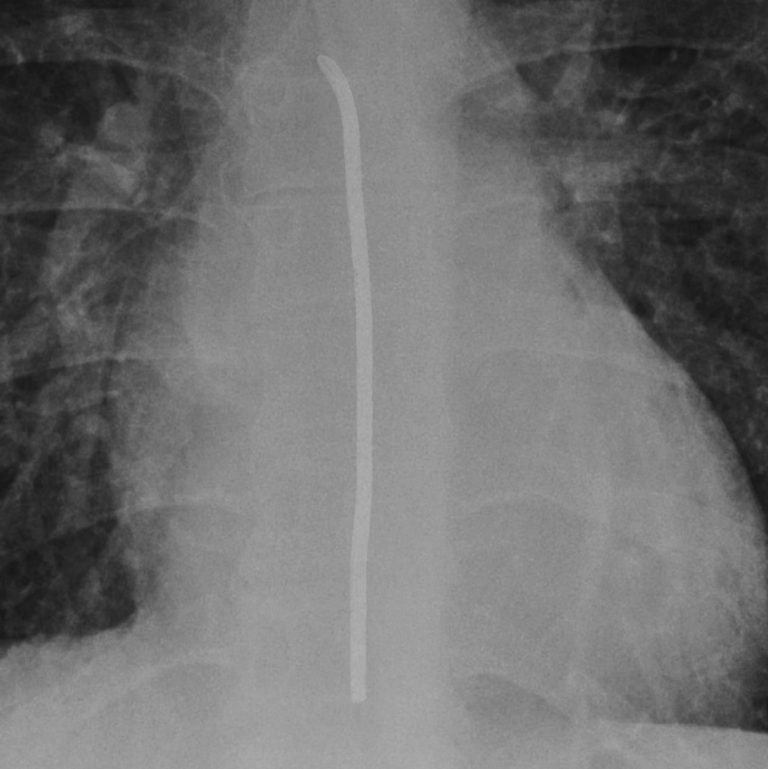
Nasogastric tube position is a critical check. A tube that inadvertently tracks into the trachea and down a bronchus is dangerous: feeding through it can be fatal. To confirm safe placement on a chest X‑ray, I look for four features:
The tube must bisect the carina in the midline. If it bisects the carina, it is almost certainly within the oesophagus rather than the airway.
Next, does the tube pass the diaphragm in a central position?
Does the tube pass below the left hemidiaphragm? This is expected if is heading to the stomach and the stomach has a normal position.
Can you see the tube tip?
If you can satisfy all four conditions then you can say your NG tube is in the right place and is ready to use.
In patients with altered anatomy for example from a hiatus hernia or prior gastric surgery, the tube may take an unusual course. In such cases, compare with prior films or if really necessary you can perform a film post contrast, fluoroscopy or a CT scan for reassurance.

The four rules of nasogastric (NG) tube placement on X-Ray
Nasogastric tubes on chest X-Ray: video guide
Have a deeper look at nasogastric tube assessment on X-Ray and watch this short video guide:
Central venous catheter (central line) placement
Central lines can take different forms, let’s look at the different types in this table below:
| Central line | Expected course | Chest X-Ray findings |
|---|---|---|
| PICC lines (peripherally inserted central catheters) | Insert via arm veins (basilic, brachial, cephalic) before following the axillary and brachiocephalic veins and then the SVC. | Thin catheter coursing from the arm across the chest to the right side of the mediastinum, with the tip ideally in the lower SVC or at the cavoatrial junction. |
| Non-tunnelled central venous catheters | Placed directly into the internal jugular, subclavian, or femoral vein. From the IJV or subclavian will end in the SVC. | Straight catheter entering from the neck (can be right or left) and heading vertically down the right side mediastinum, tip in the SVC/right atrial junction. |
| Tunnelled central venous catheter eg Hickman | Tunnelled under the skin then usually plumb into the IJV before heading to the SVC-RA (right atrium) junction. | Catheter entering the chest wall, coursing medially with a subcutaneous ‘tunnel’, then descending to terminate in the SVC/right atrial junction. |
| Port-a-cath (implantable port) | Subcutaneous reservoir connected to a catheter, accessed intermittently with a needle. Usually plumbed into the IJV and will lead to the SVC-RA junction from there. | Visible port chamber within the chest wall with an attached catheter coursing towards the SVC/right atrial junction via the IJV. |
| Dialysis catheter | Large bore usually dual lumen catheter which can be tunnelled under the skin then heading to wards the IJV and then SVC-RA junction. | Thick, dual-lumen catheter coursing into the SVC or right atrium; tunnelled types may have a subcutaneous path before venous entry. |
| Midline catheter (not technically central) | Inserted into arm veins but terminating short of the SVC, usually around the axilla. | Catheter in the upper arm, with the tip stopping short of the central veins and not extending into the mediastinum. |
Central venous catheter tips are ideally positioned at the junction of the superior vena cava and right atrium.
On a chest X-Ray this location lies just below the level of the carina and the right hilum, and beneath the aortic arch and pulmonary trunk. A line should descend along the right side of the mediastinum and take a vertical course into this region.
A tip placed too low into the right atrium has traditionally been considered a risk for arrhythmia or perforation, although in practice dialysis catheters are often placed there without issue. Nevertheless, a tip positioned within the SVC or at its junction with the atrium is generally considered optimal.
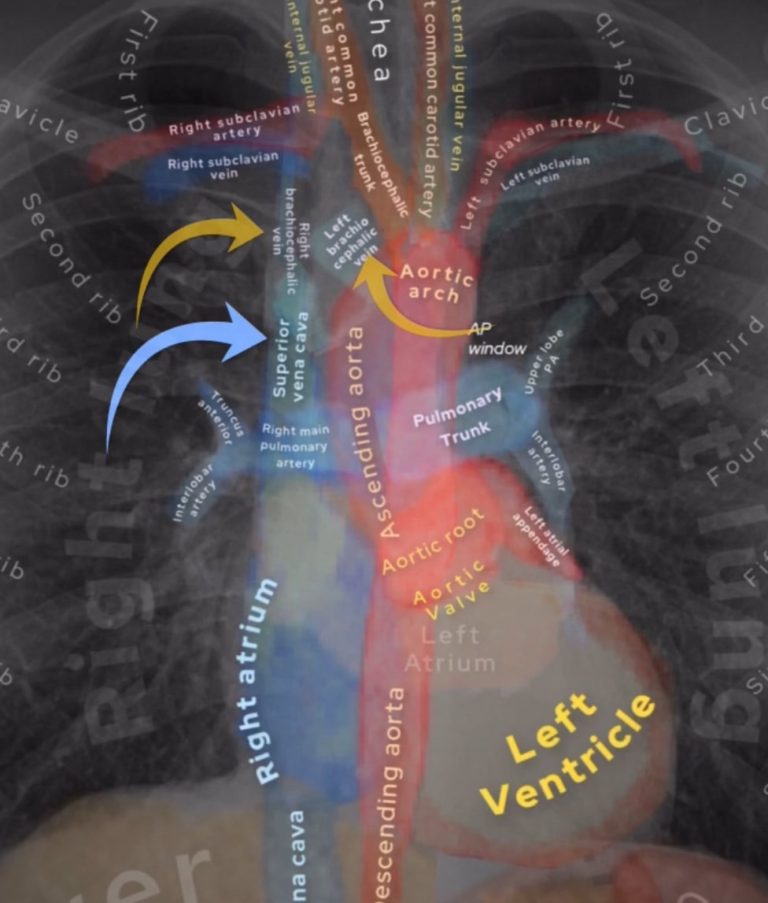
All central venous catheters that enter the neck, chest or arms will need to find their way into the superior vena cava (SVC, blue arrow) via either the right or left brachiocephalic vein (yellow arrows).
Misplacement can occur in several ways. If a line courses medially after initially following the expected path, it may have entered the azygos vein. Another risk is inadvertent arterial placement, where the catheter passes into the subclavian artery and then into the aorta. This will appear as a more medial course towards the aortic root, rather than the vertical track of an SVC catheter.
Always confirm there is no pneumothorax on the side of insertion by checking the lung apex carefully for lucency or a pleural line.
Note that lines inserted via the left arm or subclavian vein take a longer, more horizontal course through the left brachiocephalic vein before turning vertically into the SVC.
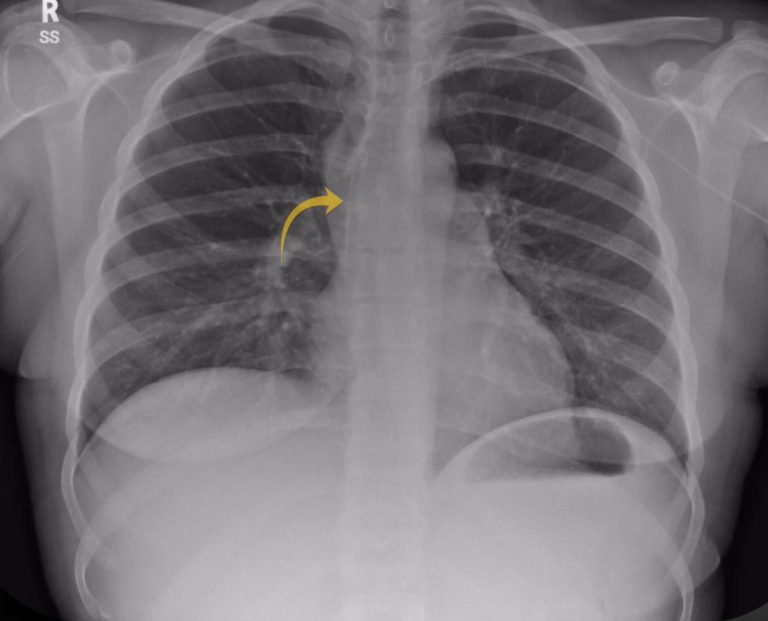
Here a left sided PICC enters the arm and takes a more horizontal course through the left brachiocephalic vein before entering the SVC (yellow arrow) with the tip well sited at the junction of the SVC and right atrium.
Central venous catheter on X-Ray: video guide
Have a deeper look at central line assessment on X-Ray and watch this short video guide:
KEY POINT
After assessing technical adequacy of the film, make sure you clear all external objects such as lines, tubes and potential foreign bodies.
A misplaced line or an unwanted foreign body such as retained surgical material could be the most important finding on the X-Ray but are easily missed.
Assessing lung apices
Now let’s move onto the lungs. The first thing I do is to zoom up onto the lung apices as there are important things to exclude here.
The three things I look for are:
- Pancoast tumour
- Rib abnormalities
- Apical pneumothorax
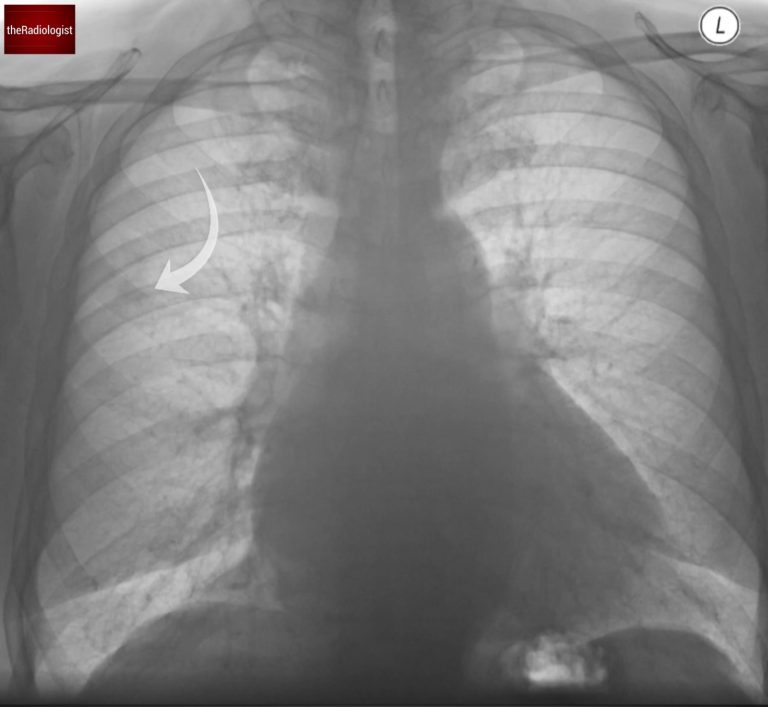
A Pancoast tumour may be subtle, showing only asymmetry overlying the ribs, clavicles or in between them. If you’re not sure inverting the film and checking previous films help. I have called subtle opacities here and in retrospect this could have saved lives by calling an early lung cancer before it metastasised.
Next look at the bones. The bones all overlie each other at the apices so it is a good idea to try and piece it all apart. Identify the T1 and C7 transverse processes: the T1 transverse process will point upwards and the C7 one will point downwards. This helps you find your first rib arising at the level of T1 – trace this and the second rib looking for erosion (a destroyed rib could be a sign of a Pancoast tumour). Also look for a cervical rib arising from the C7 vertebra which could help explain symptoms of tingling or weakness in the upper limb.

Look at the spinous processes and ensure the interspinous distance is relatively similar: more than 1.5 times difference can be significant
Pneumothorax assessment
Let’s go into pneumothorax assessment in a bit more detail.
I do not consider a chest X‑ray fully reviewed until I have zoomed right in on both apices and that’s mainly because a pneumothorax can be very subtle unless you magnify the film. A pneumothorax represents gas within the pleural space – remember the pleura has two layers the visceral (inner) and parietal pleura (outer).
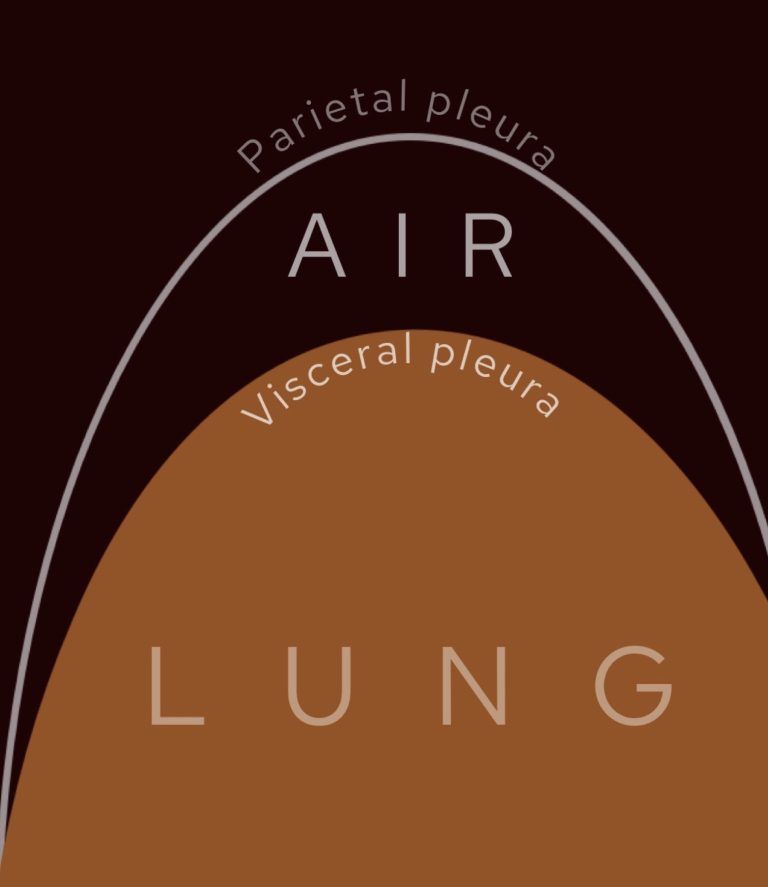
Pneumothorax represents gas within the pleural space, between the inner visceral and outer parietal pleura.
When a patient is upright, intrapleural gas will rise to the top, which is why pneumothoraces are usually detected here.
The two cardinal signs to look for are, firstly, a lucent black area of lung without visible vascular markings and, secondly, a thin white pleural line representing the visceral pleura separating from the parietal pleura. Compare side to side: if one apex lacks markings where the other has them, this should ring alarm bells. Bullae from emphysema can mimic a lucent pneumothorax, but these tend to be round and do not display a sharp pleural line paralleling the chest wall.
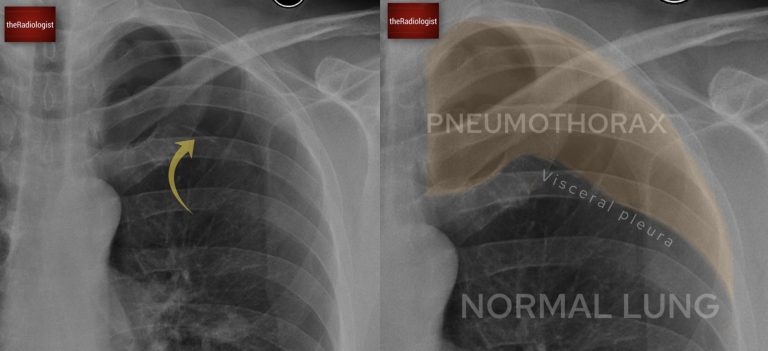
Here in this case we have the two cardinal signs of pneumothorax: one, a white pleural line (yellow arrow) and two lucency without lung markings outside of this.
In supine ITU patients, pneumothoraces may not rise to the apex and instead present as the ‘deep sulcus sign’ with an abnormally lucent and deepened costophrenic angle.
For more on pneumothorax check out this case and article here.
Assessing a pneumothorax on chest X-Ray: video guide
Have a deeper look at pneumothorax assessment on X-Ray and watch this short video guide:
Assessing the bones
With the apices complete, I sweep through the bones. This requires discipline because subtle rib erosions may be the only abnormality on the film.
I start by zooming up and tracing each anterior rib down one side, then the other, before moving to the posterior ribs. Follow both clavicles from medial to distal, assess the scapulae, and scroll carefully down the vertebral column behind the mediastinum. Look for vertebral collapse, paravertebral soft tissue swelling, or destructive lesions.
Then zoom out and compare both sides – make sure that a rib is not missing like in the first case in this article.
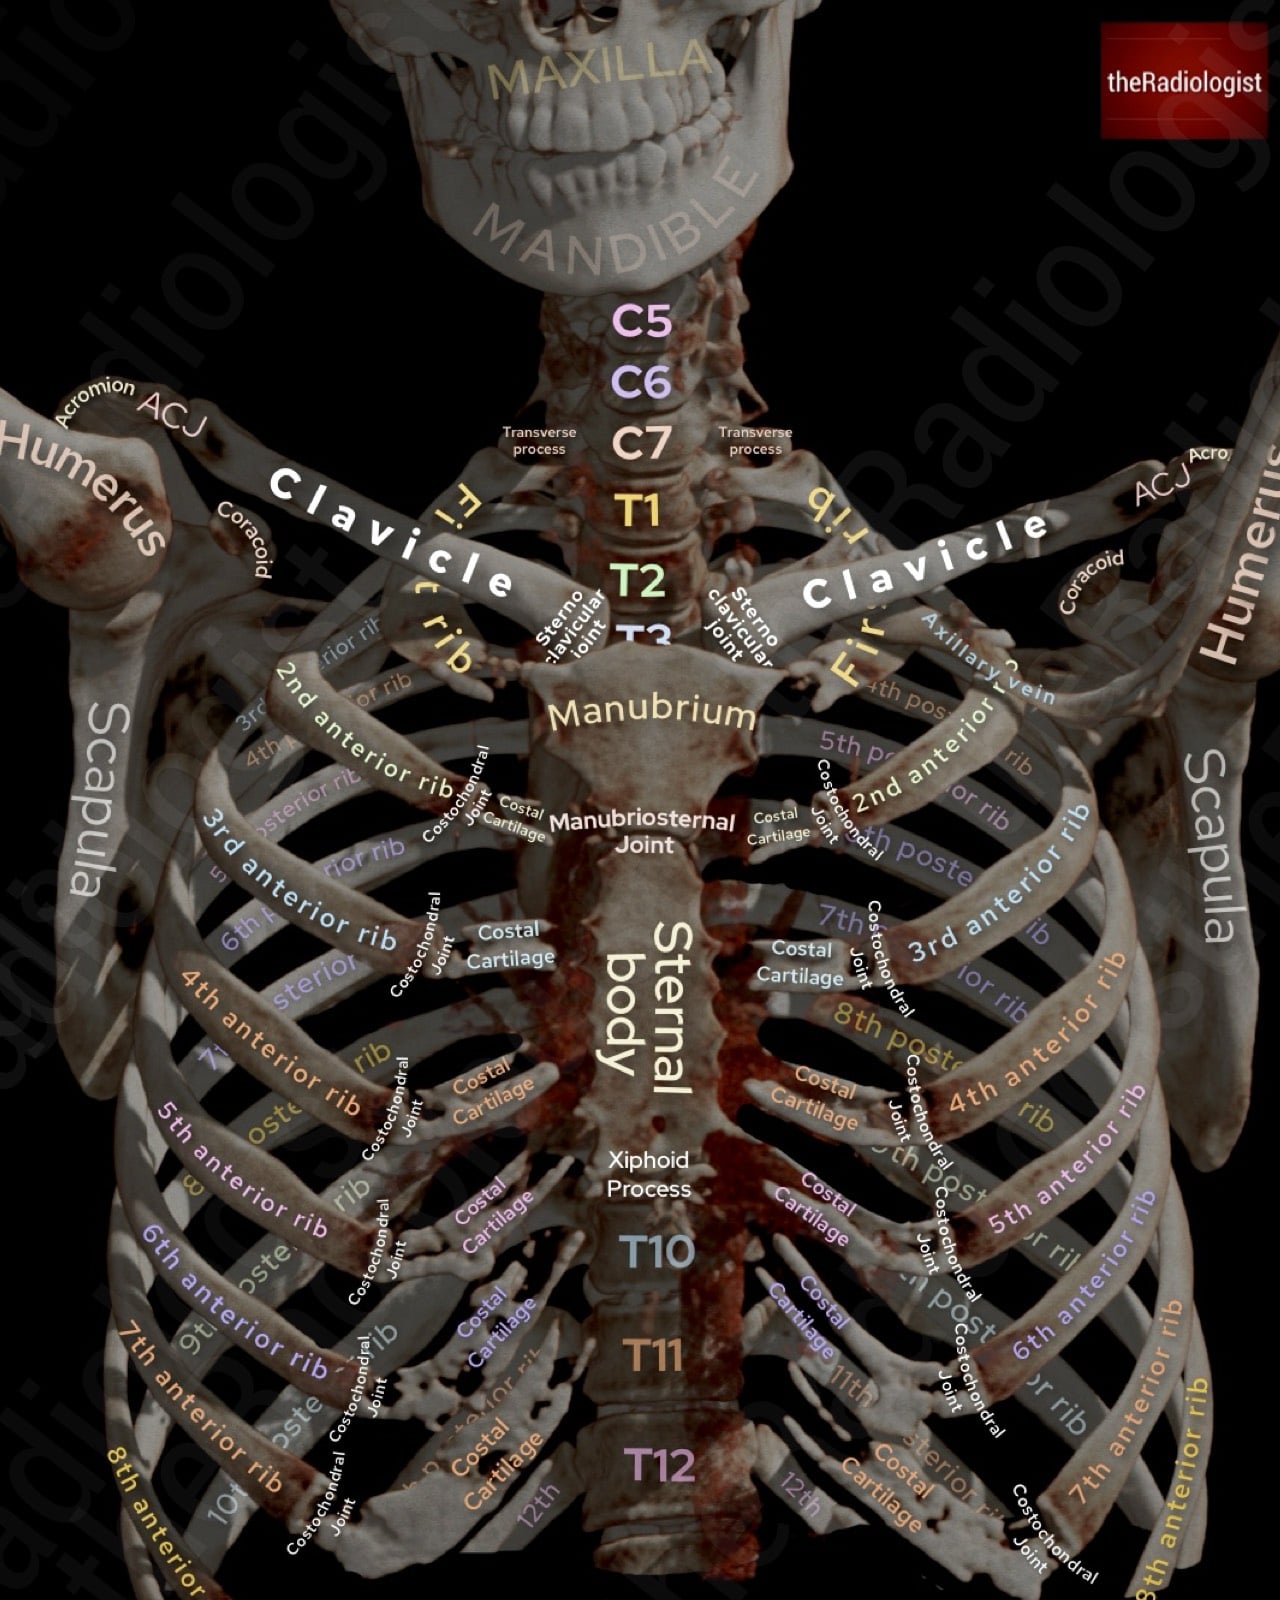
Annotated view of a 3D reconstruction of a chest CT showing the anatomy of the bones of the chest

Annotated image of a chest X-Ray showing anatomy of the bones
The mediastinum: PATACAKE system
When learning how to read chest X-Rays I found all of the different mediastinal signs to look for quite confusing so tried to create a system that covered all of the main ones. I came up with the mnemonic PATACAKE which I felt was quite neat as it covered all of the main review areas whilst going from top to bottom. Let’s go through it:
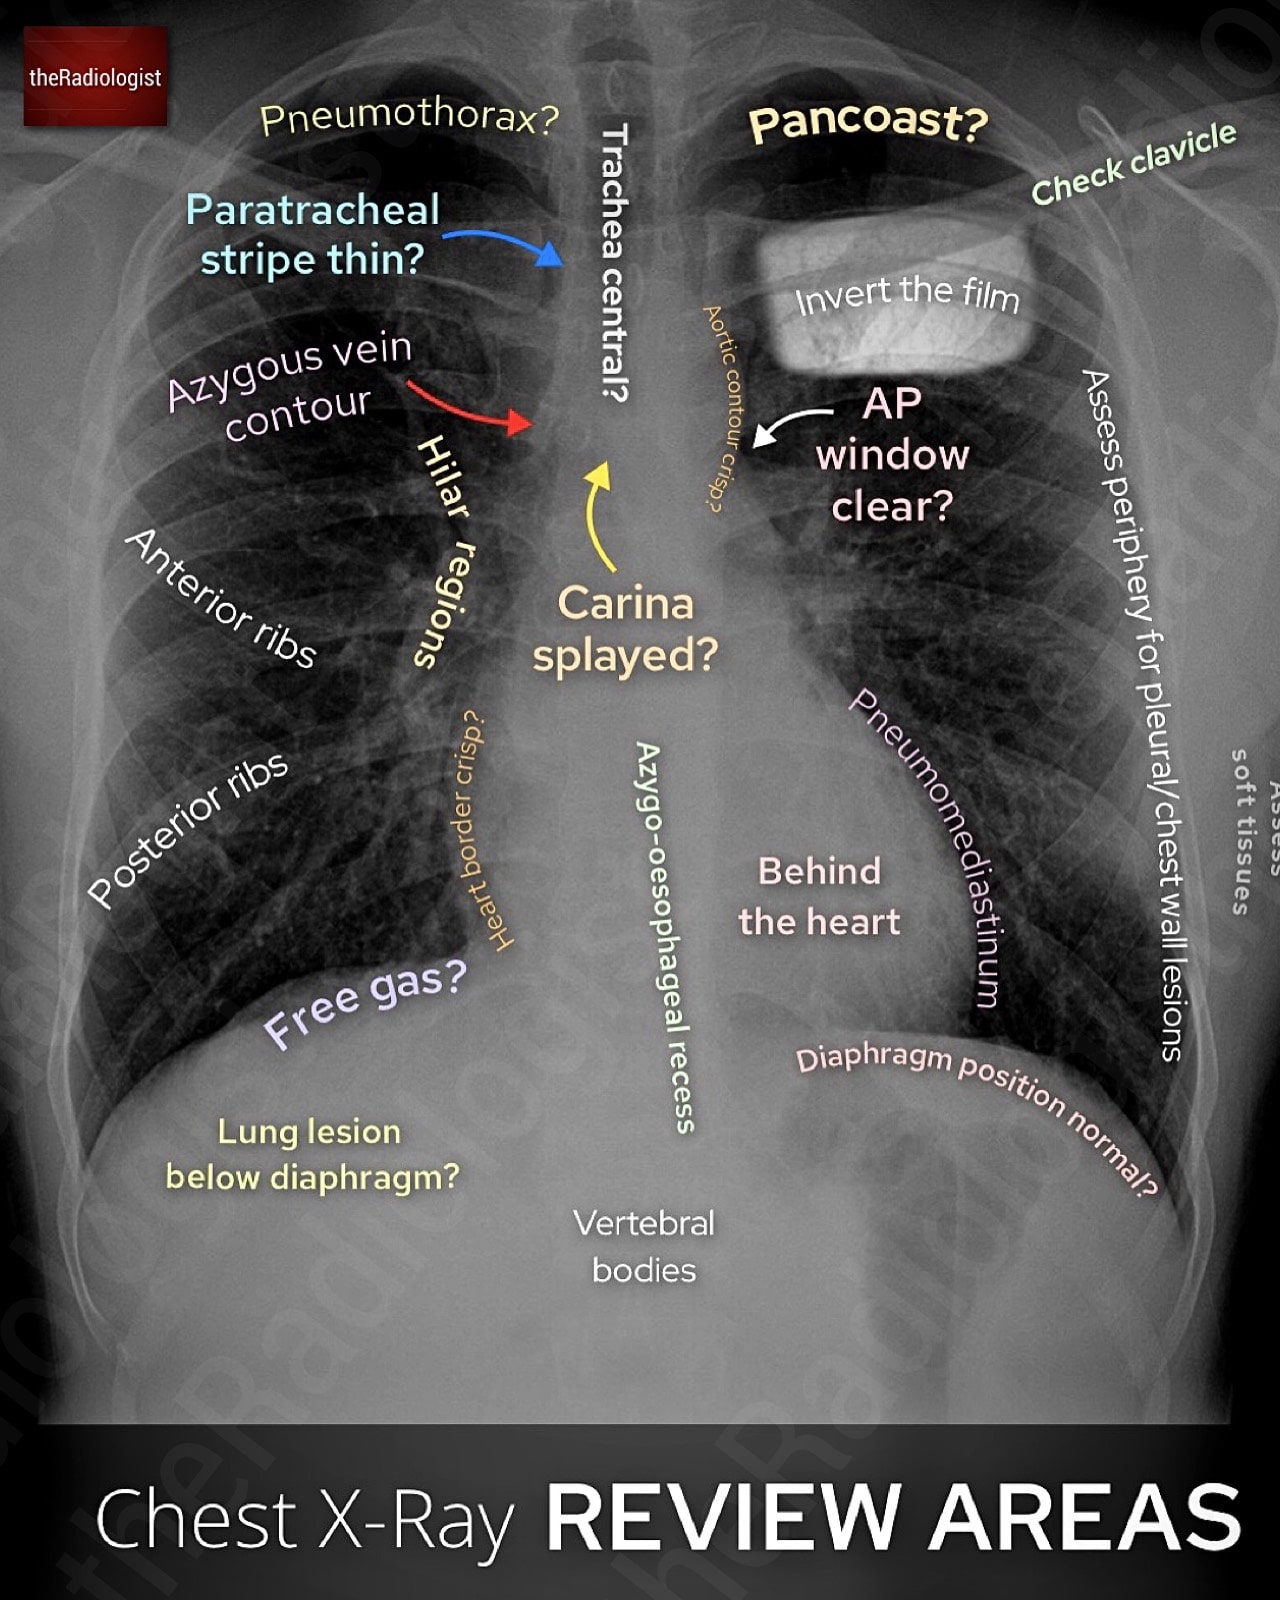
P: Paratracheal stripe
Should be a thin white stripe on the lateral aspect of the trachea (right side) essentially representing the interface between gas (trachea) and normal soft tissue within the mediastinum (fat and vessels). Loss of the stripe may indicate nodal enlargement from TB, sarcoid, lymphoma, or metastases.
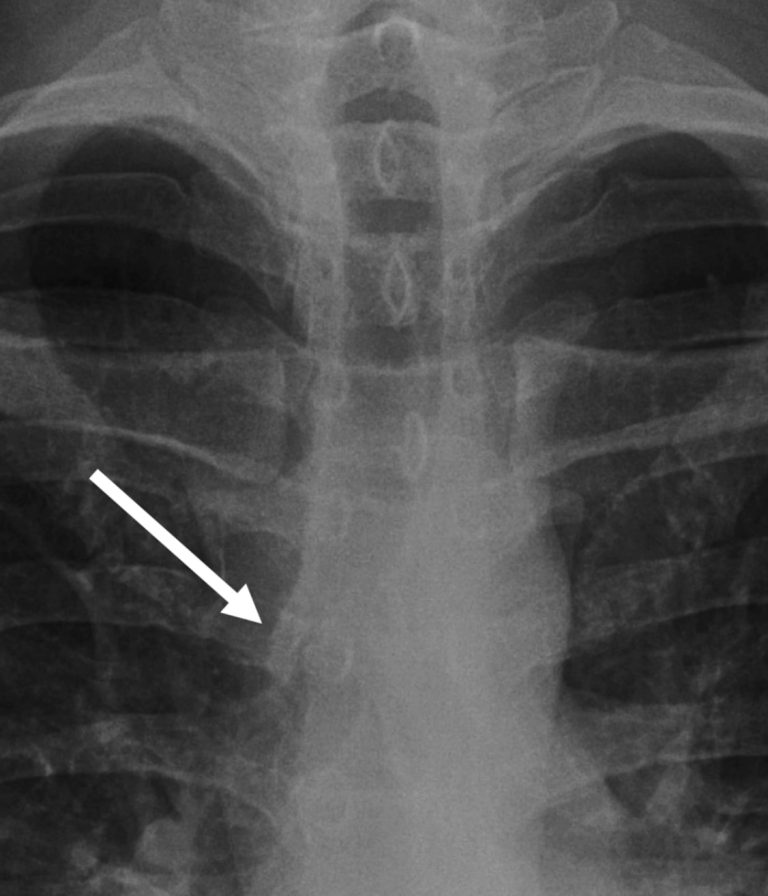
People often confuse this sign with the whole of the opacification you see to the right of the trachea. This here is not the stripe as such but represents normal mediastinal fat as well as the brachiocephalic veins draining into the superior vena cava. You should see a level of grayness here that is similar to one layer of the aorta. Anything more dense than this, or when it becomes ‘bulgy’ or round, is then abnormal and could indicate nodal disease or a soft tissue mass in the context of lung cancer. Remember the paratracheal region lies within the middle mediastinum where lung cancers account for the most important abnormality.
The opacification adjacent to the trachea on the right side (white arrow) does not represent the stripe which is a thin white stripe but does need assessing: make sure it is not more dense than ‘one layer’ of the aorta (cream coloured arrow) as this could represent abnormal soft tissue.
A: Azygos vein
You should see a small convexity above the right main bronchus. If this becomes distended and overly dense, this could represent nodal disease. I have seen films where just this abnormality represents underlying TB.
Technically, dilatation of the azygos vein could also represent SVC obstruction, although this isn’t very common.
The azygos vein can be seen on X-Ray a small convexity just above the right main bronchus. If distended and dense this could represent nodal enlargement.
T: Trachea
Look for the trachea which should be midline. One of the most common reasons for tracheal deviation in older patients is an enlarged thyroid goitre but anything that has changed compared with previous films should be approached with caution.
Note that rightward deviation at the level of the aortic knuckle can be normal in older patients with an ectatic aorta.
A: Aorta and aortopulmonary (AP) window
Confirm the aortic knuckle and AP window are well defined. The aortopulmonary or AP window represents the small concavity between the aorta and pulmonary trunk. You should see this on every chest X-Ray you look at and you may need to look ‘through’ the aorta to see it when the aorta is tortuous.
A convex or opaque AP window is concerning for nodal disease or lung cancer. I have seen films where this is the only abnormality so look carefully!
Loss of aortic contour may indicate a tumour or in the acute setting could mean dissection or traumatic aortic injury.
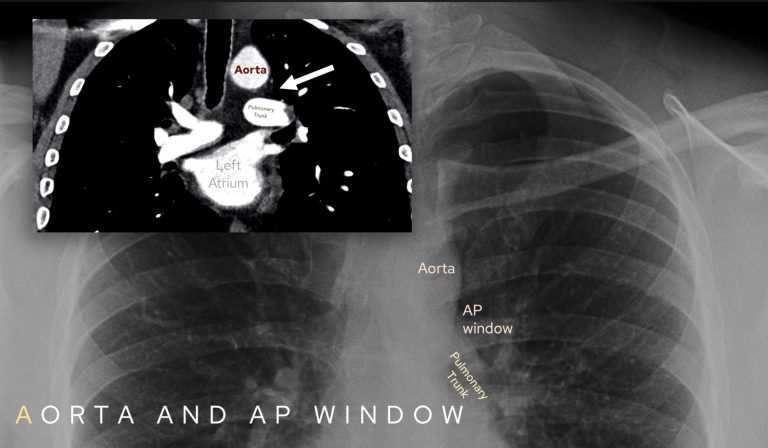
Ensure you review the aortic knuckle and aortopulmonary window on each film you look at: there should be a concavity between the aorta and pulmonary trunk.
C: Carina
This is where the trachea bifurcates into right and left main bronchi.
The angle of bifurcation should be about 60–70° and certainly no more than a right angle. A splayed carina most commonly suggests left atrial enlargement but can represent node enlargement.
As left atrial enlargement is fairly common by a certain age splaying of the carina can be considered a ‘soft sign’ so I usually use this as corroborative information to increase my confidence if there are other signs of mediastinal node enlargement such as loss of the AP window and loss of the paratracheal stripe.

Review the angle of the carina and make sure it is not more than a right angle.
A: Azygo-oesophageal recess
This is a vertical interface on the right side of the mediastinum where the right lung meets the oesophagus and azygos vein. Look for a straight line that curves slightly at its upper end.
You may not always see it but if there is a bulge in this line this could represent posterior mediastinal pathology (although at times can be middle mediastinum).
Try and outline the azygo-oesophageal recess. You may not always see it but if present looking for any bulges that usually represent posterior mediastinal pathology.
K: ‘K-shaped’ hilar regions
Not technically the mediastinum but as you’re going down the film it is as good time as any to check the hilar regions.
Assess three things: the position, morphology and density of the hila. To assess the position, draw in the ‘hilar point’ the point at which the hilar vessels intersect. The left can sit up to 2 cm higher than the right, but the right should never be higher: if position rules aren’t obeyed there could be collapse of a lobe or localised fibrosis.
In terms of morphology the hilar regions should look like tapering vessels not round nodes. Small end on vessels looking like brighter circles are OK.
In terms of density both hilar regions should be a similar density (as long as the film is not rotated). Comparing to old films can help ensure that the density of a hilum has not changed. Increased density can mean a hilar lung mass representing a primary lung cancer.
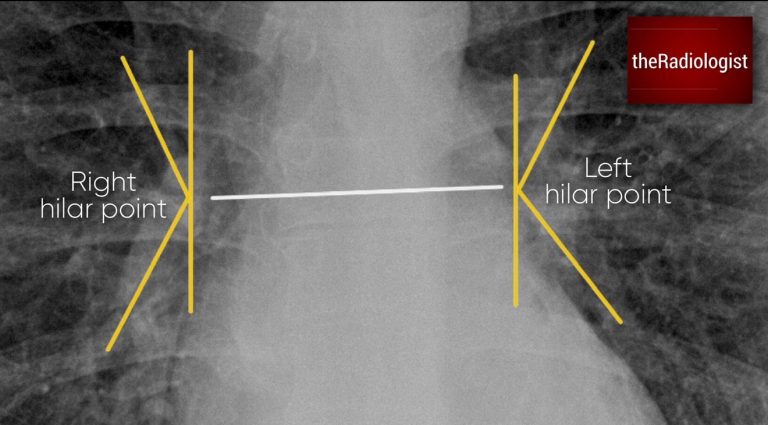
Draw in the hilar points: the place where the hilar vessels intersect. The left can sit up to 2 cm higher than the right but the right should not be higher. If these rules are not obeyed consider lobar collapse or focal fibrosis.
E: Everything else (heart size, heart borders, retrocardiac, pneumomediastinum)
The ‘E’ in the mnemonic is a bit of a cop-out but I use this to encapsulate everything else below the level of the hilar regions.
Measure the heart size relative to the chest wall. It can be a soft sign but if the cardiothoracic ratio (heart size/thoracic width) is more than 0.5 on a PA film this can mean the heart is enlarged. This is considered unreliable on an AP film. I find this useful when comparing with previous films – a rapidly enlarging heart can mean a pericardial effusion.
Trace the heart borders and make sure these are crisp. Loss of the left heart border can mean lingula pathology and loss of the right heart border can mean pathology in the middle lobe – this is known as ‘loss of the silhouette sign’.
Look behind the heart looking for nodules, a hiatus hernia (will show a fluid gas level usually), consolidation or lobar collapse (look for a dense sail sign).
Then look around the heart for abnormal lucency that you may see in pneumomediastinum. Faint lucency is normal and associated with something called the Mach effect.

On a PA film measure the cardiothoracic ratio – width of the heart/width of the thorax.

The PATACAKE mnemonic encapsulates the main review areas in the mediastinum
PATACAKE mediastinal review: recap table
Let’s recap mediastinal review and the PATACAKE mnemonic in this table below:
| Mnemonic | Review area | Notes |
|---|---|---|
| P | Paratracheal region | Look for the right paratracheal stripe which should be no thicker than a thin white line. Adjacent to this make sure there is no dense ‘bulgy’ soft tissue in the right paratracheal region. |
| A | Azygos vein | Should be a small convexity above the right main bronchus and not enlarged or dense. |
| T | Trachea | Should be central, slight deviation to the right at the level of the aortic knuckle is OK. |
| A | Aorta and aortopulmonary (AP) window | AP window – should be a small concavity on every X-Ray you look at. Aortic contour should be present and smooth. |
| C | Carina | Should be roughly less than a right angle. Left atrial enlargement most common cause but can be nodal enlargement or a central mass. |
| A | Azygo-oesophageal recess | Not always seen but look for a straight line behind the heart that curves at its upper end. A bulge could mean posterior mediastinal pathology. |
| K | ‘K-shaped’ hilar regions | Draw in hilar points, left can be 2 cm above right but not below. Also assess morphology (everything should look like tapering vessels) and density (both sides equal, no increase from previous films). |
| E | Everything else (heart size, heart borders, retrocardiac, pneumomediasintum) | If a PA film measure the cardiothoracic ratio. Make sure heart borders are crisp. Window and look behind the heart, left side should be the same as right. Make sure no abnormal lucency around the heart representing pneumomediastinum (don’t confuse for Mach effect which is a normal phenomenon). |
'Pinball machine sweep'
I use the ‘pinball’ method to sweep up some more review areas after PATACAKE. My eyes sweep like a pinball machine does – down the centre, down to the bottom then up and around the sides.
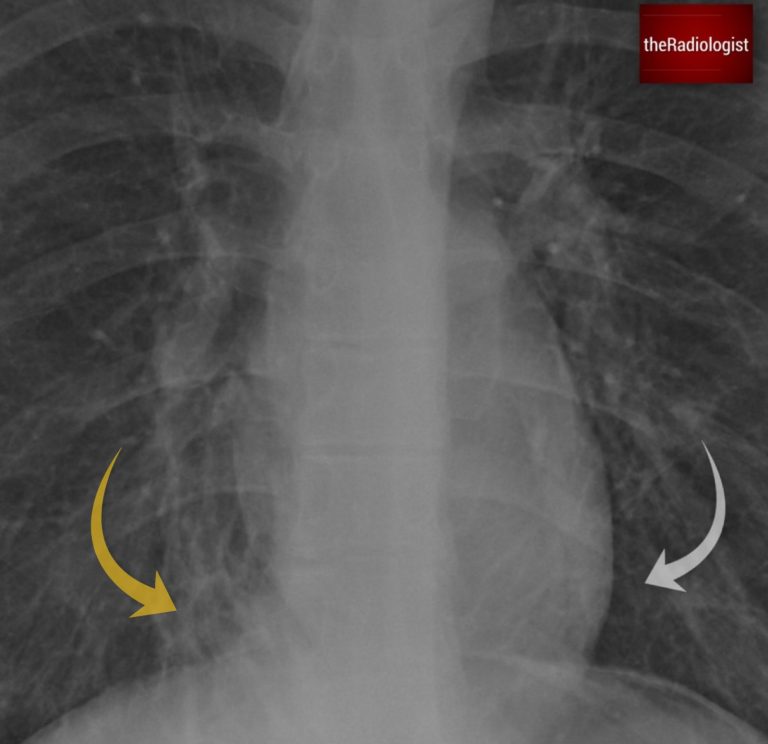
So we’ve been down the centre looking at the mediastinum. Now look below the diaphragm for free gas or lung nodules/masses. Then go to the costophrenic angles to check for blunting that could mean a pleural effusion and finally around the lung peripheries: here you are looking for nodules, pleural lesions and infarcts.
The pinball machine sweep: we’ve gone down the centre of the film (mediastinum), now go down and around (under the diaphragm) then up round the sides (peripheries).
Reviewing the lungs
Now review the lungs – there are different ways to do this but I like to take ‘upper’, ‘mid’ and ‘lower’ zones in turn comparing side by side. You are looking for nodules or masses, consolidation or any opacification you may not have seen so far.

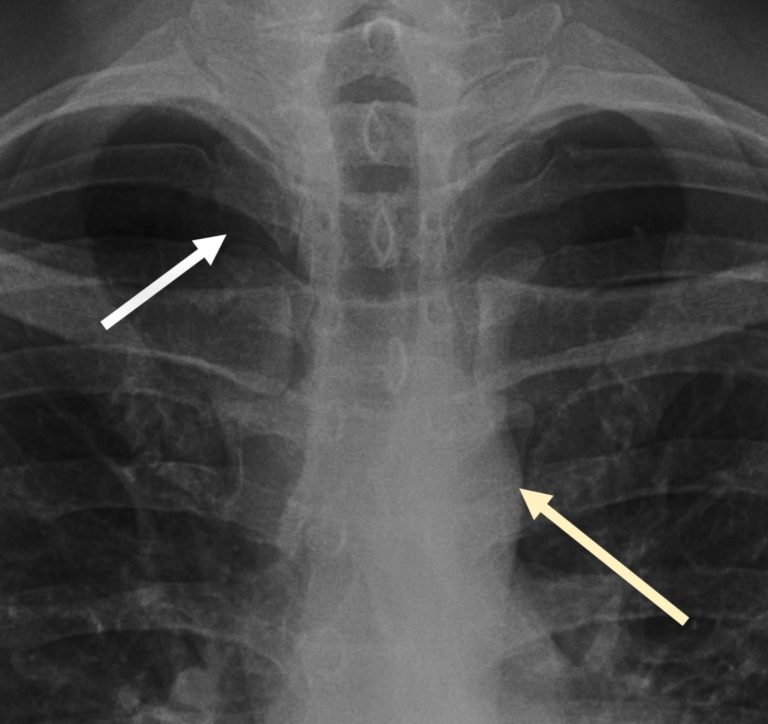
One way to review the lung is to split the lung into ‘zones’ and compare side by side. If we do so in this case we will see a small nodule within the right mid zone.
Final overview: inverted view, soft tissues and zoom out
Before finishing, I invert the film. This change of contrast can highlight lung nodules or retrocardiac lesions that might otherwise blend in.
Then check the soft tissues. Review breast shadows, look for evidence of previous surgery, and search for surgical emphysema or subcutaneous gas.
Lastly I make the film small. I try and give my eyes as many chances as possible to find subtle abnormalities so try and present the film to my brain in as many different ways as possible – magged up, zoomed out, original projection and inverted.
So zoom out and this gives your brain a chance to look for any asymmetry that it may not have picked up on so far.
Inverting the film can help and gives your eyes another chance to catch something. In this case inverting helps highlight the right mid zone nodule seen in the same case from above.
Lateral chest X-Ray review
Now let’s move on to the lateral chest X-Ray.
The lateral chest X-ray isn’t performed routinely in most UK centres, but it is in many places around the world as it can be extremely useful. It highlights blind spots that the frontal view doesn’t show well, so it’s worth having a systematic approach when reviewing one.
Review areas on a lateral chest X-Ray.
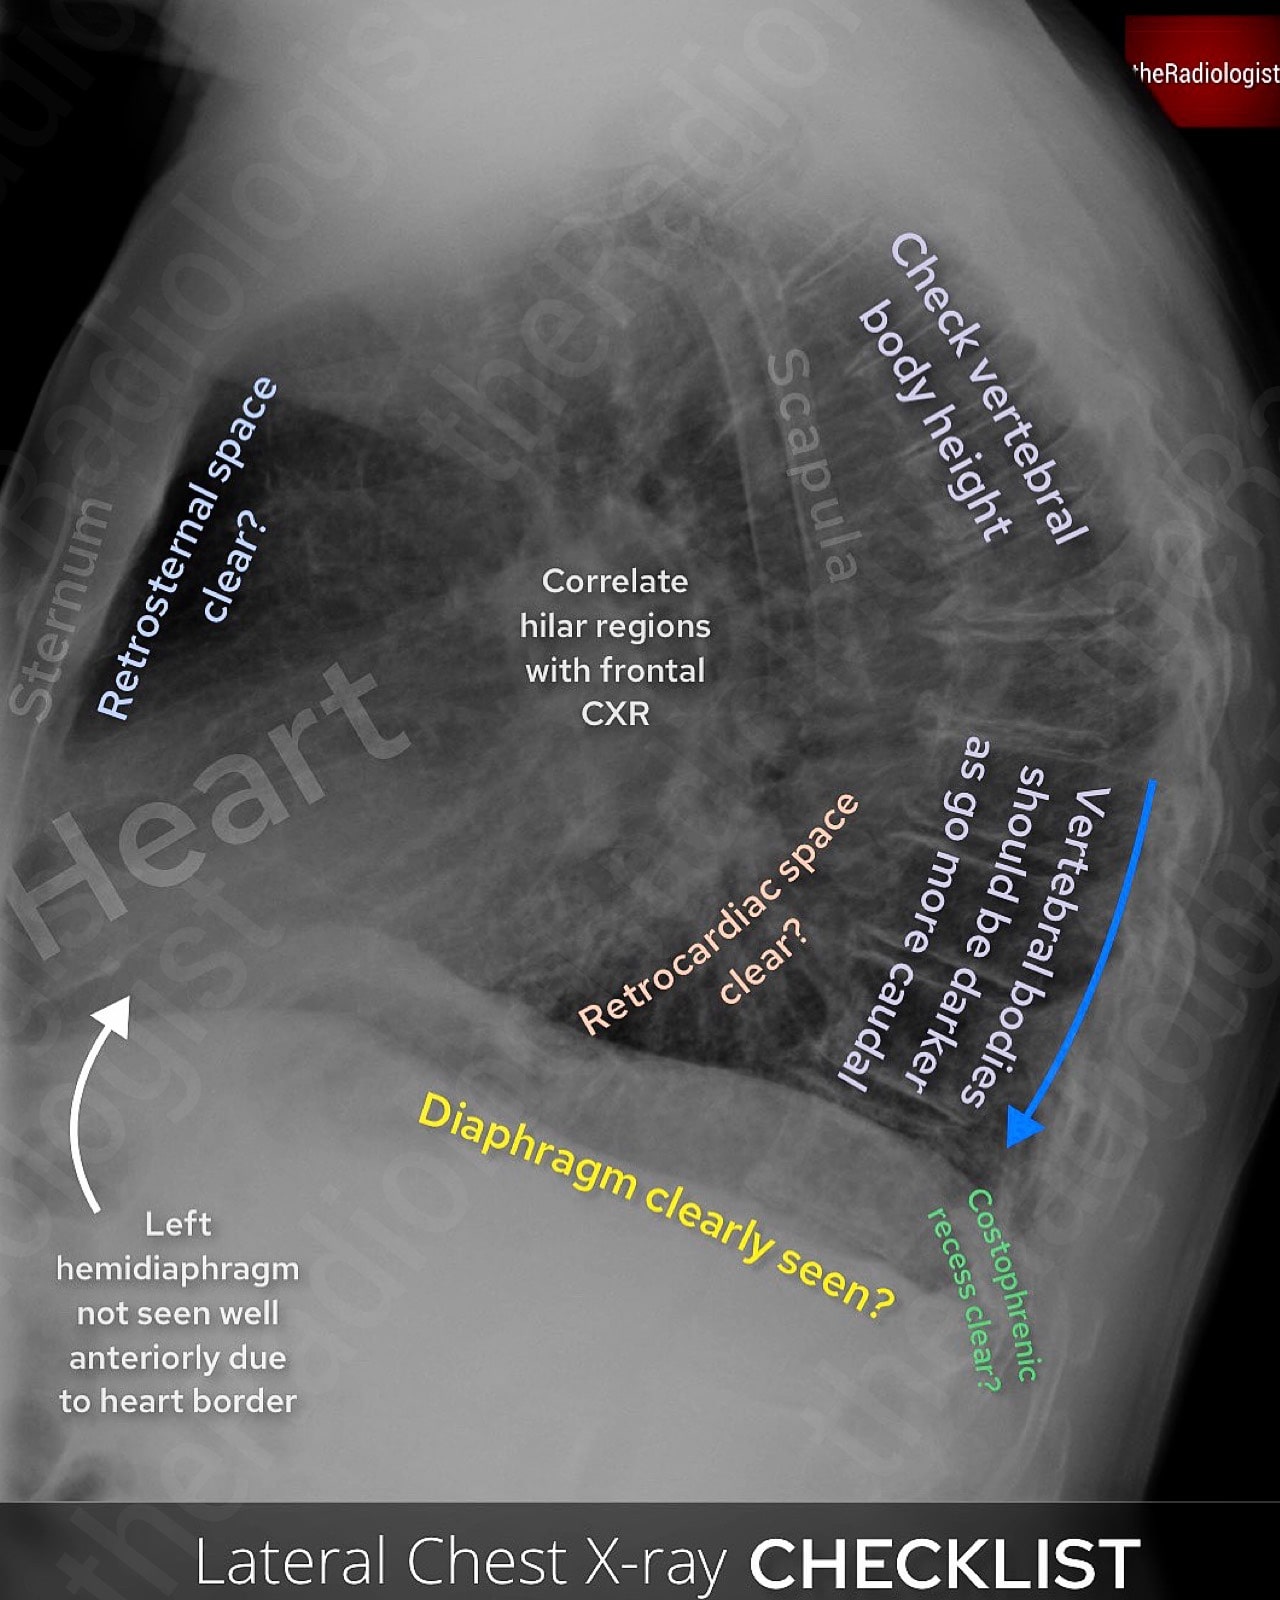
1. Retrosternal and retrocardiac space
Start by assessing the sternum for fractures or lesions. Then look at the space directly behind it, which should appear as a clear area of lucent lung. If that lucency is lost, consider an anterior mediastinal mass. Behind the heart, carefully check for any opacity that may not be visible on the frontal view.
2. Vertebral bodies
The lateral film provides a much better view of the vertebral bodies than the frontal. Look for loss of vertebral height or endplate disruption.
Normally, the vertebrae should appear progressively darker as you move caudally; if they look whiter towards the base, this could indicate lower lobe consolidation or an underlying mass.
3. Diaphragm and lung bases
Both hemidiaphragms should be visible and clearly defined, although remember the anterior left hemidiaphragm is partially obscured by the heart. Look for any loss of definition due to collapse, consolidation, or effusion. The posterior costophrenic recesses should also be checked carefully for pleural fluid.
4. Hilar regions
If the hilum looks unusually dense on the frontal view, the lateral can help determine whether the abnormality is situated anteriorly or posteriorly.
5. Middle lobe
Middle lobe collapse is easily overlooked on the frontal view but more readily seen on the lateral. Look for a wedge-shaped opacity projected over the cardiac silhouette.
Final recap
Let’s go through all of these review areas firstly in the diagram below and then in the following table that tries to cram all of the frontal and lateral review areas into one place!
Key review areas on a PA or AP chest X-Ray.
| Projection | Category | Review area | Notes |
|---|---|---|---|
| PA/AP | Technical factors (RIPE-C) | Rotation | Check the spinous processes are equidistant from the medial clavicles. |
| Inspiration | Look for 6 anterior ribs above the left hemidiaphragm in the mid clavicular line. | ||
| Projection | Either PA (standard projection) or AP (in patients who cannot stand). Cannot measure cardiothoracic ratio on AP films. | ||
| Exposure | Check you can see the vertebrae through the heart. | ||
| Coverage | Ensure the film has covered the lung apices, lateral ribs and costophrenic angles. | ||
| Tubes, lines and foreign bodies | Nasogastric tube | Follow the 4 rules: does the tube bisect the carina, does it pass the diaphragm in the centre, does it travel under the left hemidiaphragm and can you see the tip? | |
| Central lines | All central lines should end at the right atrium-SVC junction, in practice can be just within the right atrium. More temporary lines can be within the SVC. | ||
| Foreign body | Make sure you clear everything ‘external’ on the film to make sure there is not an unwanted internal foreign body or misplaced line. | ||
| Apices | Pancoast tumour | Compare both sides and make sure there is not an opacity at the lung apex. | |
| Apical rib abnormalities | Follow each rib carefully and make sure there is no erosion and ensure no cervical rib. | ||
| Apical pneumothorax | Look for a lack of lung markings and a white pleural line paralleling the chest wall. | ||
| Bones | Review all bones | Zoom up, follow all ribs, follow the clavicles and scapulae. Now follow all the vertebrae down the centre of the film if you can see them. | |
| Mediastinum (PATACAKE system) | Paratracheal region | Look for the right paratracheal stripe which should be no thicker than a thin white line. Adjacent to this make sure there is no dense ‘bulgy’ soft tissue in the right paratracheal region. | |
| Azygos vein | Should be a small convexity above the right main bronchus and not enlarged or dense. | ||
| Trachea | Should be central, slight deviation to the right at the level of the aortic knuckle is OK. | ||
| Aorta and aortopulmonary (AP) window | AP window – should be a small concavity on every X-Ray you look at. Aortic contour should be present and smooth. | ||
| Carina | Should be roughly less than a right angle. Left atrial enlargement most common cause but can be nodal enlargement or a central mass. | ||
| Azygo-oesophageal recess | Not always seen but look for a straight line behind the heart that curves at its upper end. A bulge could mean posterior mediastinal pathology. | ||
| ‘K-shaped’ hilar regions | Draw in hilar points, left can be 2 cm above right but not below. Also assess morphology (everything should look like tapering vessels) and density (both sides equal, no increase from previous films). | ||
| Everything else (heart size, heart borders, retrocardiac, pneumomediastinum) | If a PA film measure the cardiothoracic ratio. Make sure heart borders are crisp. Window and look behind the heart, left side should be the same as right. Make sure no abnormal lucency around the heart representing pneumomediastinum (don’t confuse for Mach effect which is a normal phenomenon). | ||
| Pinball system | Under the diaphragm, costophrenic angles, periphery of both lungs. | Look under the diaphragm for free gas, nodules and masses. Chek the costophrrenic angles for blunting and then trace up the periphery of both lungs looking for pleural and chest wall lesions, small nodules or masses or lung infarcts. | |
| Lungs | Lung zones | Look for lung nodules, masses and consolidation – split the lung into upper, mid and lower zones and compare each side. | |
| Final review | Soft tissues | Trace all the soft tissues. Make sure the breast tissues are present and look for masses, swelling or gas locules within the remaining soft tissues. | |
| Invert and zoom out | Give your eyes another chance by zooming out from the film and inverting the X-Ray. | ||
| Lateral | Retrosternal and retrocardiac spaces | Check the sternum for fracture or a lesion. Make sure the soace behind the sternum is clear (rule out anterior mediastinal lesion). Look behind the heart for a mass or consolidation. | |
| Vertebral bodies | Ensure no vertebral collapse. Vertebrae should appear progressively darker as you move caudally – if not could be consolidation. | ||
| Diaphragm and lung bases | Outline both hemidiaphragms, the anterior left is partially obscured by the heart. Check posterior costophrenic angles for fluid. | ||
| Hilar regions | Correlate with the frontal view. | ||
| Middle lobe | Look for a wedge shaped opacity representing middle lobe collapse that can be missed on the frontal view. | ||
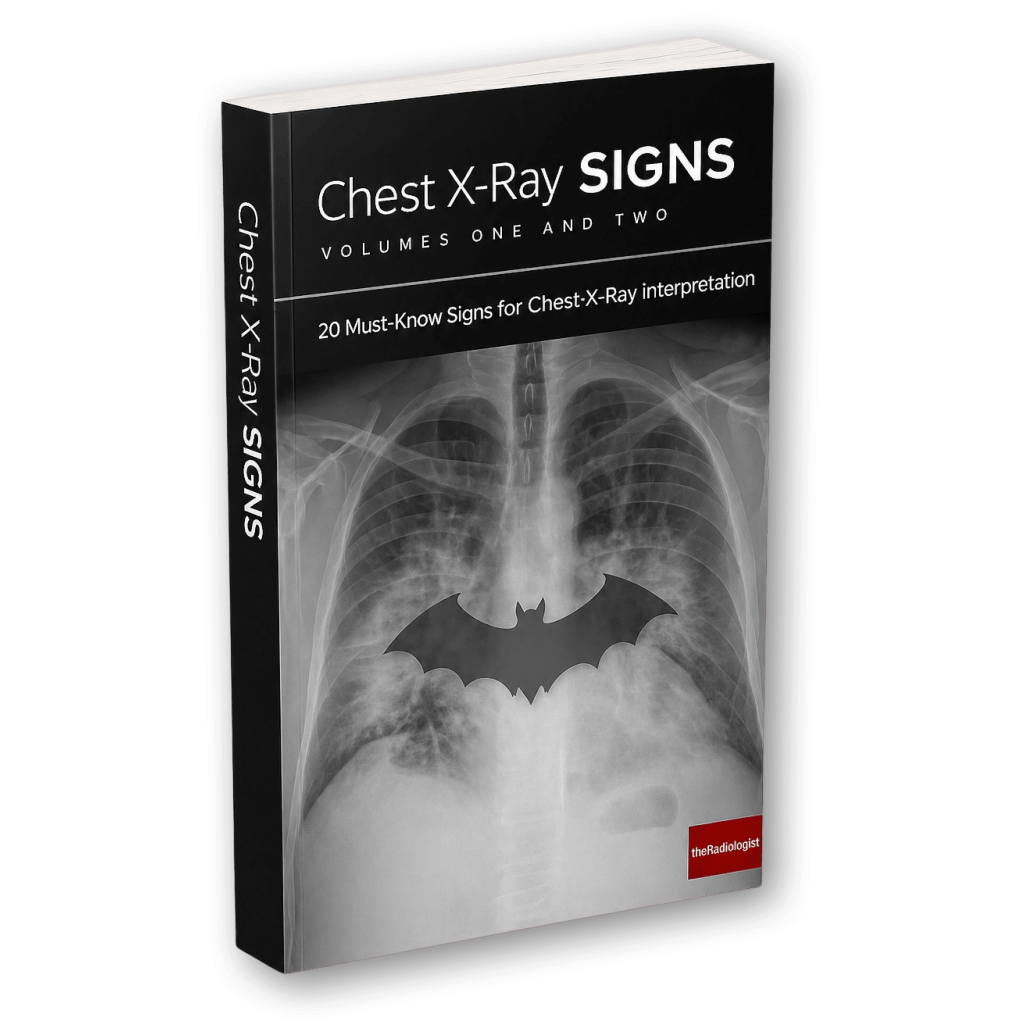
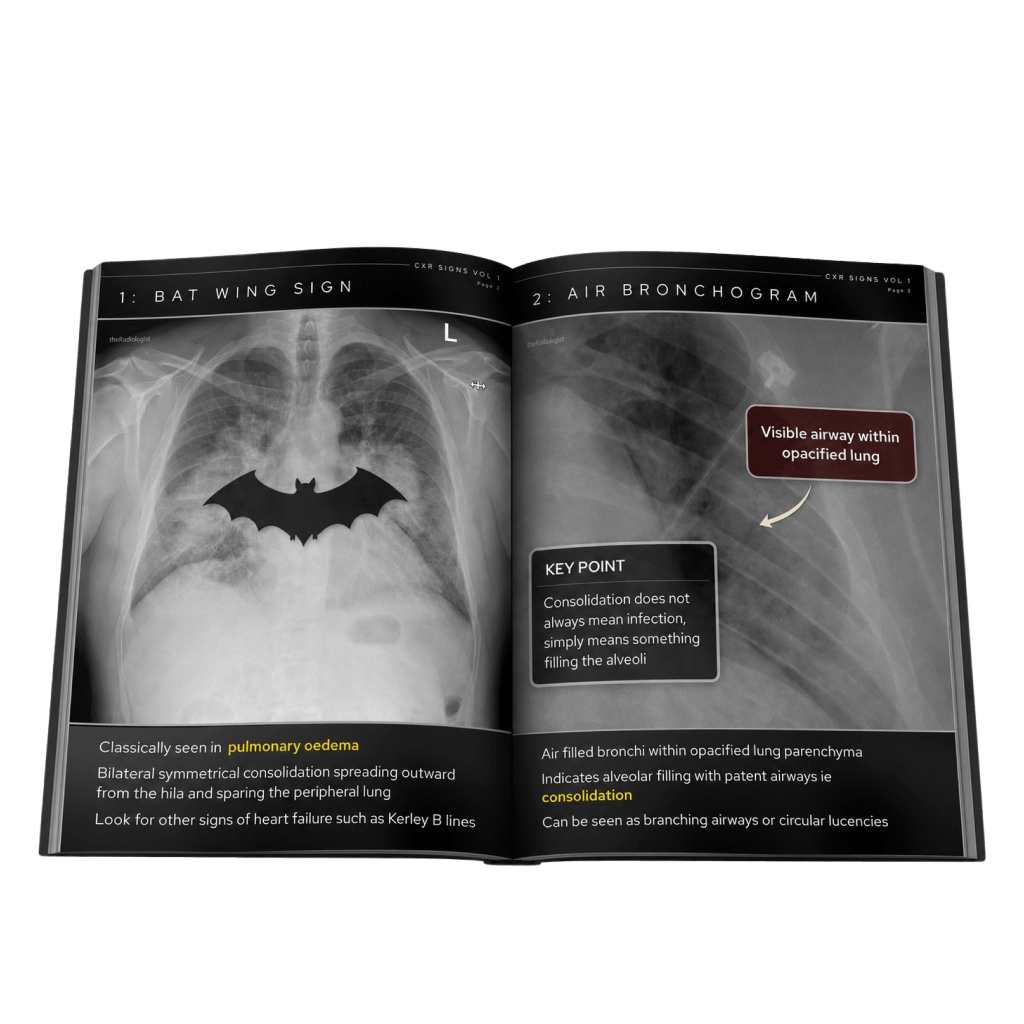
Free guide: 20 Chest X-Ray signs you need to recognise
Downloaded by 10,000+ healthcare professionals.
Get 20 annotated chest X-ray signs with clear teaching points and explanations. Written by a Consultant Radiologist, this free guide is designed to help you recognise important findings more confidently when reviewing chest X-Rays.
More to explore
You’ve got the framework now let’s put it to work. Dive into a related case to see these findings on real images, or explore another guide to build out your systematic approach. That’s where it really starts to stick.
HOW TO READ AN ABDOMINAL X-RAY
A systematic approach to bowel gas pattern, obstruction and key checks

HOW TO ASSESS FOR PULMONARY OEDEMA
Learn the CXR findings, key signs and common patterns
HOW TO ASSESS BRONCHIECTASIS
Learn the X-Ray and CT features and aetiology of bronchiectasis