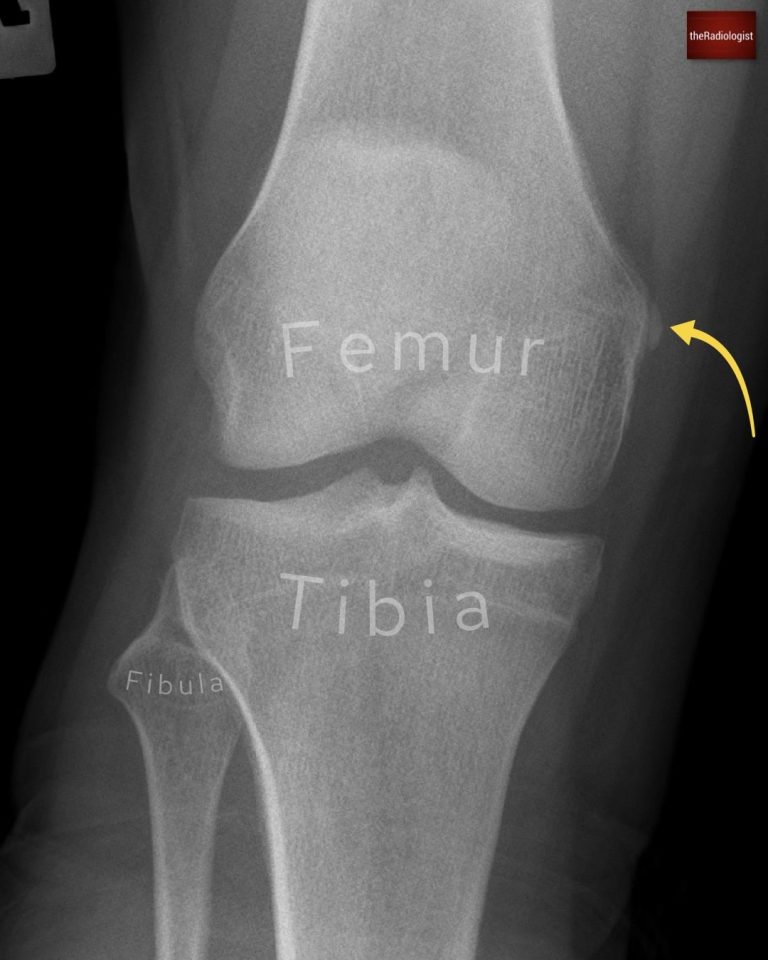
Foot and ankle X-Ray anatomy, views and key review areas
Foot and ankle injuries are common but easy to misread on X-Ray. Overlapping structures and subtle fractures mean important findings can be missed, with Lisfranc and syndesmotic injuries carrying real long-term consequences. A clear, structured approach helps you catch the small but critical details. This guide walks you through the anatomy, key views, and a practical system to read these films with confidence.
The foot and ankle form a complex region designed to provide stability, mobility, and shock absorption during weight-bearing and gait.
The ankle joint links the tibia and fibula to the talus, while the foot is composed of tarsal, metatarsal, and phalangeal bones arranged to support both movement and load transfer.
On plain radiographs, the ankle mortise view assesses talar alignment and joint space, while foot views allow evaluation of the arches, metatarsals, and phalanges. CT is superior for complex fractures (e.g. calcaneal or talar), and MRI is best for cartilage, tendons, ligaments, and marrow changes.
MRI and ultrasound are best for direct visualisation of neurovascular structures; CT angiography is useful in trauma.
Normal alignment includes a congruent ankle mortise and maintenance of the longitudinal and transverse arches of the foot. Loss of the medial arch produces pes planus (flatfoot), while a high medial arch produces pes cavus. On radiographs, alignment is assessed using angles such as the talar–first metatarsal angle (Meary angle) on lateral views.
In the acute setting, the standard starting point for a foot X-ray is the 3-view series: DP (dorsoplantar), oblique, and lateral. The DP view gives you a broad overview of the toes, metatarsals, and midfoot. It’s useful for spotting obvious fractures and checking joint spaces, though the overlap of structures means some injuries can be subtle.
That’s why the oblique view is helpful: by angling the foot around 30-45°, it separates the metatarsals and tarsals, making it easier to pick up fractures of the metatarsal shafts, bases, and midfoot bones like the cuboid or navicular, as well as Lisfranc injuries.
The lateral view adds the side-on perspective, best for the hindfoot, talus, calcaneus, and longitudinal arch, and is where you’ll often pick up alignment issues or subtalar involvement.
Outside of the routine trauma films, there are a few extra projections that get pulled out when needed. Weight-bearing views are key when you’re assessing alignment or stability and can be useful when teasing out LisFranc injuries.
The axial (Harris–Beath) view is mainly used for calcaneal fractures, giving detail on the subtalar joint. Sesamoid views focus on the small bones under the first metatarsal head, and the Canale view is a specialist projection for the talar neck.
Let’s start by go through a system for looking at the DP and oblique views. The mnemonic I used when learning was ‘FALS5’ which yes isn’t a word but helped me capture some of the key review areas.
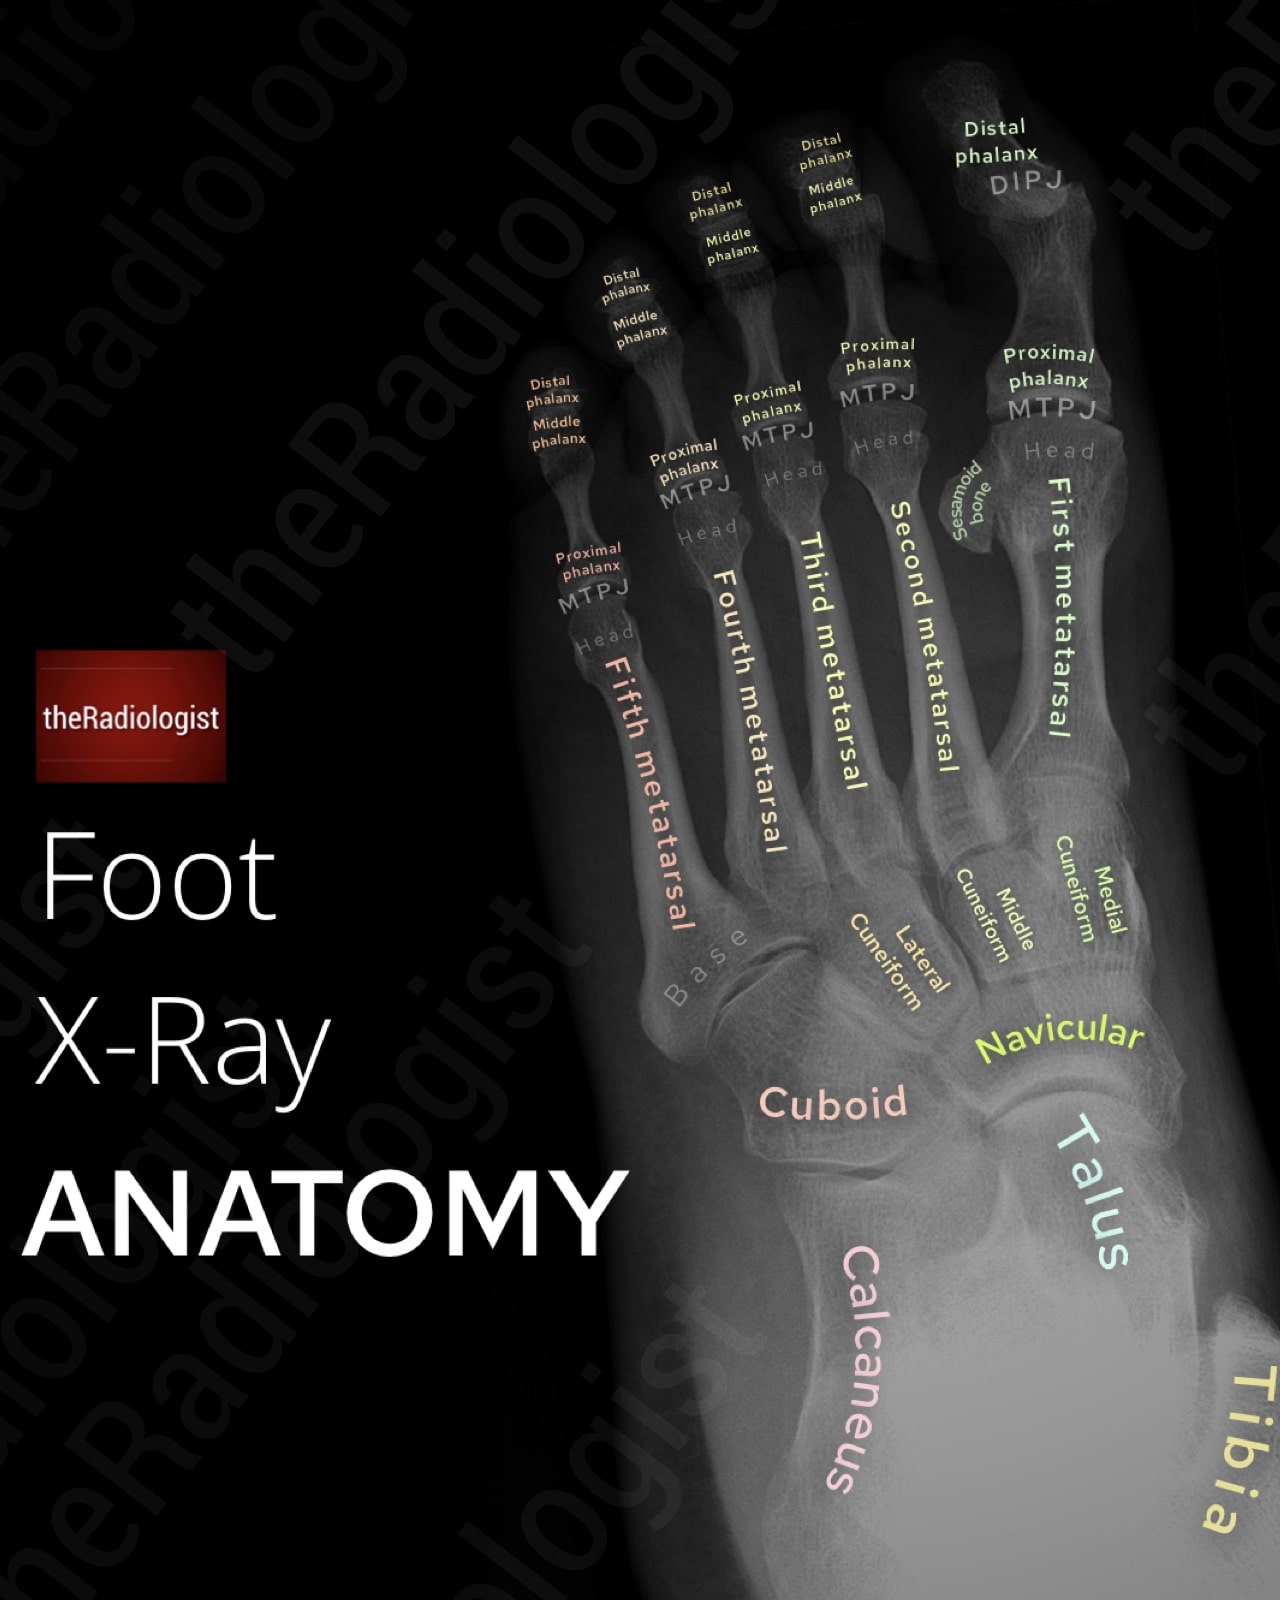
Annotated view of an oblique foot X-Ray
Before getting into bones, scan the soft tissues. Look for swelling, joint effusion, soft tissue gas, or foreign bodies. Sometimes an abnormality within the soft tissues can point you towards a subtle fracture.
Check the heads of the 2nd and 3rd metatarsals for sclerosis, flattening, or collapse. These are features of Freiberg disease where trauma leads to osteonecrosis. This can be a subtle findings but is important to pick up as it can explain forefoot pain.
Don’t forget to trace the distal tibia and fibula at the edge of the film. A ‘cheeky’ ankle fracture can present as foot pain and is easily overlooked if you don’t deliberately check these borders.
This is a must-not-miss injury and a radiologist’s medicolegal nightmare. Lisfranc injuries can be incredibly subtle, but if missed can cause long-term disability.
The LisFranc joint complex holds together the metatarsal and tarsal bones – it includes the tarsometatarsal ligaments and intermetatarsal ligaments as well as the LisFranc ligament which holds together the medial cuneiform and 2nd metatarsal.
Lisfranc injuries occur when there is disruption of the tarsometatarsal joint complex, usually involving tearing of the Lisfranc ligament. Direct Lisfranc injuries typically happen after a twisting injury with the foot planted (e.g. sports, stepping off a kerb) or from a high-energy mechanism like a road traffic accident. The injury is evident clinically and the result is instability or dislocation at the midfoot, sometimes with associated fractures.
However note that indirect Lisfranc injuries can occur – these can be the result of a minor sporting injury where the foot is plantarflexed. Clinical signs here can be subtle meaning the injury can be missed leading to long term injury.
For this reason a careful review is needed to spot these, make sure you look for these on every foot X-Ray that is requested for pain.
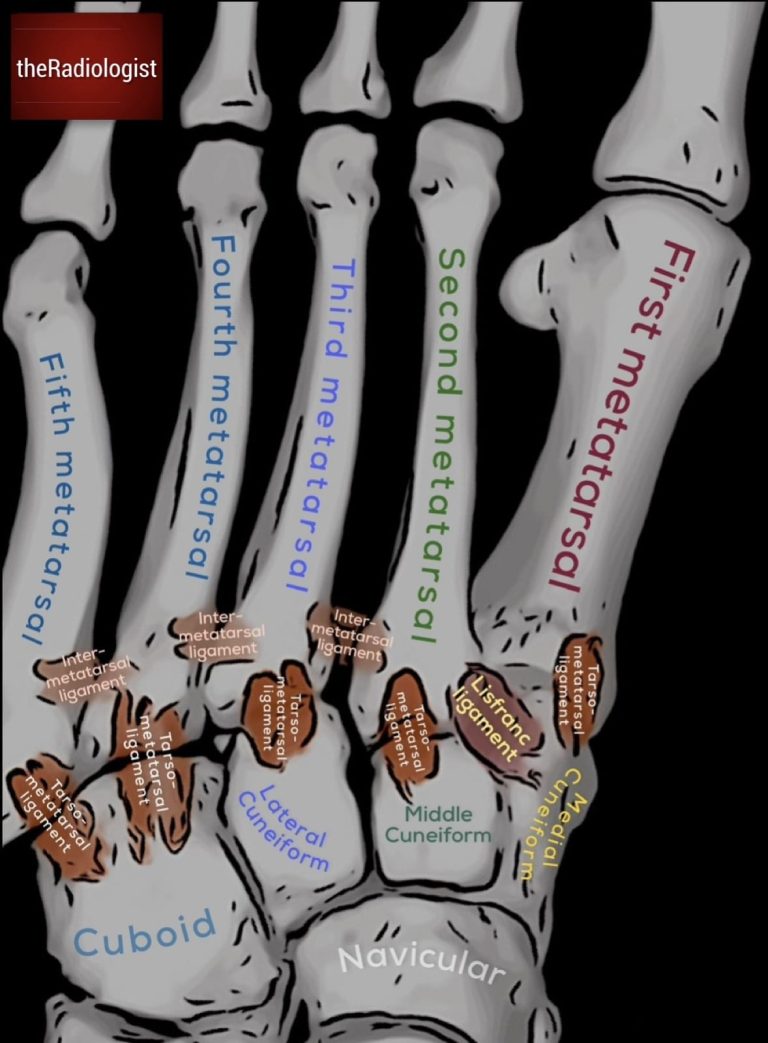
The LisFranc joint complex holds together the tarsal and metatarsal bones. The LisFranc ligament holds together the medial cuneiform and the second metatarsal.
Terminology:
Alignment checks:
To check the alignment it is really important that you zoom up and check the bones line up completely! Have a look at the X-Rays below for examples.
Typically you will see an increased gap between the 1st and 2nd metatarsal with lateral displacement of the base of the 2nd metatarsal. You may see flecks of bone at the 2nd metatrsal base, or around the 3rd metatarsal or cuneiforms.
If you are suspicious of a Lisfranc injury, weight-bearing films (if tolerated) can make subtle malalignment more obvious and it can be useful to compare to the other side. A lateral view may reveal dorsal displacement, while CT is usually the next step for confirming and characterising the injury. MRI can also be useful, particularly when you are concerned about an isolated ligamentous injury without fracture.
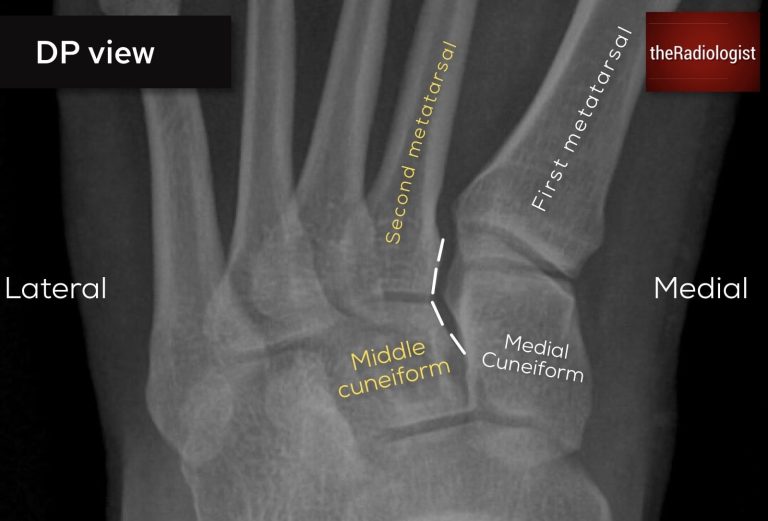
Looking for Lisfranc injury (DP view): on a DP view the lateral borders of the medial cuneiform and first metatarsal should line up as well as the medial borders of the second metatarsal and middle cuneiform
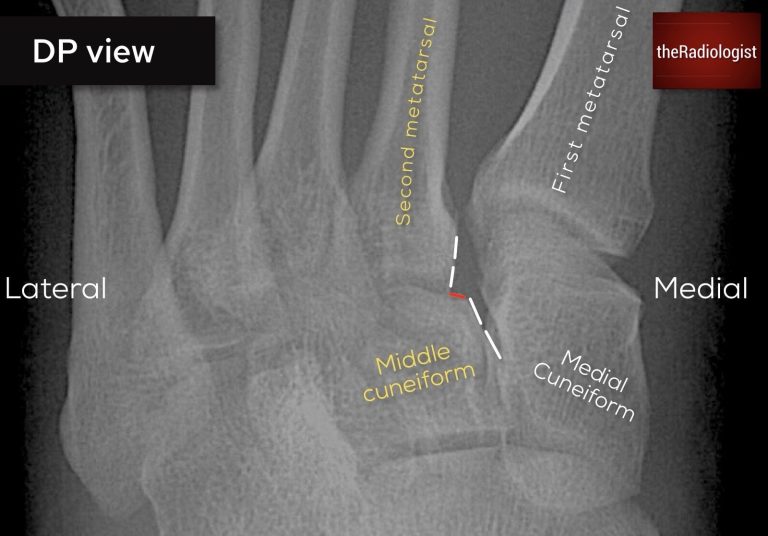
Looking for Lisfranc injury (DP view): in this case there is a subtle step between the middle cuneiform and the second metatarsal – this is a Lisfranc injury.
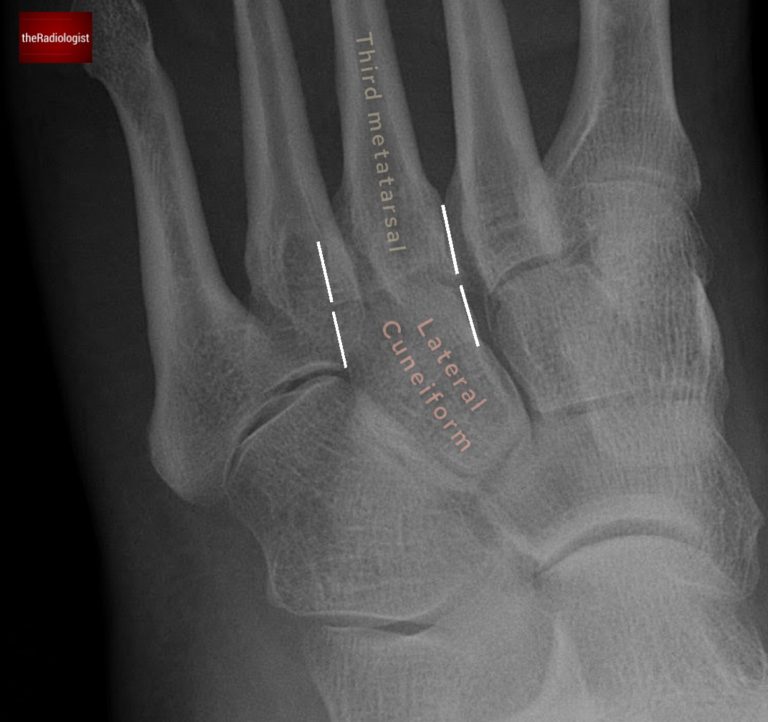
Looking for Lisfranc injury (oblique view): on an oblique view look to see if the third metatarsal lines up with the lateral cuneiform.
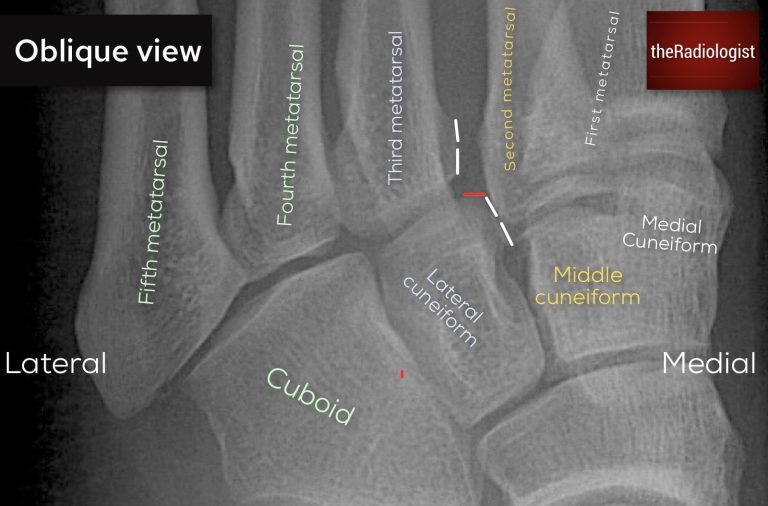
Looking for Lisfranc injury (oblique view): in this case there is a subtle step between the lateral cuneiform and the third metatarsal. This is a Lisfranc injury.
Don’t miss a Lisfranc injury!
Check tarsometatarsal alignment on every foot X-Ray performed for pain: make sure you zoom up as the malalignment can be subtle.
If you see malalignment or small avulsion fragments just inferior to the metatarsal bases (especially the 2nd), consider a Lisfranc injury.
Inspect the 2nd and 3rd metatarsal shafts in particular as this is where stress fractures are most common. Depending on the stage, you might see:
These can be very subtle. If suspicion is high but X-ray is normal, MRI is the most sensitive test.
Always zoom in on the fifth metatarsal and in particular the base. Fractures here are common so you need to carefully scutinise this area.
There are different types of fractures that can occur here and the management and prognosis differs between the type:
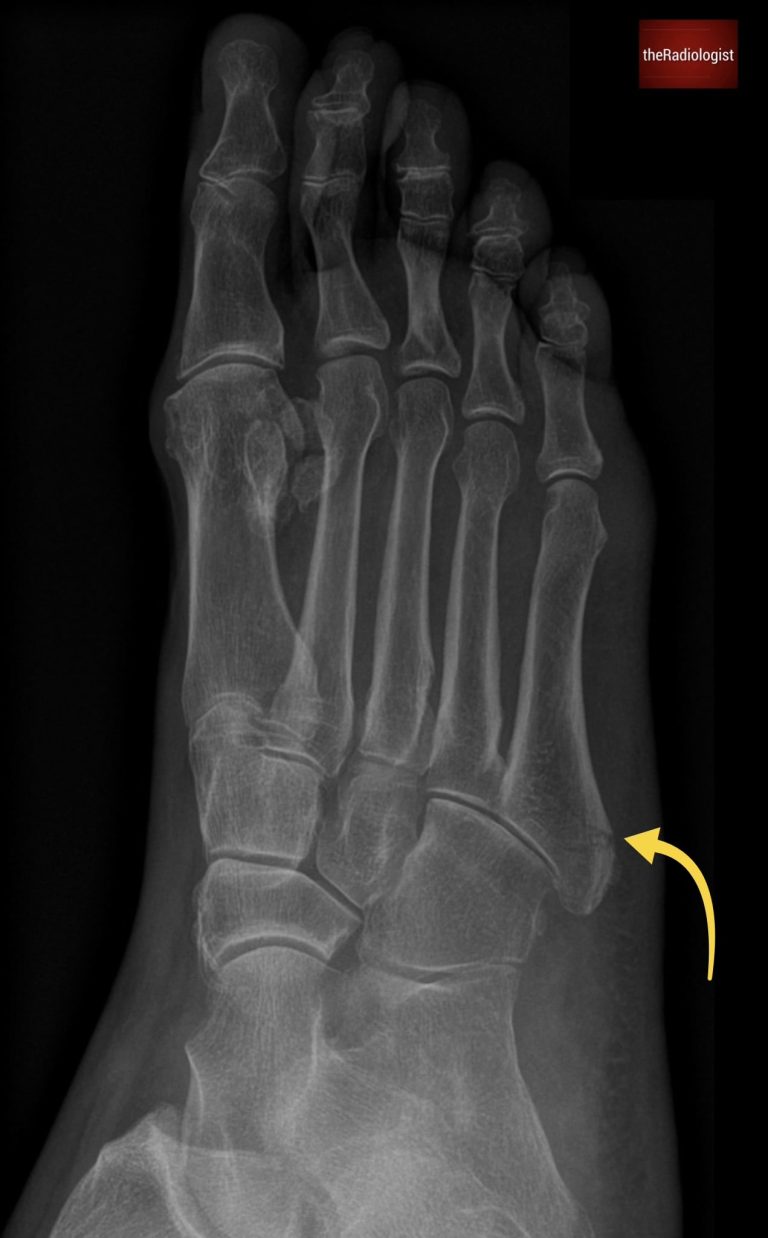
Always scrutinise the fifth metatarsal and in particular the base. Here there is a transverse lucency in keeping with a Jones fracture.
Before finishing, zoom in carefully and trace all remaining cortices, especially the phalanges: fractures here are often subtle and easily missed.
Finally, zoom out, step back and take a global look at the whole film. Reassess alignment, symmetry, and scan the bones for any lesions, erosions, or calcification. This ‘big picture’ review can reveal things you’d otherwise overlook.
Don’t forget to assess the base of the fifth metatarsal!
Check the morphology of any lucent line – an apophysis in kids will be vertical, a fracture line will be transverse.
A Jones fracture involves a transverse line at the metaphyseal-diaphyseal junction rather than an avulsion fracture at the tip which has a better pronosis.
The mortise view differs slightly from an AP ankle. The foot is internally rotated (about 15-20°) so both malleoli lie in the same horizontal plane. This opens up the joint space, letting you properly assess the ankle mortise.
On a standard AP, the talus overlaps the lateral malleolus, but on a mortise view you can clearly see the joint space which is why it’s so useful.
Most trauma series include a mortise view, and it’s essential to have a structured way of reviewing it.
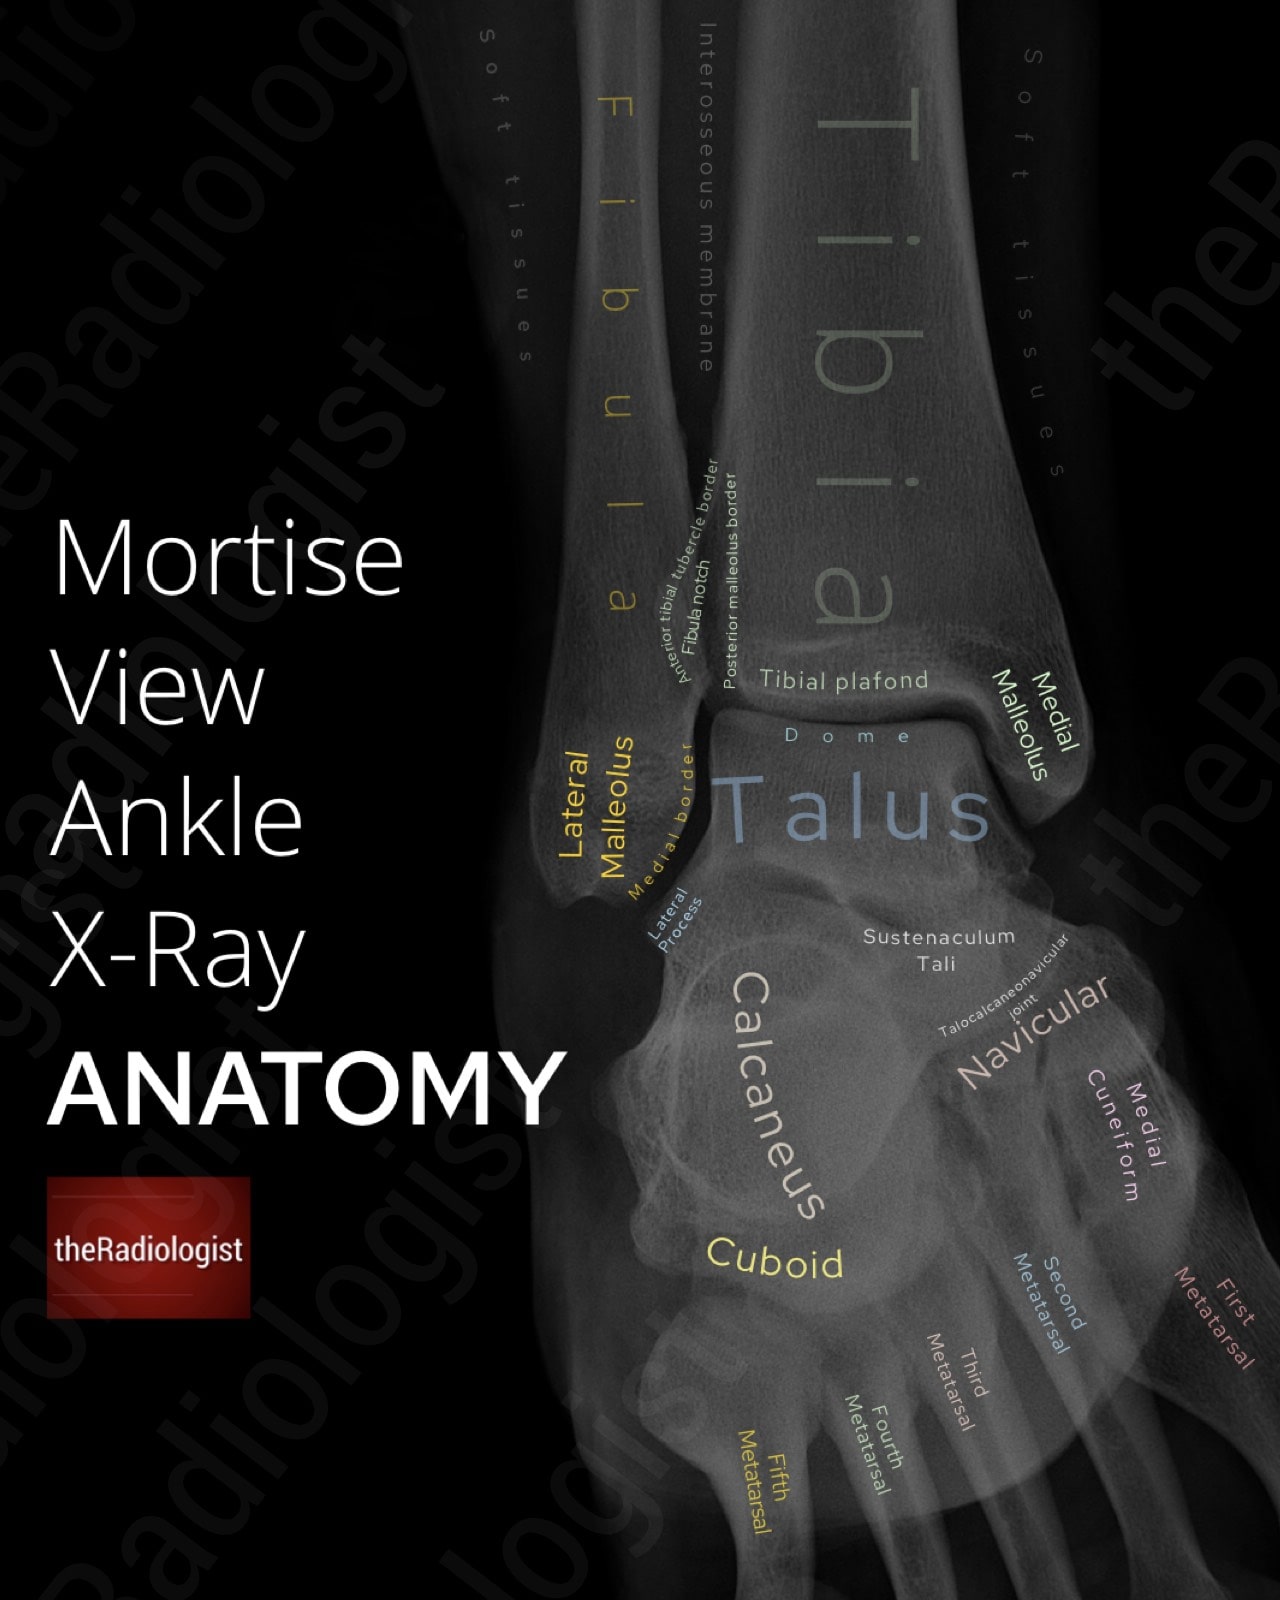
Annotated view of an mortise view ankle X-Ray.
Always start with the soft tissues. Swelling, asymmetry, or gas locules can point you to the site of injury before you even find a fracture. For example, swelling over the lateral malleolus is a clue to a distal fibula fracture.
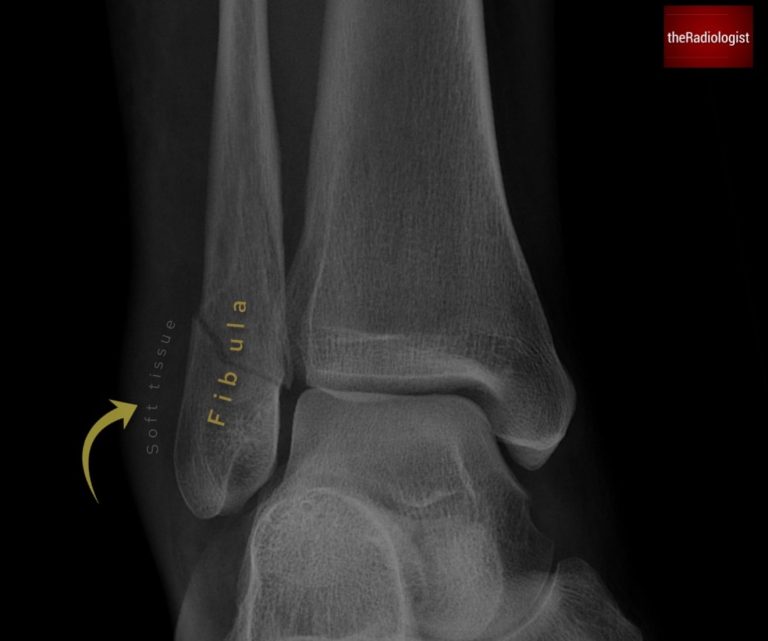
Swelling of the soft tissues overlying the lateral malleolus leads us to a distal fibula fracture which may not always be as obvious as this one.
Trace the cortices of the distal tibia and fibula carefully looking for a break in the cortex or a lucent line.
If you find a distal fibula fracture, classify it using Weber:
This classification is an exam favourite and guides how the fracture is treated.
Now trace the mortise joint: the tibial plafond with the medial and lateral malleoli and the talar dome. The joint space should be symmetric and uniform. Any asymmetry could represent a ligament injury with or without a fracture.
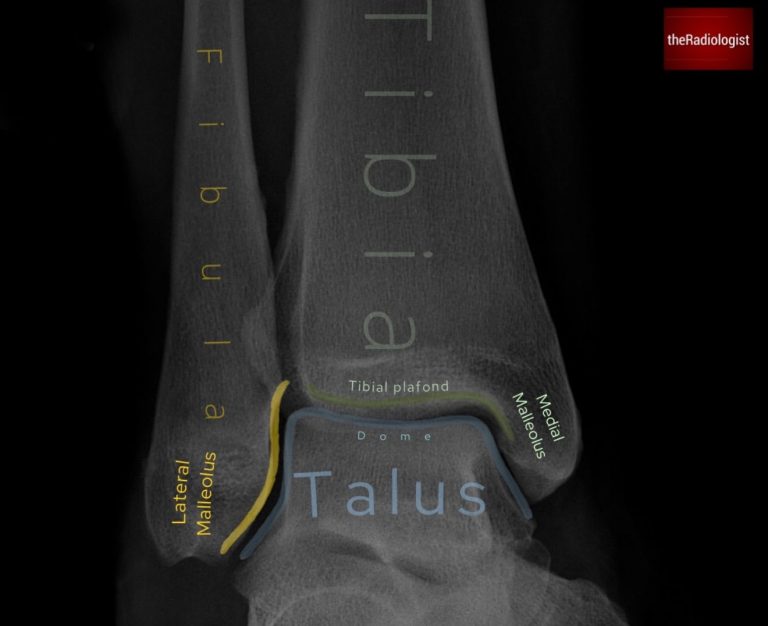
The mortise view lets you assess the mortise joint accurately – make sure the joint space is symmetric and uniform.
Measure the distance between the medial malleolus and the talus. It should be <4 mm and roughly equal to the superior joint space. In the context of a distal fibula fracture, widening could mean deltoid ligament disruption and lateral talar shift, which makes the injury unstable.
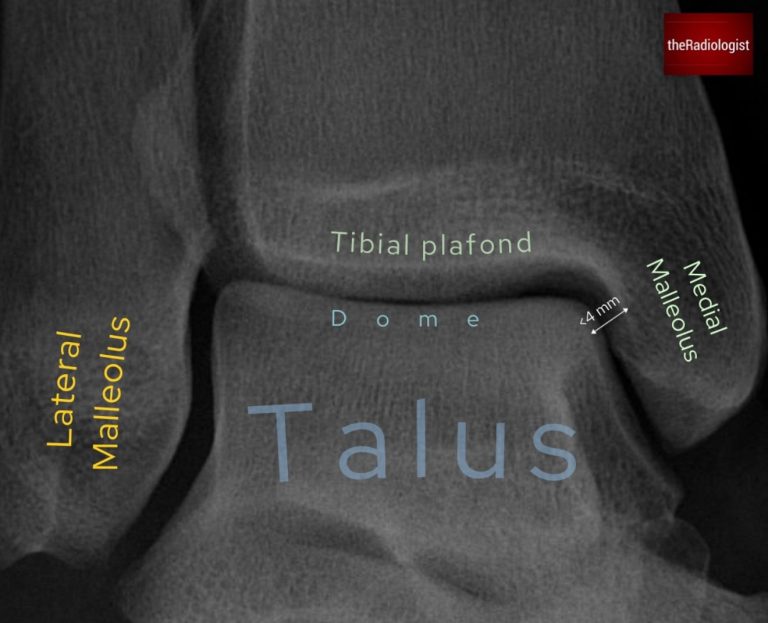
Meaure the medial clear space: this should be less than 4 mm and roughly equal to the superior joint space.
Measure the lateral clear space 1 cm above the tibial plafond. Normal is <6 mm. Anything wider suggests a syndesmotic injury ie. damage to the distal tibiofibular ligaments. This usually means surgical fixation is needed.
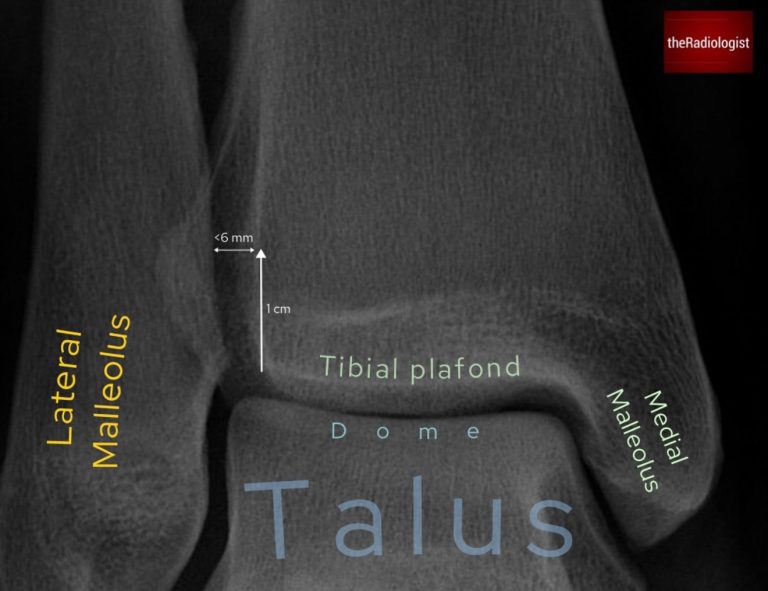
Meaure the lateral clear space: measure 1 cm above he tibial plafond. This should be less than 6 mm.
Check the talar dome for disruption or a small bone fragment that could represent an osteochondral defect. This is a defect of both bone and cartilage and is possible here as the talar dome is covered with a layer of cartilage. These can be subtle and plain X-rays can miss them: MRI is better if you’re suspicious.
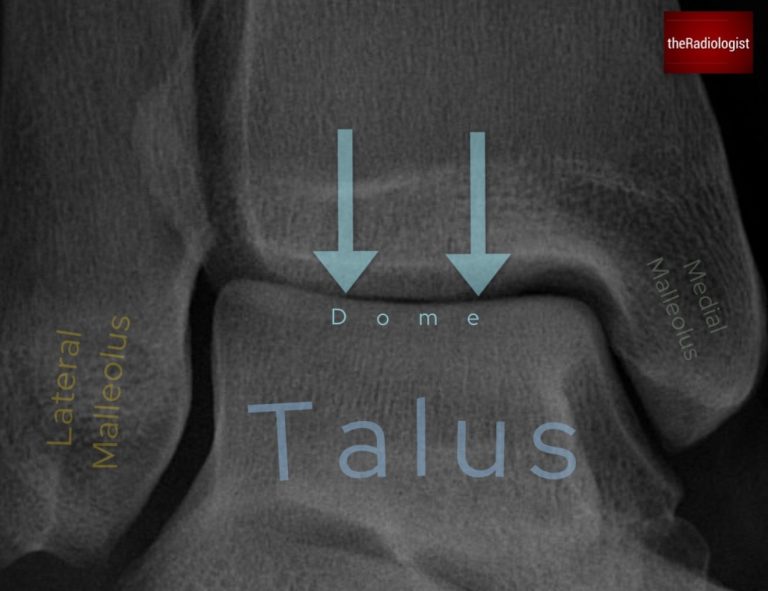
Assess the talar dome for small lucencies, disruption or a small fragment that could represent an osteochondral defect.
Pause to review the lateral process of the talus which can be subtle on X-Ray. These fractures often mimic ankle sprains and are easily missed on X-ray. If you don’t look for them, you won’t see them.
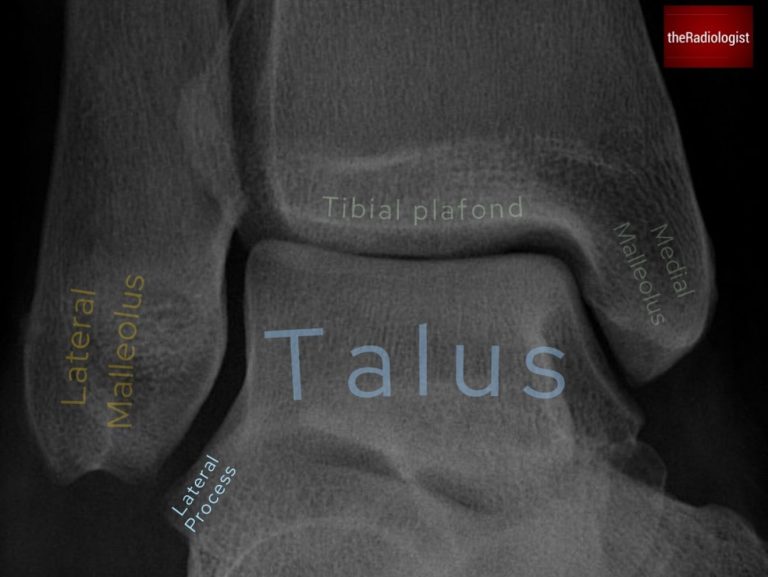
Take a moment to review the lateral process of the talus – fractures here can mimic ankle sprains.
Always check the edges of the film. Fractures at the base of the 5th metatarsal can be overlooked but often explain lateral ankle pain. Distinguish between:
Zoom in to trace all remaining cortices then zoom back out for an overview: that’s often when subtle fractures or bone lesions stand out.
Like all X-rays, you can’t clear the ankle on one view alone. The lateral must always be reviewed alongside the AP or mortise. There are several things the lateral shows much better, and this is how I approach it:
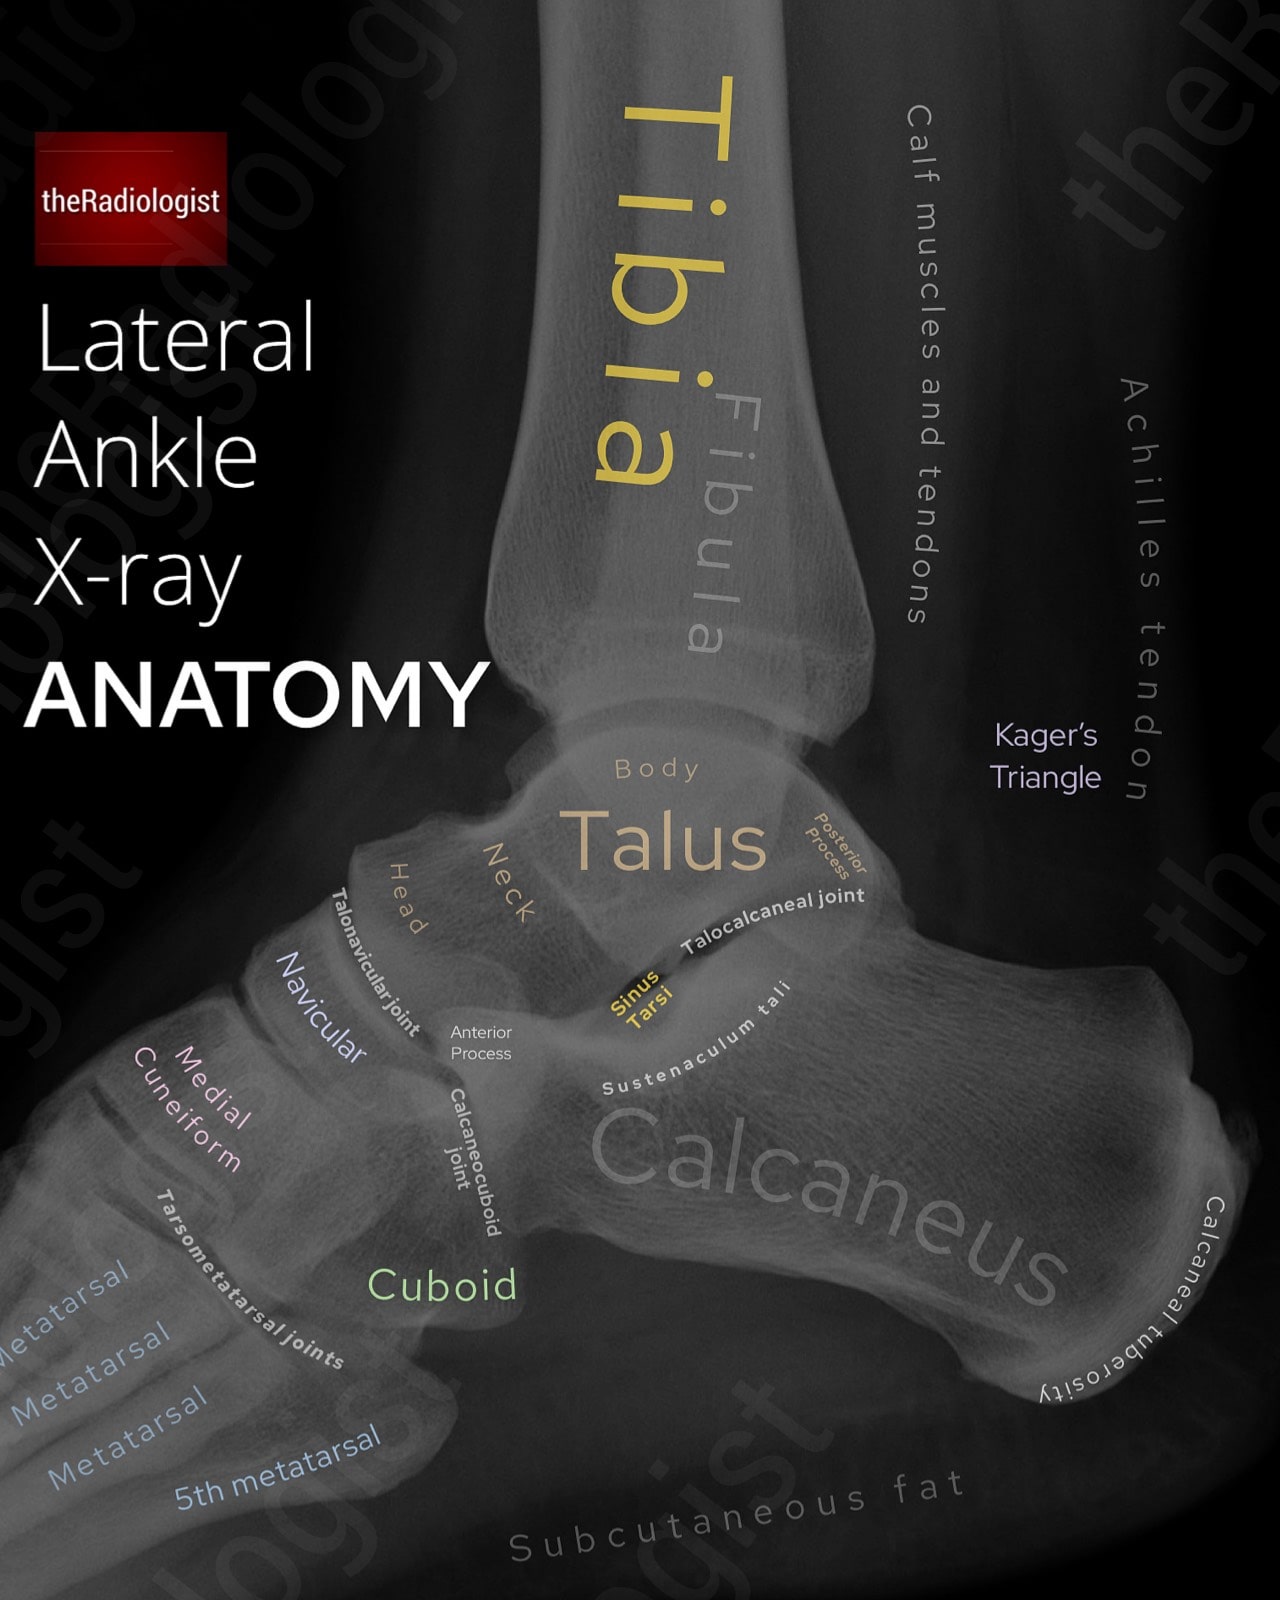
Annotated view of a lateral ankle X-Ray.
Start with the soft tissues. Look for swelling or gas, which can point to an underlying fracture. Check that you can clearly see Kager’s triangle: a lucent fat triangle bounded by the Achilles tendon posteriorly, flexor hallucis longus anteriorly, and the calcaneus below. Loss of its sharp outline may suggest Achilles tendon rupture, effusion, or other posterior ankle pathology.
Depending on the angle of the fracture line, a fibula fracture may not be well seen on the mortise or AP view and can only be seen on the lateral. The problem with the lateral is that the fibula is ‘hidden’ by the tibia so you need to ‘look through’ the tibia to find it.
Carefully trace the fibula on the lateral view and make sure its contour is smooth. Even a subtle step-off or irregularity can indicate a fracture that was invisible on the frontal film.
The calcaneus is the most commonly fractured hindfoot bone: often after a fall from height, though anterior process fractures can happen after simple twisting injuries.
If there’s clinical suspicion and the lateral is equivocal, try an axial (Harris) view (would suggest this if you suspected calcaneus fracture from the start) or CT.
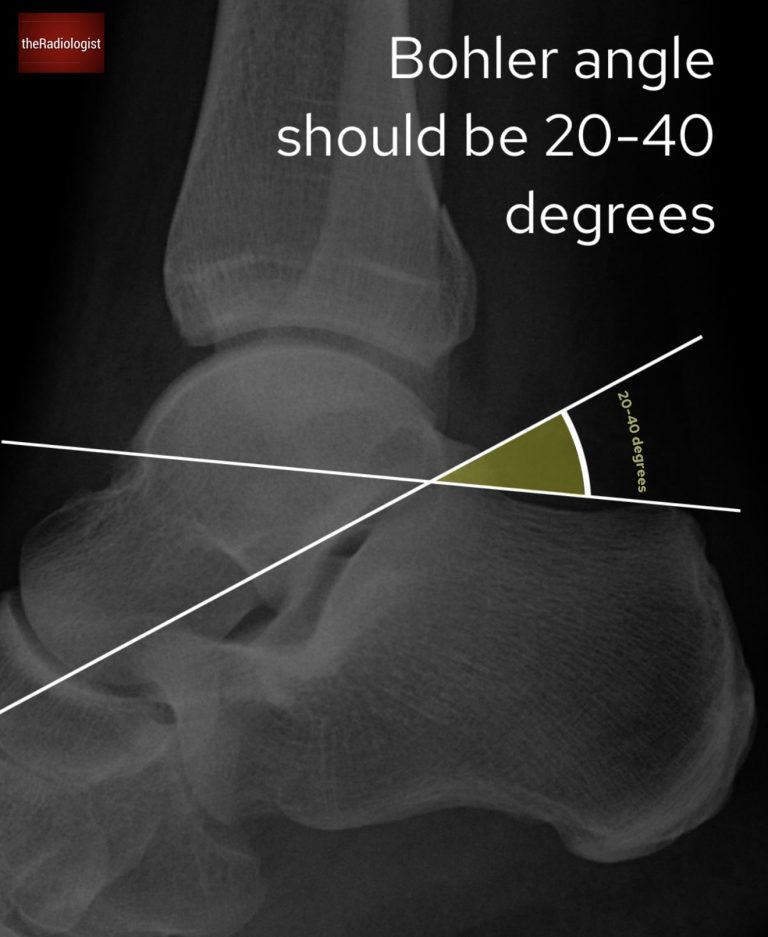
Find the Böhler angle: draw from the posterior tuberosity to the highest midpoint, then another line from midpoint to anterior process. Find the angle between the two lines – this should be 20-40 degrees, any less could be a compression fracture of the calcaneus.
Pay attention to two small processes where fractures can be easily missed:
Not an acute trauma finding, but worth checking: review the sustentaculum tali, the horizontal shelf of the calcaneus. If you see a continuous C-shaped line between the sustentaculum and the talus (“C sign”), think of a tarsal coalition where the bones are abnormally fused.
Don’t forget the edges of the film! The base of the 5th metatarsal is often captured on a lateral ankle and can be fractured even if the pain feels more ‘ankle’ than ‘foot’.
Finish by zooming in and tracing the remaining cortices. Look for subtle fractures, erosions, or bone lesions. Then zoom out and give the film a final overview.
Let’s summarise the above: below you’ll find a checklist to help you when you next review a foot or ankle X-Ray. Remember the FALS5 mnemonic for foot X-Rays. Many of the mortise ankle review areas apply to an AP ankle.
| Projection | Review area | Notes |
|---|---|---|
| DP/oblique foot | Soft tissues | Scan for any swelling or gas locules that could lead you to the site of injury and a possible fracture. |
| Freiburg disease | Shows as flattening and sclerosis of the | |
| Ankle fracture | Look for an ankle fracture at the edge of the film | |
| Lisfranc | Zoom up and look for any malalignment at the tarso-metatarsal joints or small bone fragments in this region. | |
| Stress fracture | Commonly the 2nd/3rd metatarsal shafts, look for a fracture line, faint periosteal reaction or callus. | |
| Fifth metatarsal | Zoom up and look for a fracture – differentiate from a normal apophysis in kids and between an avulsion and Jones fracture as management differs. | |
| Final review | Zoom in and trace all remaining cortices and zoom out and take a final overview. | |
| Mortise ankle | Soft tissues | Scan for any swelling or gas locules that could lead you to the site of injury and a possible fracture. |
| Distal tibia and fibula | Trace the cortices of the distal tibia and fibula looking for a fracture. | |
| Ankle mortise | Check the mortise looks symmetric and uniform. | |
| Medial clear space | Measure the distance between the medial malleolus and the talus. It should be <4 mm. | |
| Lateral clear space | Measure the tibiofibular clear space 1 cm above the tibial plafond. Normal is <6 mm. | |
| Talar dome | Check for disruption, lucency or a fragment that could mean an osteochondral defect. | |
| Lateral process of the talus | Check for a subtle fracture. | |
| Base of 5th metatarsal | Check the edge of the film. | |
| Final review | Zoom in and trace all remaining cortices and zoom out and take a final overview. | |
| Lateral ankle | Soft tissues | Check Kager’s triangle looks lucent with sharp outlines. |
| Hidden fibula fracture | Fibula fractures may not always project well on the AP/mortise view – ‘look through’ the tibia to try and find a fibula fracture. | |
| Calcaneus | Measure the Bohler angle. Look for a lucent or sclerotic line. | |
| Key processes | Check the posterior process of the talus and anterior process of calcaneus. | |
| Coalition (the ‘C sign’) | Look for a continuous C-shaped line between the sustenaculum tali and talus representing coalition. | |
| Base of 5th metatarsal | Check the edge of the film. | |
| Final review | Zoom in and trace all remaining cortices and zoom out and take a final overview. |
Downloaded by 10,000+ healthcare professionals.
Get 20 annotated chest X-ray signs with clear teaching points and explanations. Written by a Consultant Radiologist, this free guide is designed to help you recognise important findings more confidently when reviewing chest X-Rays.


You’ve got the framework now let’s put it to work. Dive into a related case to see these findings on real images, or explore another guide to build out your systematic approach. That’s where it really starts to stick.
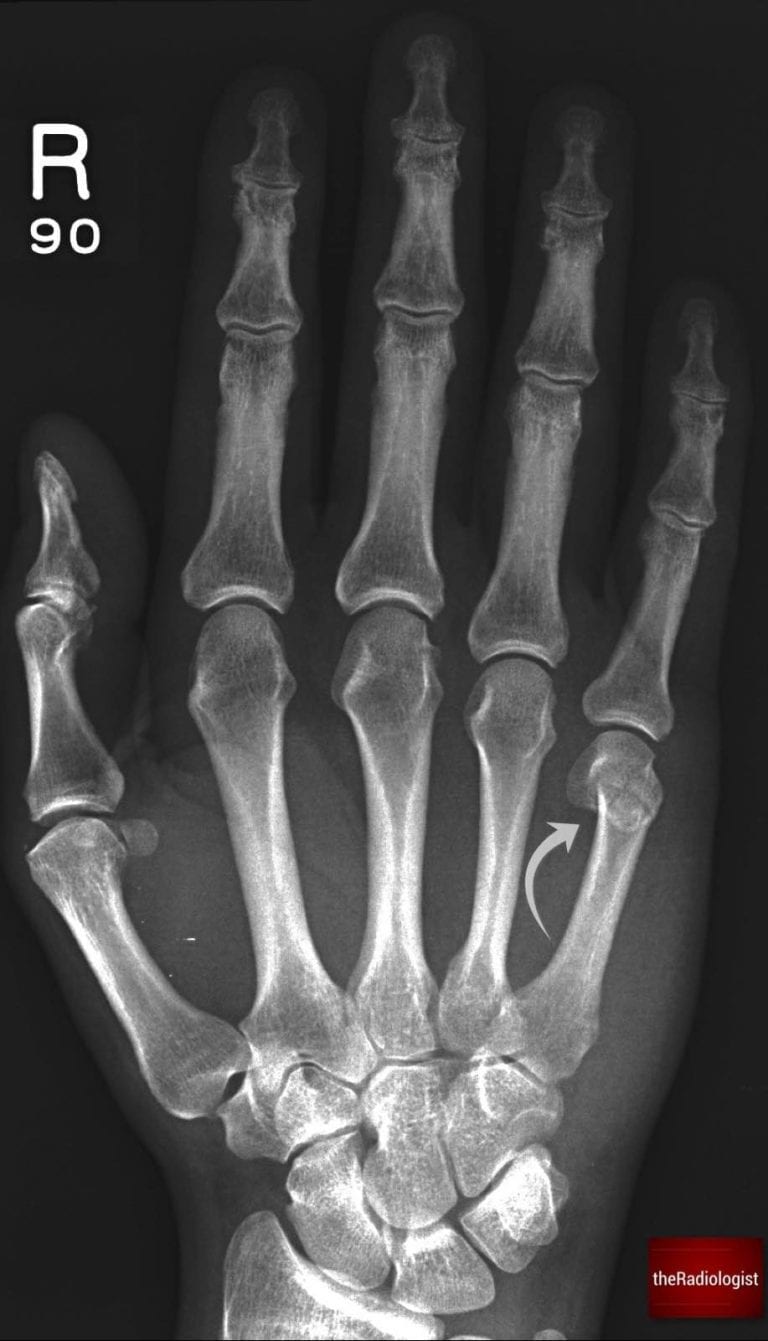
Hand and wrist X-Ray anatomy, views and key review areas
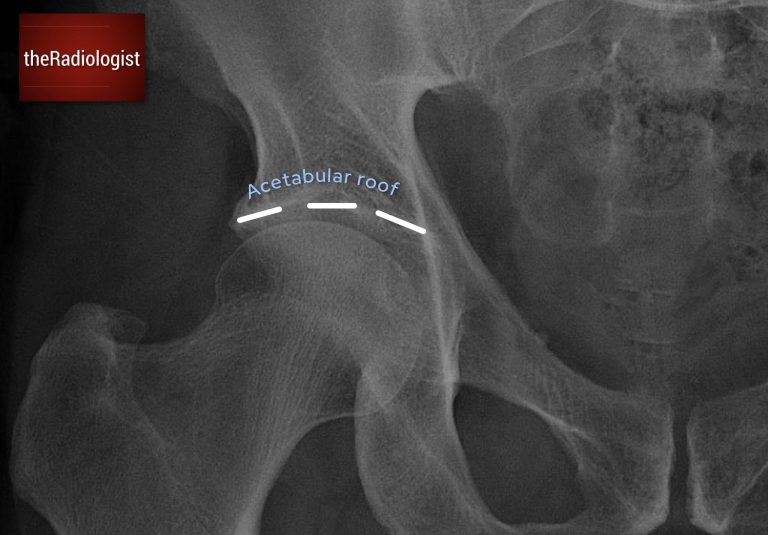
Pelvis X-Ray anatomy, alignment and fracture review areas
We use cookies to make this website work and to understand how it is used. You can accept all cookies, use essential cookies only or manage your preferences.