
Hand and Wrist X-Ray Guide
How to interpret hand and wrist X-Rays
Introduction
Hand and wrist X-rays can feel overwhelming, but with the right approach they become much clearer.
In this guide you’ll learn the essential anatomy, how to read the key X-ray views, and the common pitfalls that lead to missed injuries. We’ll finish with a simple step-by-step checklist you can use every time, making your wrist and hand X-ray review faster, easier, and more reliable.
General hand and wrist anatomy
The hand and wrist are built for a pretty amazing mix of power, grip, and fine-tuned precision. Between them they pack 27 bones – 8 in the wrist (the carpals), 5 in the palm (metacarpals), and 14 in the fingers and thumb (phalanges).
The wrist
The wrist joint mainly comes from the radius meeting the scaphoid and lunate, with the ulna helping out more on the stabilising side through the triangular fibrocartilage complex (TFCC). The proximal carpal row is scaphoid, lunate, triquetrum, and pisiform. The distal row is trapezium, trapezoid, capitate, and hamate. These form an arch that shapes the carpal tunnel – the narrow passage for tendons and the median nerve.
Wrist movements
- Flexion and extension – bending forwards and backwards.
- Abduction (radial deviation) – tilting towards the thumb.
- Adduction (ulnar deviation) – tilting towards the little finger.
- Pronation and supination – turning the forearm so the palm faces down or up (mainly at the forearm, but the wrist follows along).
The hand
The metacarpals give the palm its framework, while the phalanges make up the digits – 3 for each finger and 2 for the thumb. The thumb’s base joint, the first carpometacarpal joint (between the trapezium and first metacarpal) is a saddle joint, and that’s what lets it oppose the fingers for gripping and pinching.
Muscles and tendons
Most of the heavy lifting is done by muscles in the forearm, with long tendons crossing the wrist:
- Flexor tendons (flexor digitorum superficialis, profundus, and flexor pollicis longus for the thumb) run through the carpal tunnel.
- Extensor tendons travel over the back of the wrist under the extensor retinaculum.
Then there are the intrinsic muscles in the hand itself for fine control:
- Thenar group (thumb side) – opposition, precision grip.
- Hypothenar group (little finger side) – moving the little finger.
- Interossei and lumbricals – help spread and close the fingers, and fine-tune flexion/extension.
Blood supply comes from the radial and ulnar arteries, which join up to form the superficial and deep palmar arches. Nerves come from the median, ulnar, and radial nerves, each taking care of sensation and movement in their own patch.
X-Ray anatomy
The PA (posteroanterior) view is the standard starting point for hand and wrist X-rays. The hand is placed palm-down on the detector with the fingers slightly spread, which helps separate the bones and reduce overlap. This view gives you a complete look at the phalanges, metacarpals, carpals, distal radius and ulna, and the key joint spaces.
Within the hand, you’ll see:
- Phalanges – three in each finger, two in the thumb.
- Metacarpals – long bones forming the palm, bases articulating with the distal carpals.

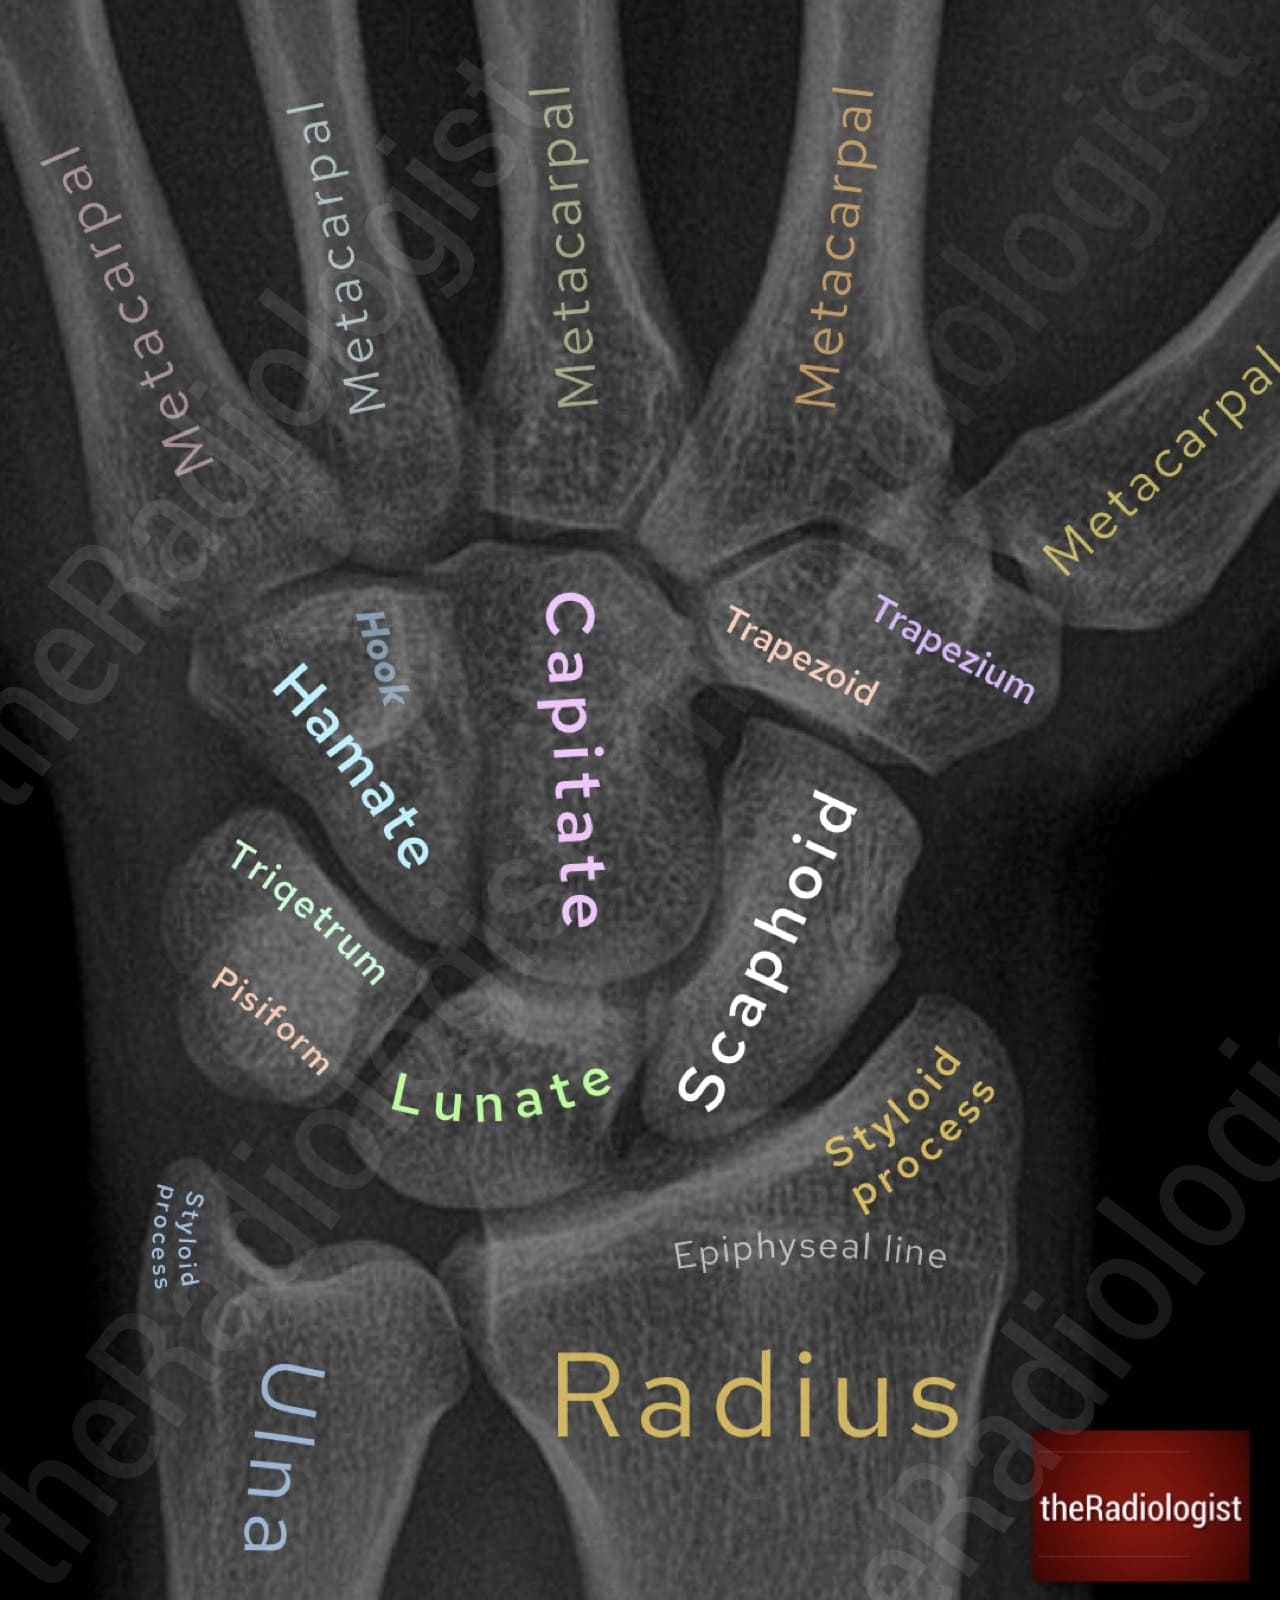
Annotated view of a PA hand X-Ray
Within the wrist, you’ll see the carpal bones in two neat rows. I always found these tricky to remember before radiology training, and while there are plenty of mnemonics out there:
- She Looks Too Pretty, Try To Catch Her
- Some Lovers Try Positions That They Can’t Handle
- Sally Left The Party To Take Cathy Home
Mnemonics can sometimes be harder to recall than the thing you’re actually trying to remember! I found it easier to break them down one by one:
- Capitate – sits right in the middle, the ‘capital’ of the hand.
- Hamate – has a ‘hook’ (hook of hamate) and sits on the ulna side of the capitate
- TrapeziUM– sits under the thUMb.
- TrapezOId – sits right ‘besoid’ the trapezium
- Scaphoid – shaped like a boat (the Greek work for boat is skaphos).
- Lunate – next to the scaphoid; always check for a widened scapholunate gap as seen in scapholunate dissociation.
- Pisiform – small bone seen overlying the triquetrum.
- Triquetrum – overlies the pisiform on the ulna side.
The carpal bones
MEMORY AID
Remember the capitate is the ‘capital’ of the hand and branch out from there.
The oblique view is usually taken alongside the PA. By rotating the hand and wrist about 45 degrees, it helps separate overlapping bones especially in the metacarpal shafts, trapezium, trapezoid, and bases of the fingers and can reveal fractures that are less obvious on the straight PA image.
PA view review areas
Now let’s go through a review process for looking at the PA view in a step-wise manner.
1. Look at the soft tissues
In any trauma case, start by looking at the soft tissues. Swelling can be your first clue to the site of injury and may be the only sign if the fracture is subtle. Compare with the opposite side if possible: asymmetry, bulging, or loss of the normal contour can direct your attention to the right spot early on.
2. Metacarpals
An indented fourth or fifth metacarpal head is a classic sign of a Boxer’s fracture following a punching injury.
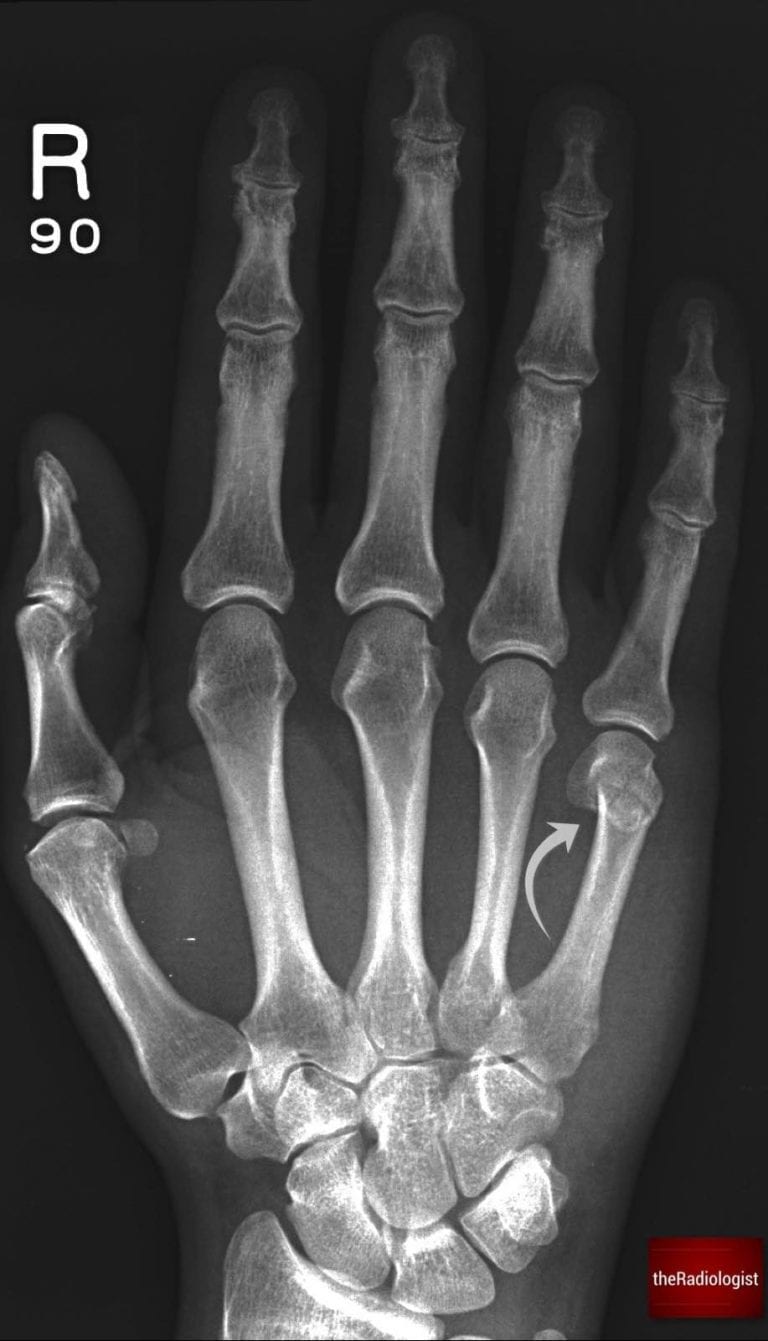
Here we have an example of a Boxer’s fracture – look for indentation at the heads of the fourth and fifth metacarpal.
Don’t stop there: trace an imaginary line across the bases of the metacarpals. Normally this will be continuous, but in some cases the fourth or fifth metacarpals can dislocate and drop downwards, overlapping the carpal bones and breaking the line. Overlapping bones on a hand X-ray should always make you think about dislocation.
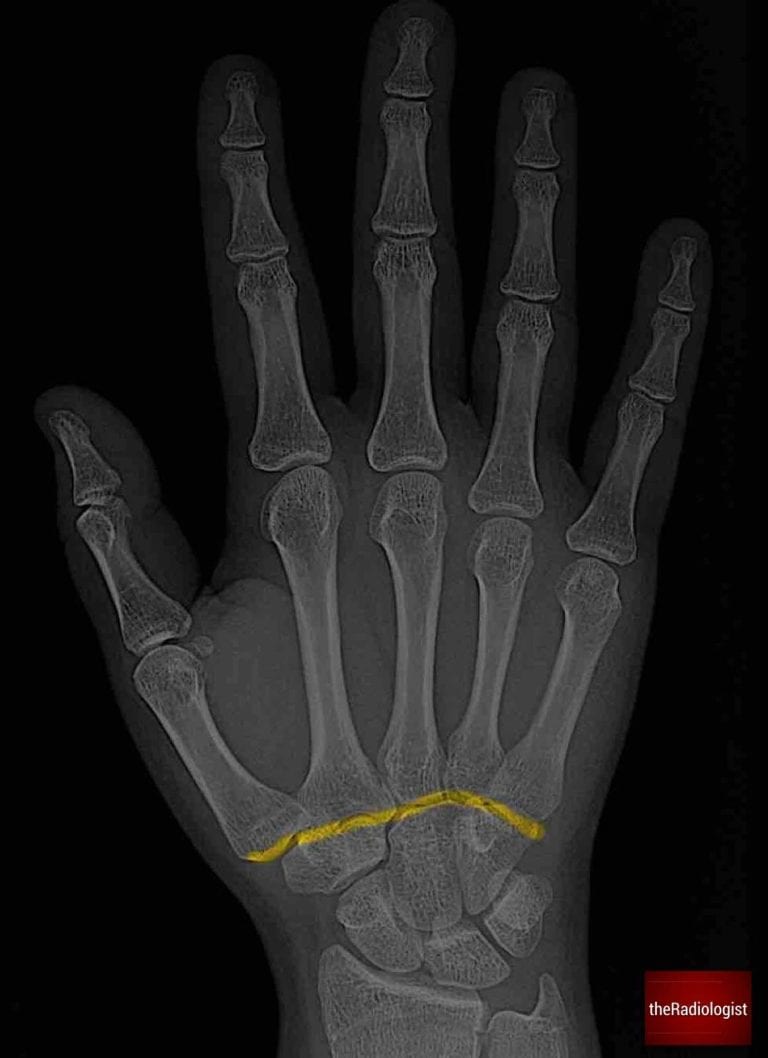
Trace a line across the base of the metacarpals – this should be continuous. If a metacarpal base drops downwards it could be dislocated.
KEY POINT
Don’t forget to trace a line across the base of the metacarpals. A metacarpal dislocation can be subtle and easily missed.
3. Base of the thumb metacarpal
Outline the base of the first metacarpal carefully. Forced abduction here can result in an intra-articular fracture. If it’s a single fragment, it’s called a Bennett’s fracture; if it’s comminuted, it’s known as a Rolando fracture. Both are intra-articular fractures in that the fracture line communicates with the 1st carpometacarpal joint.
4. Finger alignment and avulsion injuries
Next, check whether all the fingers line up properly. Malalignment can point to subluxation or dislocation. The phalanges should not overlap on a PA view: if they do, this may suggest subluxation and you should check an oblique or lateral view to be sure. While you are at the fingers, look for small bone fragments near joint margins or tendon insertions that could represent avulsion fractures.
5. Non-acute finger pathology
Not all findings will be traumatic. Take the time to look for joint space narrowing, erosions, or osteophytes, and think about the pattern of joint involvement in different conditions: osteoarthritis, rheumatoid arthritis, and psoriatic arthritis each have characteristic patterns. For example rheumatoid arthritis spares the DIPJs but these can be involved in OA. OA has a predilection for the 1st CMC joint.
Keep bone lesions in mind as well. The most common in the hand is an enchondroma, typically appearing as a well-defined, centrally located lytic lesion that may have endosteal scalloping.
6. Scaphoid
The scaphoid is the most commonly injured carpal bone. The word scaphoid is derived from the Greek word ‘skaphos’ meaning boat given its boat-like shape.
We can divide the bone into three different parts which are fractured at differing frequencies:
- proximal pole
- waist
- distal pole
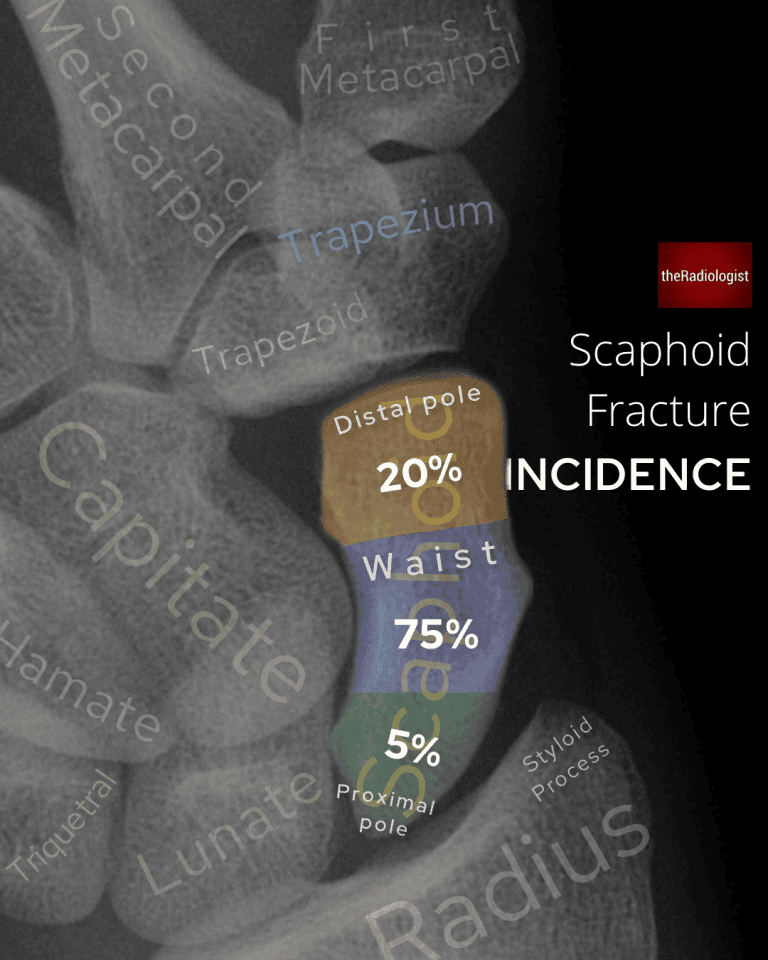
Incidence of scaphoid fractures split up into each third: note the waist is most commonly fractured
Fractures most commonly affect the waist of the scaphoid, classically happening after a fall onto an outstretched hand.
Where you fracture your scaphoid bone has implications with regards to complications. The main blood supply comes from the dorsal branch of the radial artery which enters the distal pole of the scaphoid and then travels back towards the proximal pole. Because of this pattern of blood supply, scaphoid fractures are at risk of leading to avascular necrosis. The more proximal the fracture the higher the risk.
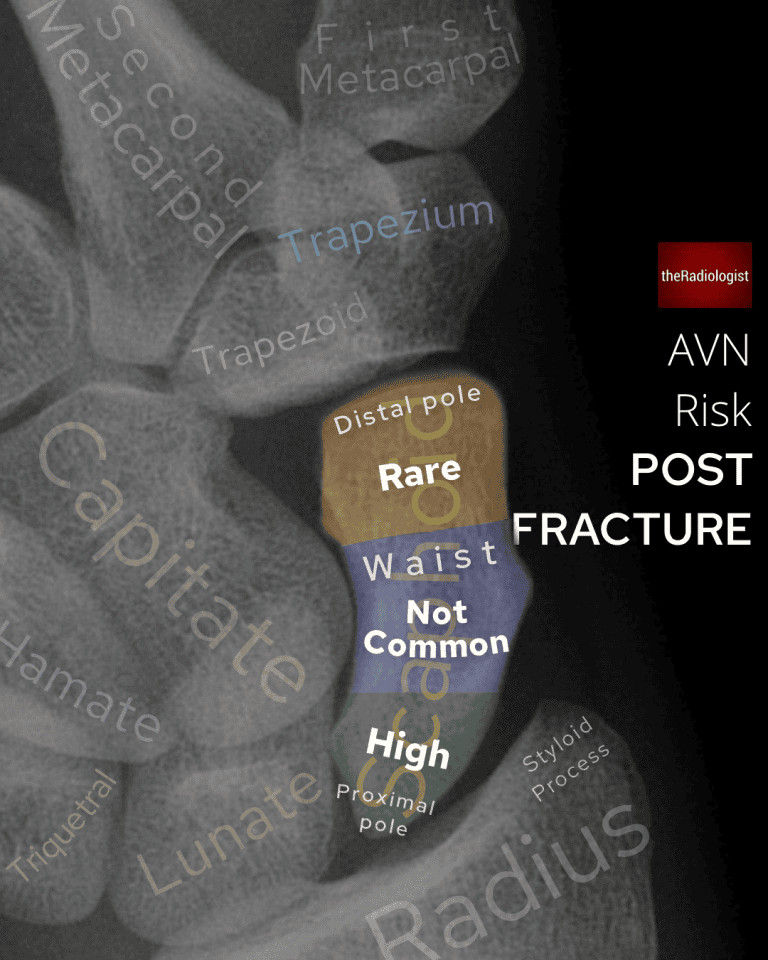
The risk of avascular necrosis (AVN) is highest when fracturing the proximal pole given the blood supply enters the distal pole and travels proximally.
A normal PA view does not exclude a fracture, so a ‘scaphoid series’ of X-Rays is usually performed for anyone thought to potentially have a scaphoid fracture. However this still may not pick up the fracture, missing up to 27%. This can make management difficult as people with a normal X-ray may still have a scaphoid fracture.
Practice varies: some centres recall patients with snuffbox tenderness in seven to ten days for a repeat X-ray, others repeat the clinical assessment, and some go straight to MRI.
7. Other carpal bones and spaces
Beyond the scaphoid, check that the spaces between all the carpal bones are equal and less than two millimetres. A widened scapholunate gap can indicate scapholunate dissociation, sometimes called the Terry Thomas sign, named after a English actor in the 50s/60s who had a gap between his front teeth. In America this is also known as the David Letterman sign.
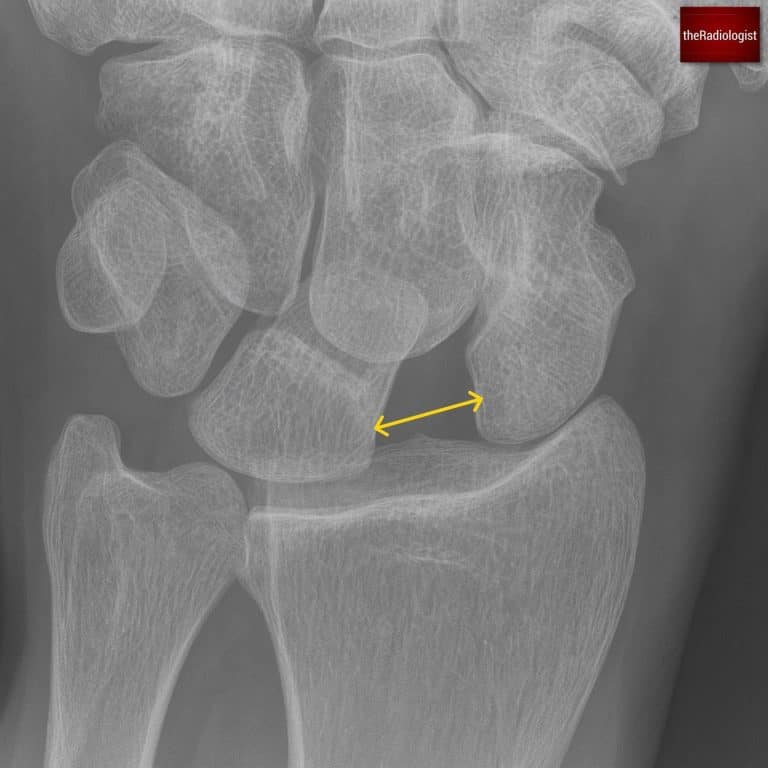
Widening of the gap between the scaphoid and lunate bones point towards scapholunate dissociation.
Make sure the lunate has its usual quadrangular shape; a triangular appearance can be a clue to perilunate dislocation. We will go through lunate and perilunate dislocation in a bit more detail below in the lateral X-Ray section.
Trace Gilula’s arcs across the proximal and distal carpal rows, watching for any break in these smooth curves. A break could mean a ligament injury or fracture.
Trace all carpal bones making sure there is no subtle fracture.

Trace Gilula’s arcs: disruption of any of these points towards carpal instability or fracture
8. Radius and ulna
Finally, assess the distal radius and ulna. Look for cortical breaks or fracture lines, and check the relationship of their articular surfaces: the articular surface of the ulna should not sit distal to that of the radius. If it does, think about an impacted distal radial fracture or possible injury to the distal radioulnar joint. Ensure the distal radioulnar joint is intact and the radius and ulna are not separated: in the context of a radial fracture this could represent a Galeazzi fracture.
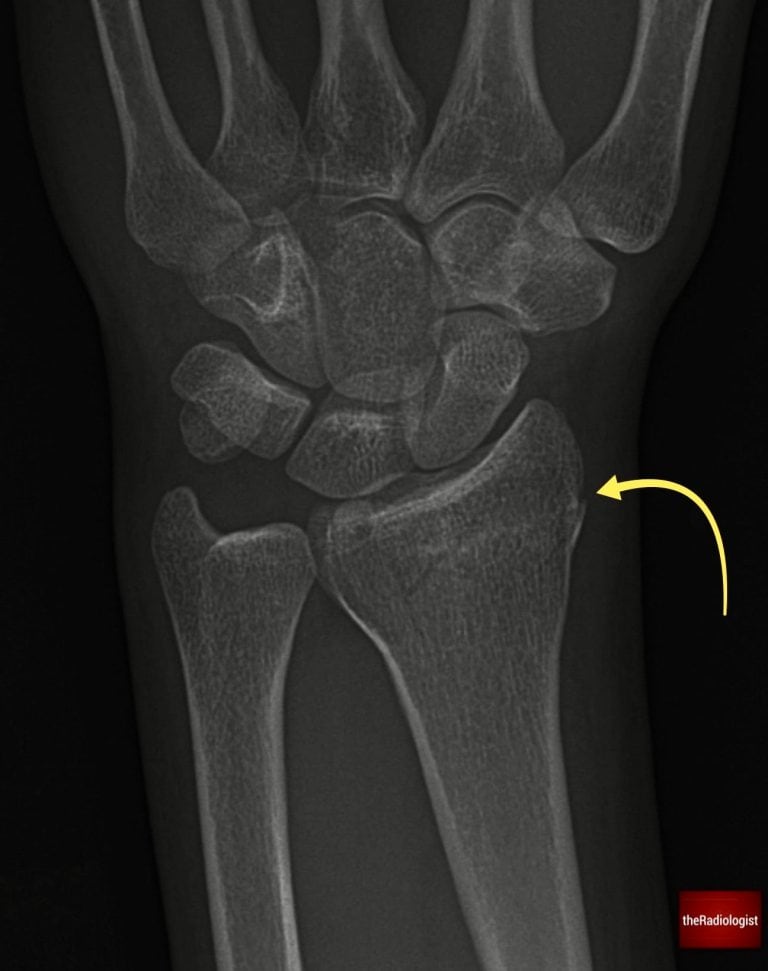
Scrutinise the distal radius and ulna looking for a break in the cortex or any suggestion of a fracture line which can be subtle. Here there is a distal radius fracture.
Lateral view review areas
The lateral wrist X-ray can be confusing with so many overlapping bones. However, there are several key injuries that may appear better on a lateral view than on a PA view. Let’s go through lateral wrist X-Ray review areas:
1. Check soft tissues
First, look at the soft tissues. Assess for general swelling and pay particular attention to the fat stripe on the palmar side of the distal radius. If this stripe is bowed or displaced, it suggests haematoma within the pronator quadratus muscle and should make you consider an underlying distal radius or ulna fracture. Note however this is a bit of a soft sign and if it isn’t there, it doesn’t mean there isn’t a fracture!
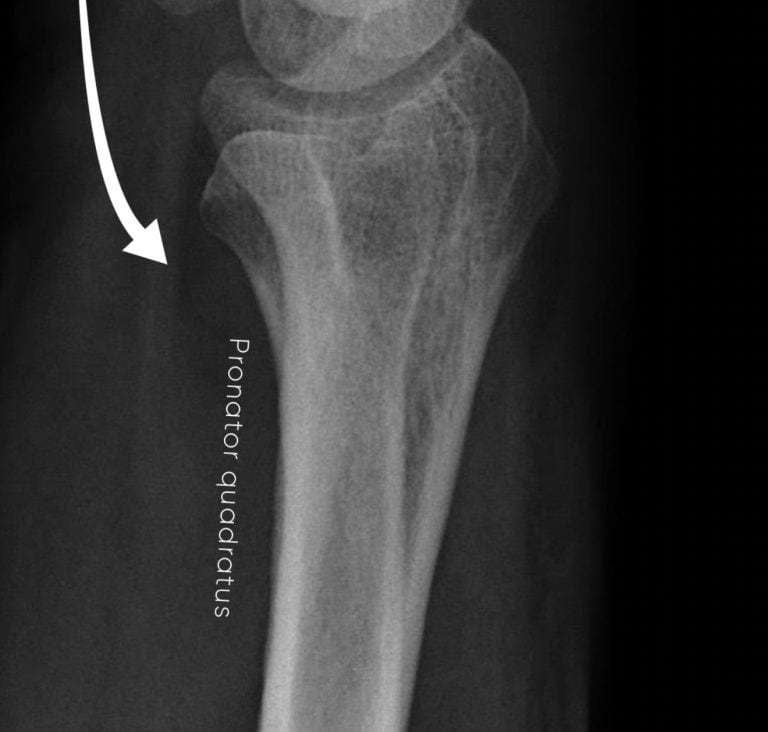
Check the fat stripe on the palmar side of the distal radius – it should be straight as it is here. Bowing or displacement could mean a fracture.
2. Assess for a normal volar/palmar tilt
Firstly have a look to see if there is a normal volar (or palmar) tilt. If you draw a line perpendicular to the shaft of the radius and one between the dorsal and palmar tips of the distal radius, the angle between these should be less than 15 degrees. If more this could be related to an unstable fracture or DISI (see below).
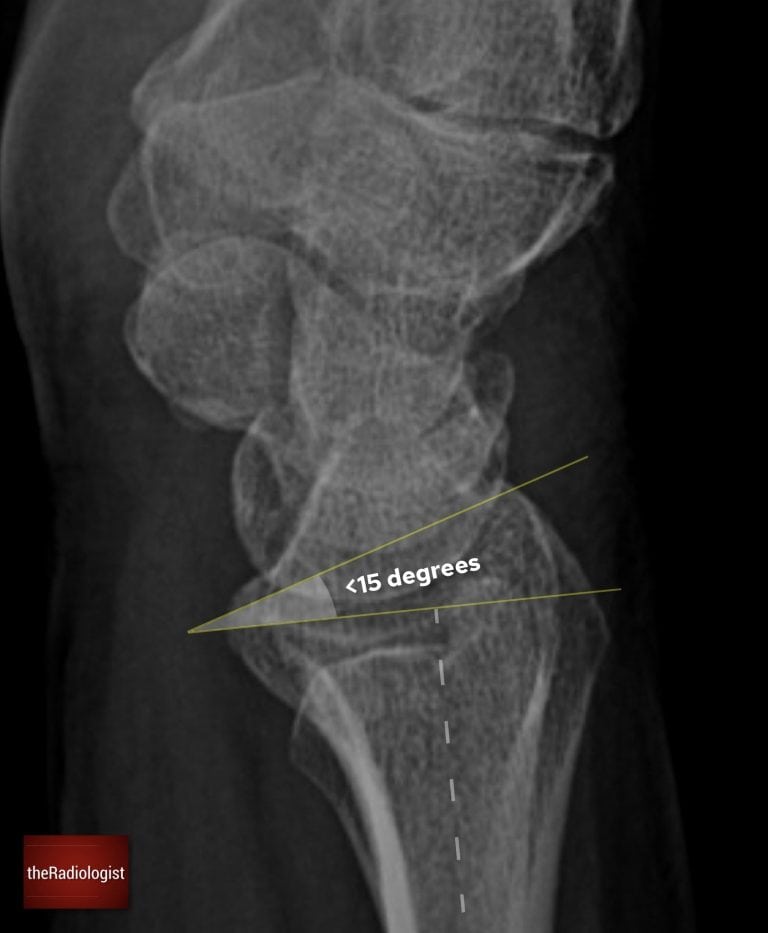
Check for a normal volar (palmar) tilt on a lateral wrist X-Ray
3. Assess for perilunate and lunate dislocation
Check the overall alignment of the carpal bones. Perilunate and lunate dislocations are uncommon but important high-energy injuries, and they are often missed. Recognition is vital because if untreated they can lead to chronic instability, weakness, and early arthritis. Think of these injuries as a spectrum, beginning with scapholunate ligament disruption and progressing across the proximal carpal row as more force is transmitted.
In a normal wrist, if you draw a line down the long axis of the radius it should pass through the lunate and into the capitate. This is the ‘apple in the cup’ relationship, where the capitate (apple) sits neatly within the concavity of the lunate (cup). I’m not sure who out there is putting apples in teacups but who am I to argue?
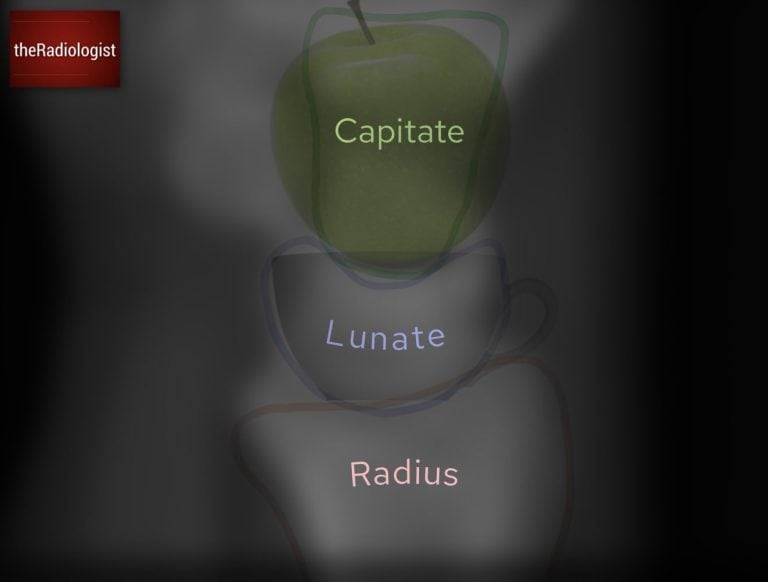
The capitate, lunate and radius should line up – the capitate (apple) should sit on the lunate (teacup)
In a perilunate dislocation the lunate remains aligned with the radius, but the capitate dislocates dorsally. In other words, the apple has fallen out of the cup. There is a high incidence of associated scaphoid fractures, so if you see this, the PA view should always be reviewed carefully and additional scaphoid views or cross-sectional imaging considered.
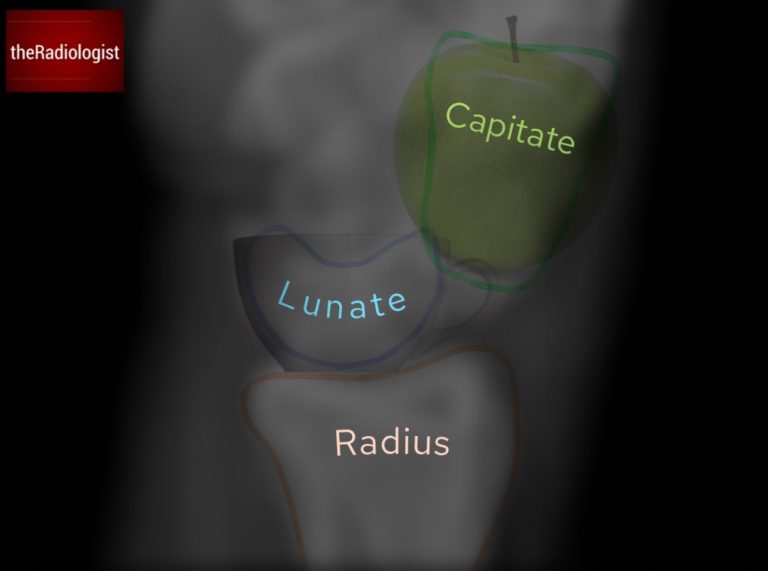
Perilunate dislocation: the lunate stays aligned with the radius but the capitate dislocates. The apple has fallen out of the cup.
In a lunate dislocation the relationship between the lunate and the radius is lost. The lunate tips forward and no longer articulates with the distal radius, producing the classic ‘spilled teacup’ sign on the lateral view. In this case the capitate remains aligned with the radius, but the lunate itself is displaced in a volar direction. On the PA view you may seen the lunate take on a triangular configuration. This can be subtle so important to look for alignment on a lateral view.
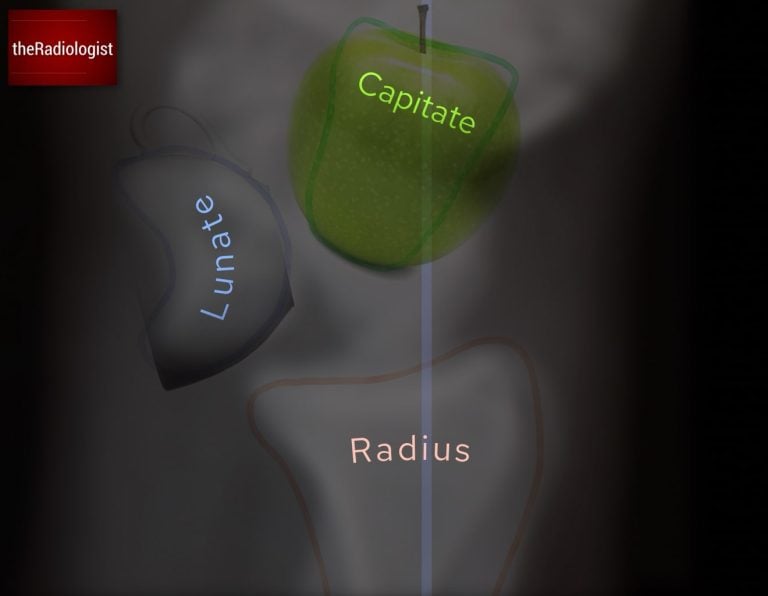
Lunate dislocation: The lunate becomes displaced whilst the capitate stays in line with the radius. The teacup has spilled.
Both perilunate and lunate dislocations require urgent recognition and referral, as delayed treatment can result in permanent loss of grip strength and significant long-term disability.
Whilst assessing alignment also review the scapholunate angle: we will go into this in a bit more detail below.
4. Assess for triquetral avulsion fracture
Next, review the dorsal aspect of the proximal carpal row for a triquetral fracture. This is the second most common carpal bone fracture after the scaphoid and is often seen after a fall onto an outstretched hand with hyperflexion. On the lateral film you’re looking for a small piece of bone dorsal to the proximal row – look for the pooping duck sign! The shape of the lunate and scaphoid can just about be made into a duck so you’re looking for a duck poo just behind this.
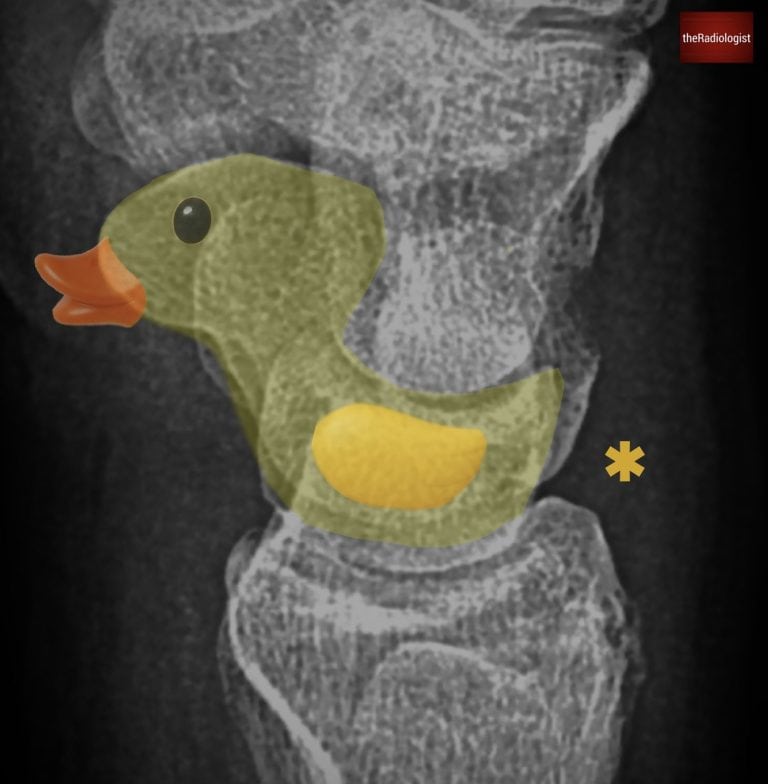
The shape of the scaphoid and lunate on a lateral view can look like a duck – look for a duck poo just behind this (star) which could represent a triquetral fracture.
5. Assess the dorsal contour of the distal radius
Then, trace the dorsal cortex of the distal radius. The outline should be smooth without any indentation or step. Any deviation from the normal contour raises suspicion of a distal radius fracture, even if subtle.
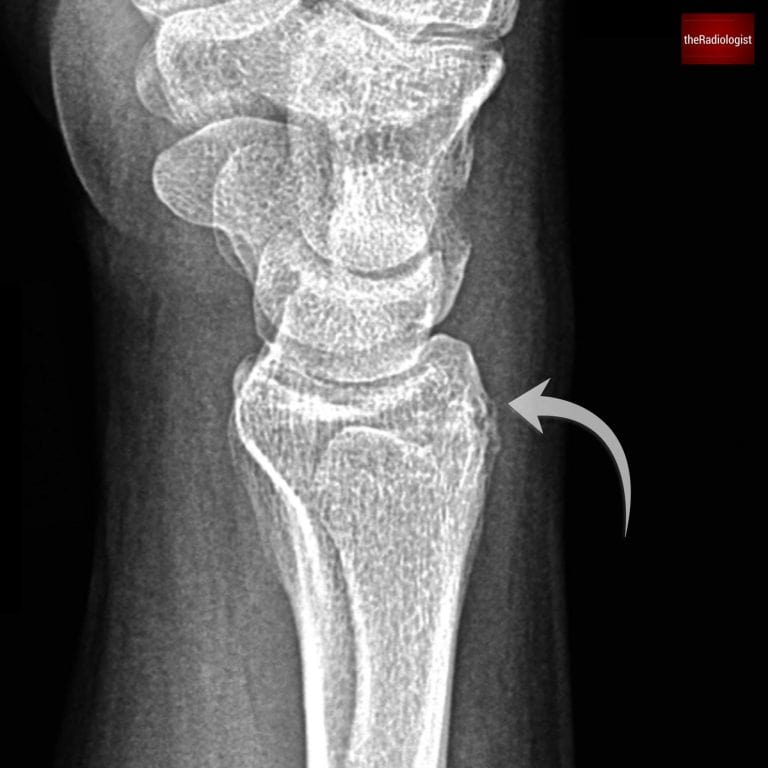
Look for any irregularity of the dorsal cortex of the distal radius like in this case: there is a distal radius fracture
Scapholunate angle
On a well-positioned true lateral wrist X-ray, one of the most informative measurements you can make is the scapholunate (SL) angle. It reflects the alignment between the scaphoid and lunate. When their relationship breaks down, instability patterns emerge that can progress to long-term arthritis if missed.
You can measure it by drawing a line along the long axis of the scaphoid and drawing another line along the long axis of the lunate. The angle between these two lines is the scapholunate angle.
Normal range: 30–60°.
>70–80° suggests DISI (Dorsal Intercalated Segment Instability) whilst <30° suggests VISI (Volar Intercalated Segment Instability).
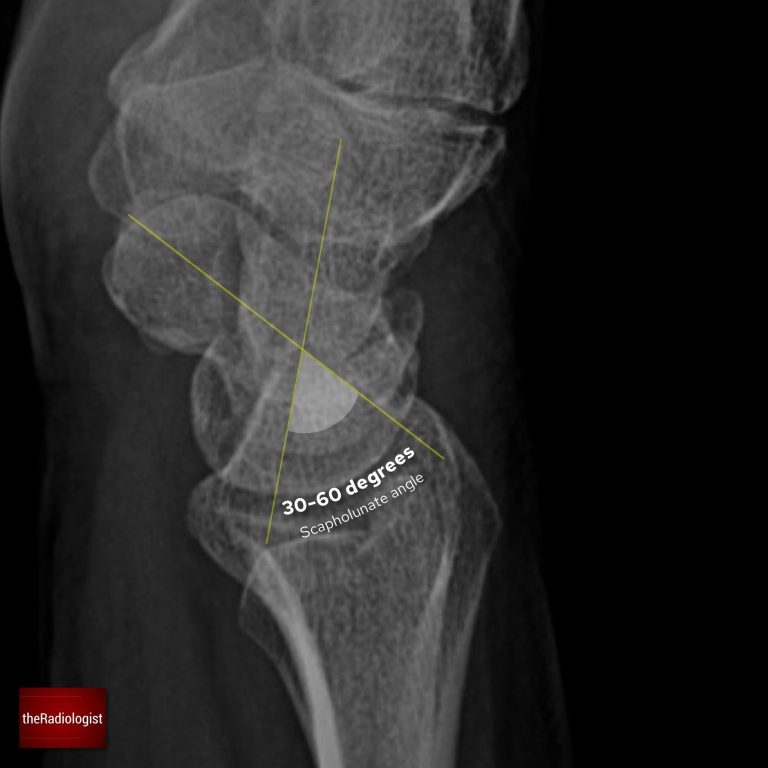
A normal scapholunate angle ranges between 30-60°. An increase suggests DISI whilst a reduction suggests VISI.
DISI: Dorsal Intercalated Segment Instability
In DISI, the lunate tips dorsally relative to the radius while the scaphoid flexes forward.
Most often this occurs due to scapholunate ligament injury, causing loss of the normal coupling between the bones. The scaphoid falls into flexion, the lunate drifts dorsally, and the scapholunate angle rises above 70–80°.
If you see this look for signs of scapholunate dissociation and scaphoid fracture.
VISI: Volar Intercalated Segment Instability
In VISI, the lunate tips in a volar direction, often in association with lunotriquetral ligament injury.
With the ligament disrupted, the lunate follows the triquetrum into flexion. The scapholunate angle drops below 30°.
Review area checklist
Let’s summarise the above: below you’ll find achecklist to help you when you next review a hand/wrist X-Ray.
| Projection | Review area | Notes |
|---|---|---|
| PA | Soft tissues | Look for any asymmetry that can point to a fracture. |
| Metacarpals | Look for Boxer’s fracture. Trace line across base of the metacarpals. | |
| Base of thumb metacarpal | Look for Bennett’s (single fragment) and Rolando (comminuted) fracture | |
| Finger alignment and avulsion | Check no overlapping bones and check no small bone fragments at joint margins. | |
| Non-acute finger pathology | Arthritis – joint space narrowing, erosions, osteophytes. Bone lesions, most common is an enchondroma (well defined, lucent). | |
| Scaphoid | May need a scaphoid series and/or cross-sectional imaging. Proximal pole at higher risk of AVN. | |
| Other carpal bones and spaces | Check for scapholunate dissociation, ensure lunate not triangular. Trace Gilula’s arcs. | |
| Radius and ulna | Look for distal radius/ulna fracture and dislocation of radioulnar joint. | |
| Lateral | Soft tissues | Ensure palmar fat stripe maintained. |
| Normal volar/palmar tilt | If increased could be associated with an unstable fracture or DISI. | |
| Perilunate and lunate dislocation | Ensure the capitate (apple) sits on the lunate (teacup). | |
| Triquetral avulsion fracture | Look for a pooping duck sign. | |
| Dorsal contour of distal radius | Ensure smooth, if irregular could represent a fracture. |