
Elbow X-Ray Essentials
A guide to interpreting elbow trauma on X-Ray
Introduction
Elbow X-rays can be challenging, especially with subtle fractures and overlapping anatomy. This guide breaks it down step by step, from key anatomy and alignment lines to fat pads and common fracture sites. By the end, you’ll know exactly what to look for and how to avoid the most common mistakes.
General elbow anatomy
The elbow is a synovial joint, structurally classified as a hinge-type joint. This means it primarily allows movement in a single plane: flexion and extension of the forearm relative to the arm. The hinge function is made possible by the precise shape of the articulating bony surfaces and reinforced by strong ligamentous support.
Three bones form the elbow joint:
- The distal humerus (from the upper arm)
- The proximal ulna (medial forearm bone)
- The proximal radius (lateral forearm bone)
There are two primary articulations within the elbow:
Humeroulnar joint
This is the true “hinge” of the elbow. The trochlea (a spool-shaped, grooved structure on the medial side of the distal humerus) fits into the trochlear notch of the ulna, allowing the ulna to hinge up and down during flexion and extension.
Humeroradial joint
Here, the capitellum (a smooth, rounded lateral projection on the distal humerus) articulates with the head of the radius. This joint also contributes to flexion and extension, but more importantly plays a role in forearm rotation.
A third articulation, the proximal radioulnar joint, lies within the same joint capsule but serves a distinct function. It is a pivot-type joint that enables pronation and supination, the rotational movements of the forearm. This motion is facilitated by the radial head rotating within a ring formed by the radial notch of the ulna and the annular ligament, which securely holds the radial head in place while allowing it to spin.
The elbow joint is enclosed in a fibrous capsule that provides stability while allowing movement. This capsule is reinforced by key ligaments:
- The ulnar collateral ligament (medially), which connects the medial epicondyle of the humerus to the ulna and stabilises against valgus stress.
- The radial collateral ligament (laterally), which extends from the lateral epicondyle and blends with the annular ligament encircling the radial head, stabilising against varus stress.
X-Ray anatomy
Now let’s get to the important bit, how this all looks on an X-Ray. We will go through the AP and lateral views in turn.
AP View
Firstly find the olecranon which overlaps the humerus – this tells you you are looking at the ulna and this is the medial side of the elbow. Once you find the ulna look for its articulation with the trochlea which is a medial structure and part of the humerus.
On the other side you have the radial head which articulates with capitulum, again part of the humerus. The radial neck and tuberosity may also be visible depending on positioning.
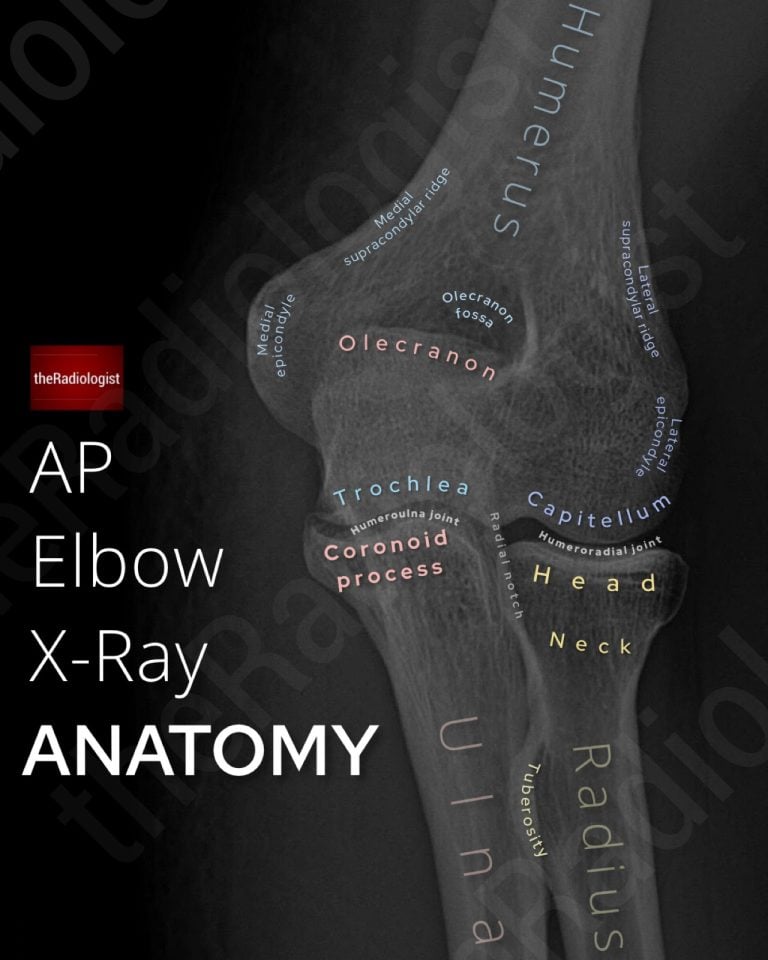
Annotated view of an AP elbow X-Ray
MEMORY AID
UM: Find the Ulna and you’ve found the Medial side of the elbow
Lateral view
This time the capitellum and trochlea are more difficult to see separately as they are superimposed over each other. Finding your hourglass sign at the distal humerus can tell you you are looking at a true lateral.
Now look for the two elbow ‘fat pads’. These are important to be wary of as when they’re abnormal they point to an underlying fracture. Remember fat will be darker than the surrounding soft tissues.
The anterior fat pad normally lives within the coronoid fossa. This may not be visible at all, or if present, appears as a thin stripe parallel to the anterior humerus.
The posterior fat pad resides within the olecranon fossa. It is normally hidden by bone and not visible on X-ray.
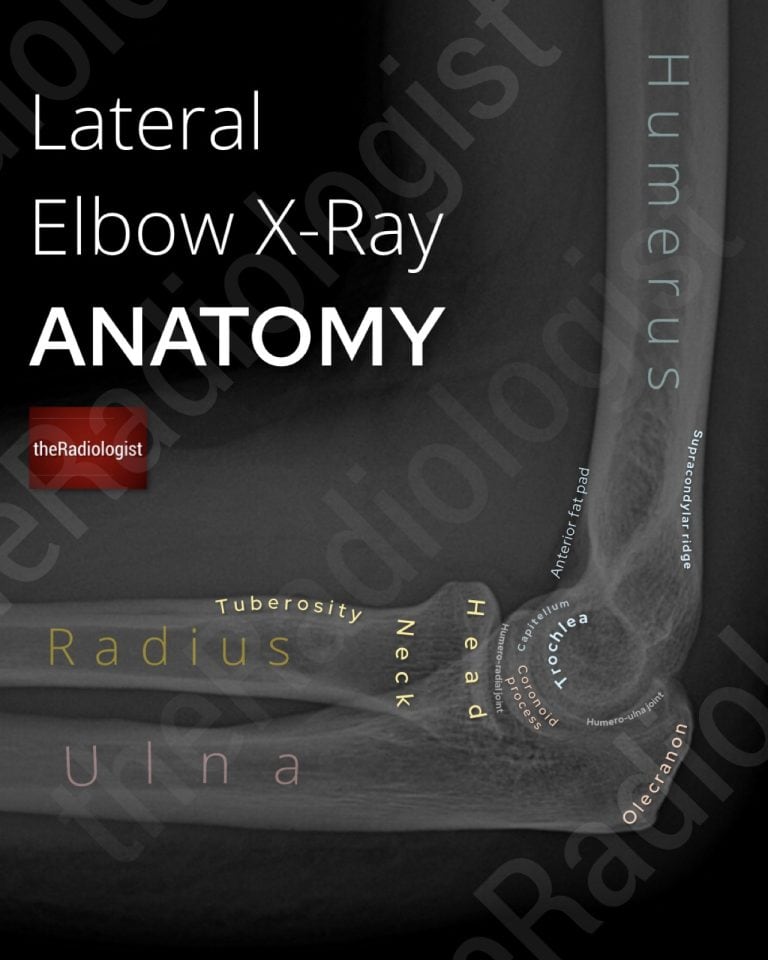
Annotated view of a lateral elbow X-Ray
X-Ray review areas
Let’s go through a step by step guide on how to assess an adult elbow X-Ray.
In terms of general principles it is important to check soft tissues, alignment and then sweep through the bones looking for any cortical defect that could be a fracture. Don’t be afraid of zooming up. I usually like to go through the lateral elbow view first and then go through the AP.
1. Look at the soft tissues
As always try and decide whether there is any swelling of the soft tissues that can lead you to the site of the fracture – this may be a bit easier on the AP.
2. Articulations
Is there a dislocation? Usually posterior (ie the olecranon moves posteriorly relative to the humerus) and can be associated with radial head or coronoid process fractures. The ulna nerve is the most common nerve injury associated with a posterior dislocation.
Does the capitellum align with the radius? Does the trochlea align with the ulna? Is the radioulnar joint intact?
MEMORY AID
Here’s a memory aid to help you remember the articulations between the humerus and the radius/ulna:
CRAzy TULips
Capitellum = RAdius
Trochlea = ULna
3. Radiocapitellar line
Now start assessing alignment. The radiocapitellar line is a really important review area and ensures you don’t miss a radial head dislocation.
A line drawn through the middle of the radial neck should intersect the capitellum – if not consider a radial head dislocation. Make sure the line is orientated with the angle of the radial NECK rather than the radial shaft.
In the context of a proximal ulna fracture a radial head dislocation means this is termed a Monteggia fracture. Although the proximal ulna fracture may be very obvious the radial head dislocation can be really subtle and I have seen them missed. It’s really important to pick the radial head dislocation up early as when it is missed it means the patient is more at risk of a poor outcome.
So whenever you see an ulna fracture in particular make sure you look at your radiocapitellar line – I make sure I review this on every elbow X-Ray I review. Note the rules also stand on the AP so you can also check on there that the radiocapitellar line is well aligned.
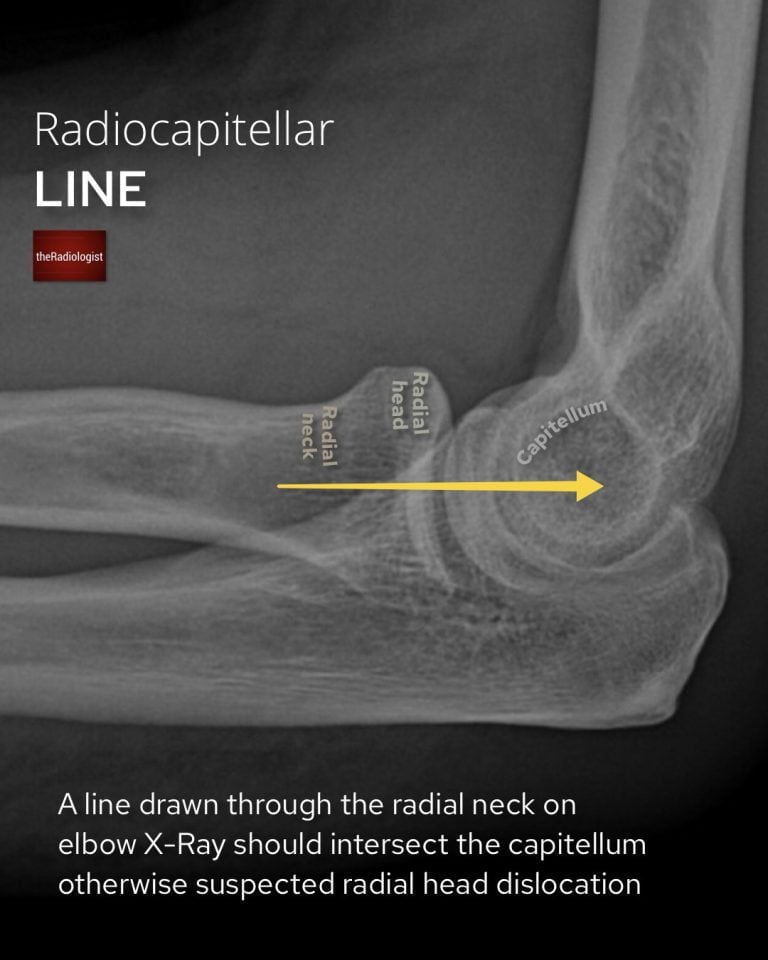
A normal radiocapitellar line drawn through the centre of the radial neck should intersect the capitellum.
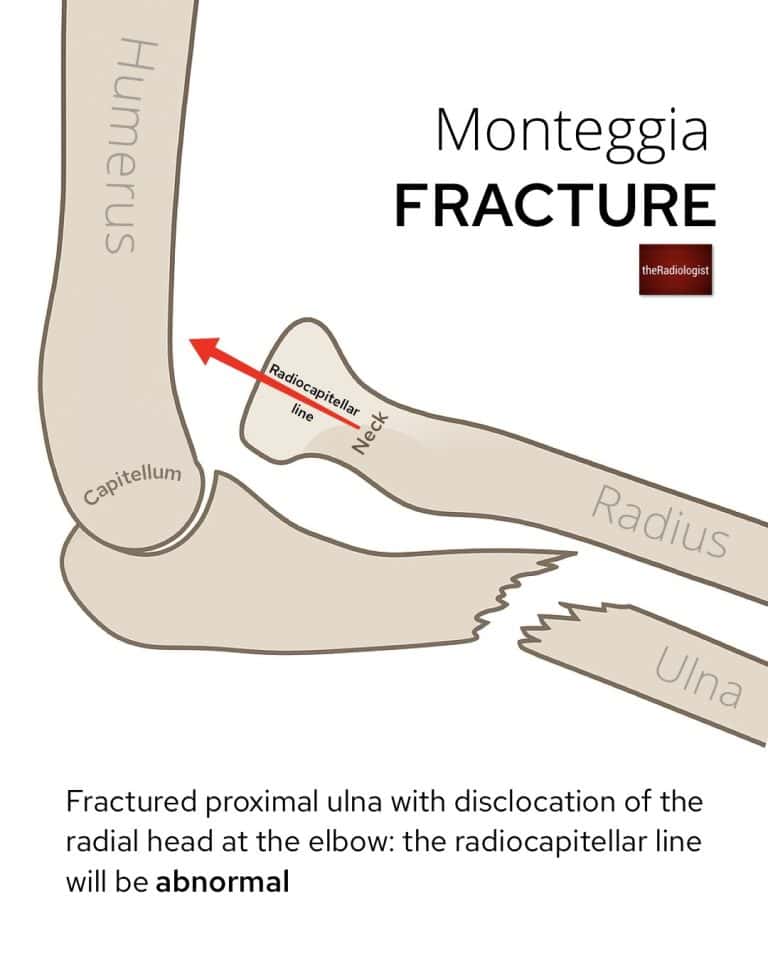
In a Monteggia fracture there is a proximal ulna fracture with a radial head dislocation: make sure you don’t miss the latter as this can have implications on long term recovery
4. Anterior humeral line
Checking the anterior humeral line helps avoid missing a supracondylar fracture.
A line drawn down the anterior surface of the humerus should intersect the middle third of the capitellum. When abnormal the capitellum is pushed backwards and this won’t be the case in supracondylar fractures. This is far more common in kids but is worth keeping in your review for adults.
Be wary that this can be misinterpreted if it isn’t a true lateral film so you should be seeing your ‘hourglass sign’ in the distal humerus before looking to interpret this.
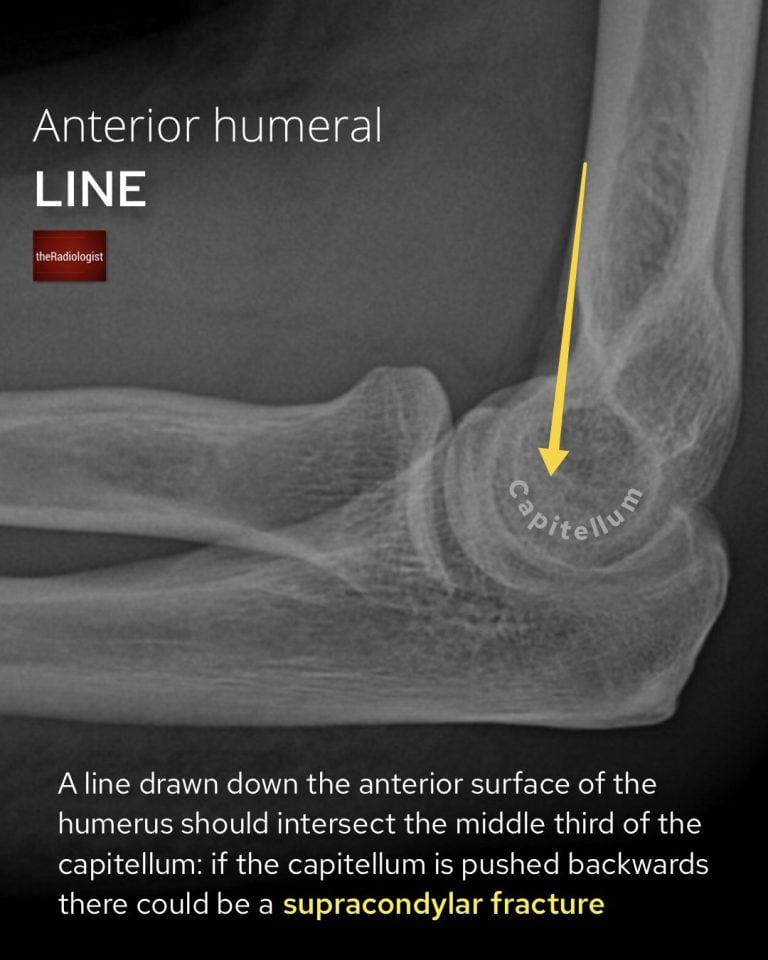
More important in paediatric elbow X-Ray review but worth checking on all elbow X-Rays, an abnormal anterior humeral line can help avoid missing a supracondylar fracture.
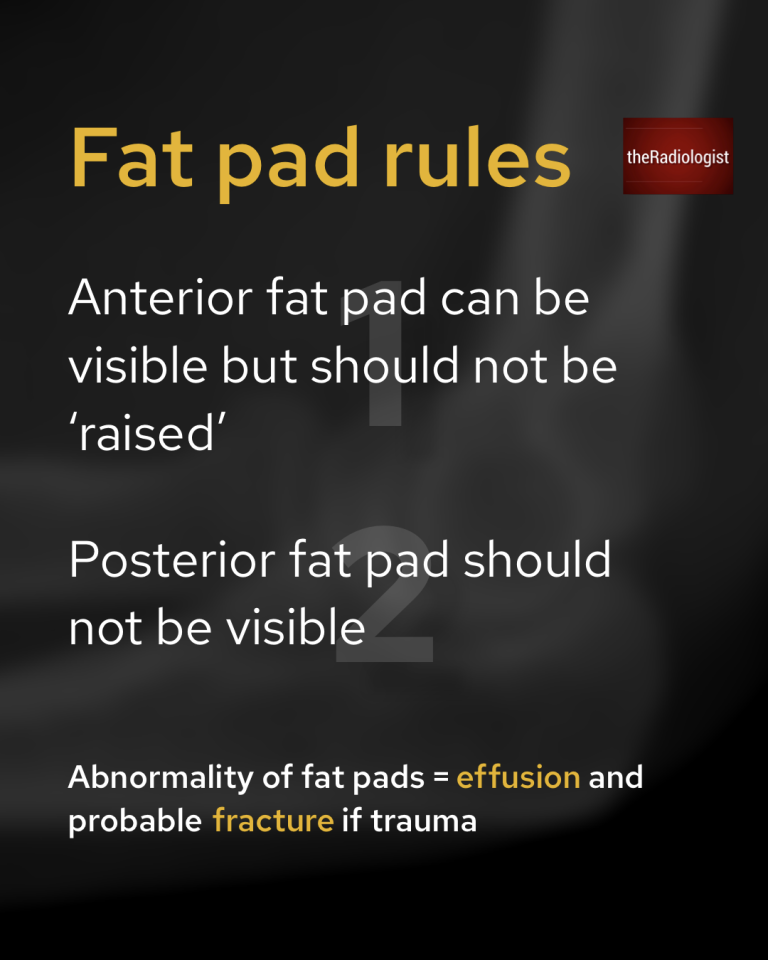
5. Fat pads
Elbow fat pads are important to be wary of as when they’re abnormal they point to an underlying fracture. Remember fat will be darker than the surrounding soft tissues.
These are the rules of the fat pads:
- an anterior fat pad can be present but should not be raised away from the humerus
- a posterior fat pad should not be present
If the rules aren’t followed in the context of trauma you need to be thinking about an intra-articular fracture which may be difficult to see
Have a look at this more detailed look at reviewing elbow fat pads here.
The elbow fat pad rules.
6. Radial head
Now it’s a case of looking through all the bones and cortices but let’s look at a few of the more common and important fracture sites.
Fractures of the radial head are the most common elbow fracture in adults so take a moment to zoom in and make sure the radial head looks clean – these ones can be subtle!
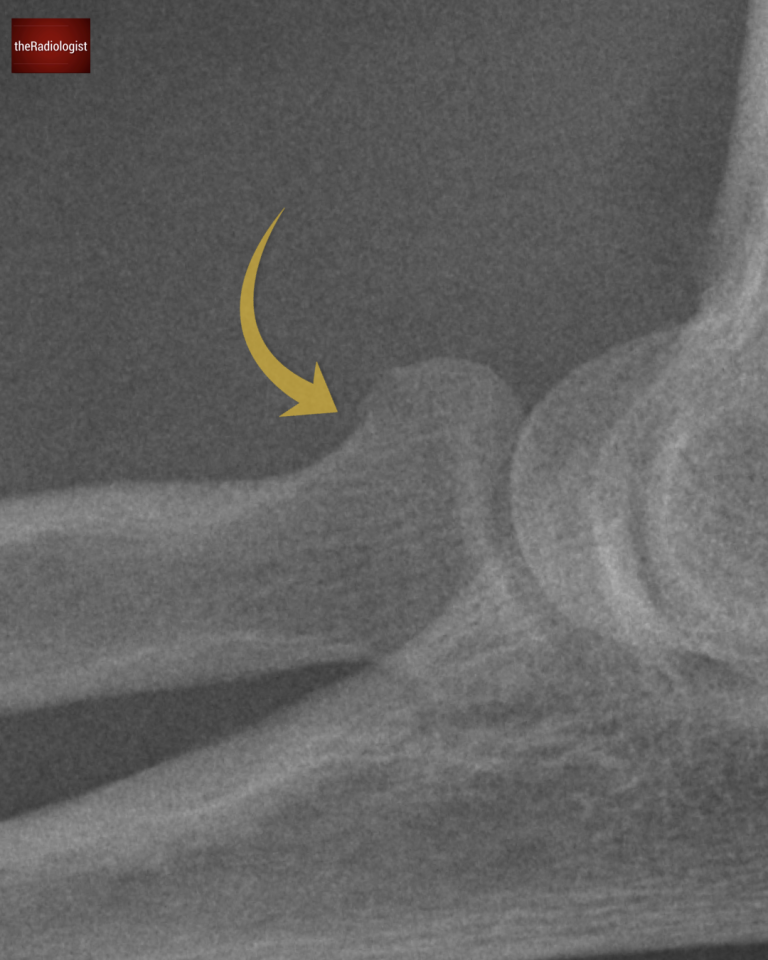
Here is a subtle case of a radial head fracture. Looking for secondary features such as abnormal fat pads can increase your confidence of a fracture.
7. Olecranon fracture
Relatively common in adults, often quite obvious as long as there is a good quality lateral elbow X-Ray. In terms of reporting these, mention if it extends to the articular surface (ie where it articulates with the trochlea) and if there is any displacement. The ulna nerve runs medial to the olecranon so can be involved.
8. Coranoid process fracture
Not common but can be missed, best seen on a lateral view. Can be associated with a ‘terrible triad’ injury where there is also elbow dislocation and radial head fracture.
Paediatric elbow X-Rays
Paediatric elbow X-Rays can be more difficult to assess than adult X-Rays: what makes them even more difficult are the different ossification centres that appear at different ages however this is fairly reproducible in that appear in the same order most of the time.
Let’s go through some of the nuances of paediatric elbow X-Rays:
Ossification centres
The ossification centres typically appear in the following order, spelling out ‘CRITOL’. Where this is important is if you see an apparent ossification centre that shouldn’t be there yet – this is likely to be an avulsion fracture rather than an ossification centre! Example: if you see a bone fragment in the region of the lateral epicondyle before the trochlea ossification has formed – this is most likely an avulsion fracture.
Note the lateral/external epicondyle can be wide of the humerus, this is often normal, but its lateral border should parallel the cortex of the humeral metaphysis.
So in each paediatric elbow X-Ray you see, spell out CRITOL, go in order and try to spot the appropriate ossification centre. If you find one that shouldn’t be there yet suspect a fracture if it goes with the site of pain.
- Capitellum: age 1
- Radial head: age 3
- Internal (medial) epicondyle: age 5
- Trochlea: age 7
- Olecranon: age 9
- Lateral (external) epicondyle: age 11

Elbow ossification centres in chilren.
Anterior humeral line
More important in kids (see the above review) as supracondylar fractures are more common in kids.
Pulled (nursemaid’s) elbow
This occurs when a sudden pull on the extended, pronated arm causes the radial head to slip out from under the annular ligament, ie a partial subluxation. The child often holds the arm slightly flexed and pronated, refusing to use it.
Note in these cases the X-Ray is usually normal and the diagnosis is clinical.
Review area checklist
Let’s summarise the above: below you’ll find an elbow X-Ray checklist to help you when you next review an elbow X-Ray.
| Review area | Notes |
|---|---|
| Soft tissues | Swelling can help identify the fracture |
| Articulations | Look for dislocation, posterior more common. |
| Radiocapitellar line | Assesses for radial head dislocation: line through radial neck intersects capitellum |
| Anterior humeral line | Assesses for supracondylar fracture: line down the anterior surface of the humerus intersects middle third of capitellum |
| Fat pads | Anterior fat pad can be present but not raised. Posterior fat pad should not be present. If rules disobeyed consider a fracture. |
| Radial head | Most common fracture site in adults. |
| Olecranon fracture | Fairly common fracture site. |
| Coranoid process fracture | Can be subtle. |
| Ossification centres | In kids, spell out CRITOL and look for ossification centres in order – if one appears that shouldn’t be there consider an avulsion fracture. |