How to read a facial bone X-Ray
Facial bone X-Ray anatomy, views and review areas
Introduction
Facial bone trauma is best assessed with CT which is more sensitive than plain radiographs. However facial bone X-Rays remain a first-line investigation in some settings. They are quick and accessible but are difficult to interpret so understanding the key anatomy, views and a systematic approach is essential to avoid missing fractures.
General facial bone anatomy
The facial skeleton is composed of 14 bones that provide the framework of the face, protect the orbits and upper airway, and support key functions such as mastication, speech, and respiration. These bones form a structurally complex region, closely related to the cranial base and paranasal sinuses, and are frequently involved in trauma. Let’s look at the main components of the facial skeleton.
Major bones
- Maxillae: Paired bones forming the central midface, contributing to the upper jaw, hard palate, nasal aperture, and inferior orbital rims. They house the upper dentition and form the floor of the maxillary sinuses.
- Mandible: The only mobile facial bone, forming the lower jaw and articulating with the temporal bones at the temporomandibular joints. It is the strongest facial bone and a common site of fractures.
- Zygomatic bones: Paired bones forming the cheek prominence and contributing to the lateral orbital wall and zygomatic arch.
- Nasal bones: Small paired bones forming the bridge of the nose, frequently fractured in facial trauma.
- Lacrimal bones: Small paired bones within the medial orbit, housing the nasolacrimal canal.
- Palatine bones: Paired bones forming the posterior hard palate and part of the nasal cavity and orbital floor.
- Inferior nasal conchae: Curved paired bones projecting from the lateral nasal wall, increasing surface area for humidification and filtration.
- Vomer: A single midline bone forming the inferior portion of the nasal septum.
On plain radiographs, the outlines of the maxillae, orbits, zygomas, mandible, and nasal bones should be traced carefully for cortical disruption, asymmetry, or displacement.
Sutures and articulations
The facial bones are joined by fibrous sutures, which normally appear as fine radiolucent lines on X-ray and CT. Important articulations include the frontomaxillary, zygomaticomaxillary, nasomaxillary, and zygomaticotemporal sutures. Disruption or diastasis of these sutures may indicate a complex midface fracture such as a Le Fort pattern.
Sinuses
The paranasal sinuses (maxillary, ethmoid, frontal, and sphenoid) are closely related to the facial bones and are often involved in trauma or infection. On X-ray, fluid levels within the maxillary antra can be a subtle clue to an orbital floor or maxillary fracture.
Neurovascular structures
The infraorbital, mental, and supraorbital foramina transmit branches of the trigeminal nerve and accompanying vessels, visible as small notches or lucencies on imaging. Disruption or asymmetry of these regions may help localise fractures. The alveolar canals within the maxillae and mandible carry the dental nerves and vessels, important to consider when assessing fractures involving the dental arches.
Symmetry and alignment
In the normal facial skeleton, paired structures such as the orbits, zygomas, and maxillary sinuses should appear symmetric. Loss of symmetry, cortical step-offs, or displacement are key radiographic signs of fracture. On plain films, this can be subtle, whereas CT offers much greater sensitivity and is the gold standard in acute trauma.
Facial bone X-Ray review system
Facial bone X-ray is being replaced by CT in many centres, but in some places in the world it is still first line in trauma. The film is busy and prone to composite shadowing, so use a fixed system. Nasal bone fractures are the most common but are hard to assess on a facial bone X-ray and their management is often conservative, so this review focuses on zygoma, orbit, and mandible which together cover the great majority of clinically important injuries.
The occipitomental (OM) projections are the standard plain films for assessing facial bones. The OM0 (Waters’ view) is taken with the orbitomeatal line at 45° to the detector and shows the orbits, maxillae, zygomatic arches, and maxillary sinuses. The OM30 view is angled further forward and projects the zygomatic arches, frontal processes, and orbital rims more clearly. Together, these two views provide complementary information on the midface, allowing assessment of fractures, sinus opacification, and orbital floor disruption.
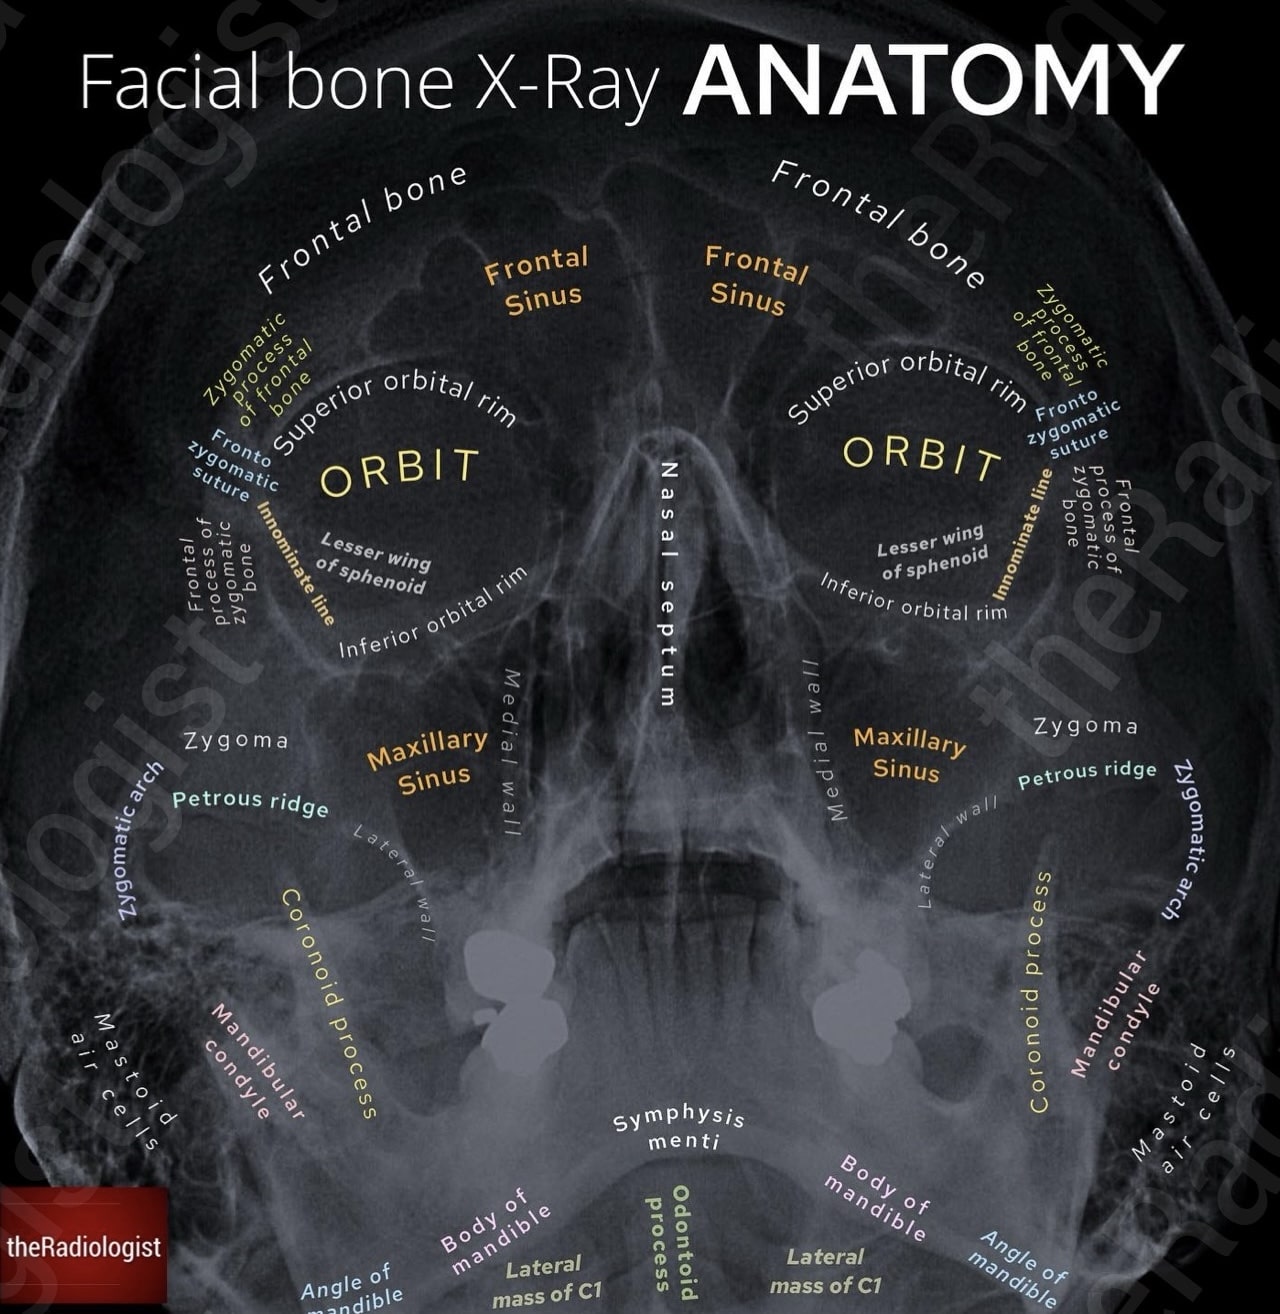
Annotated view of an OM0 (Waters’ view) facial bone X-Ray
Let’s go through a step-wise approach to approaching an occipito-mental facial bone X-Ray:
1. Look for a zygomaticomaxillary complex fracture
Begin by finding the zygoma, the keystone of the cheek, and then fan outwards in several directions. At each margin, carefully trace the cortex from end to end, looking for any break or step in the cortex that could represent a fracture. Comparing with the contralateral side can help prevent you being misled by normal variation or overlapping structures.
Classically, a blow to the cheek can result in fractures across these three or four points — the zygomaticomaxillary complex, sometimes termed a ‘tripod’ fracture. Depending on how many fractures there are, some authors use the term ‘quadripod’ fracture if there are four discrete fractures.
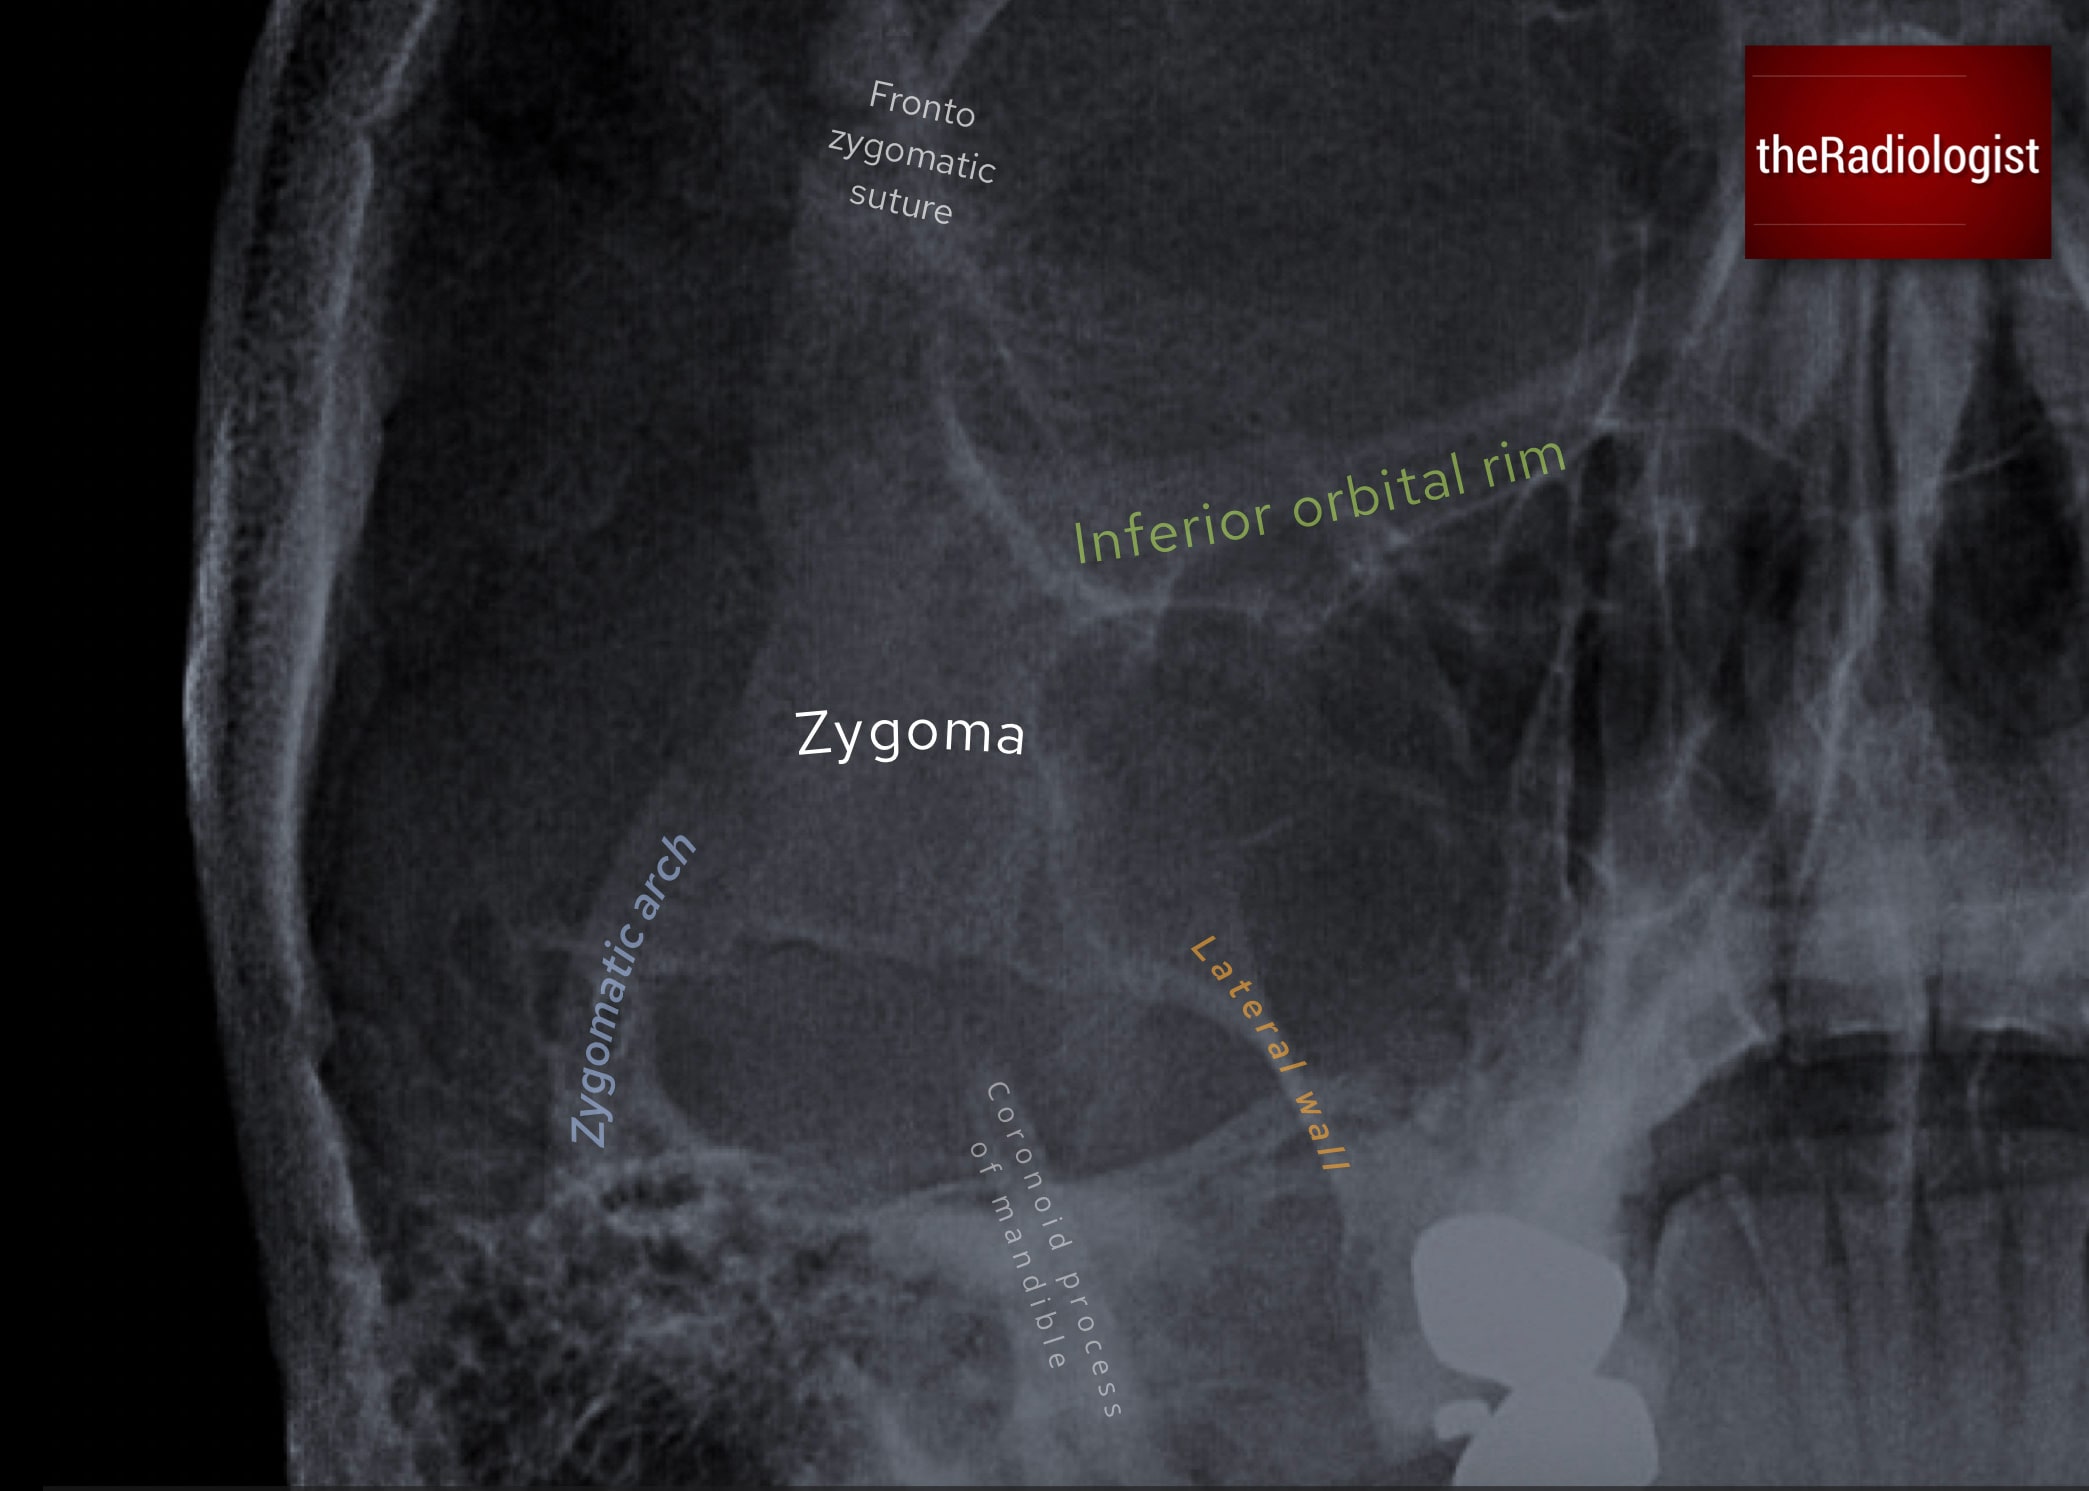
Find the zygoma and fan out in four directions looking for a fracture.
Fronto-zygomatic suture
First, go superiorly and assess the frontal process of the zygoma and its articulation with the frontal bone. A subtle widening or step at the fronto-zygomatic suture may be the only clue to a fracture at this site.

Go superiorly and assess the frontal process of the zygoma and compare the fronto-zygomatic suture with the other side to see if it is widened.
Inferior orbital rim
Next, track along the inferior orbital rim. Look for a sharp interruption or subtle depression of the rim’s normally smooth contour. Even small irregularities can be important in the context of trauma.
Zygomatic arch
Then sweep down along the zygomatic arch, sometimes described as the ‘elephant trunk’. Check for discontinuity or bowing, as even minimal displacement can indicate a fracture.
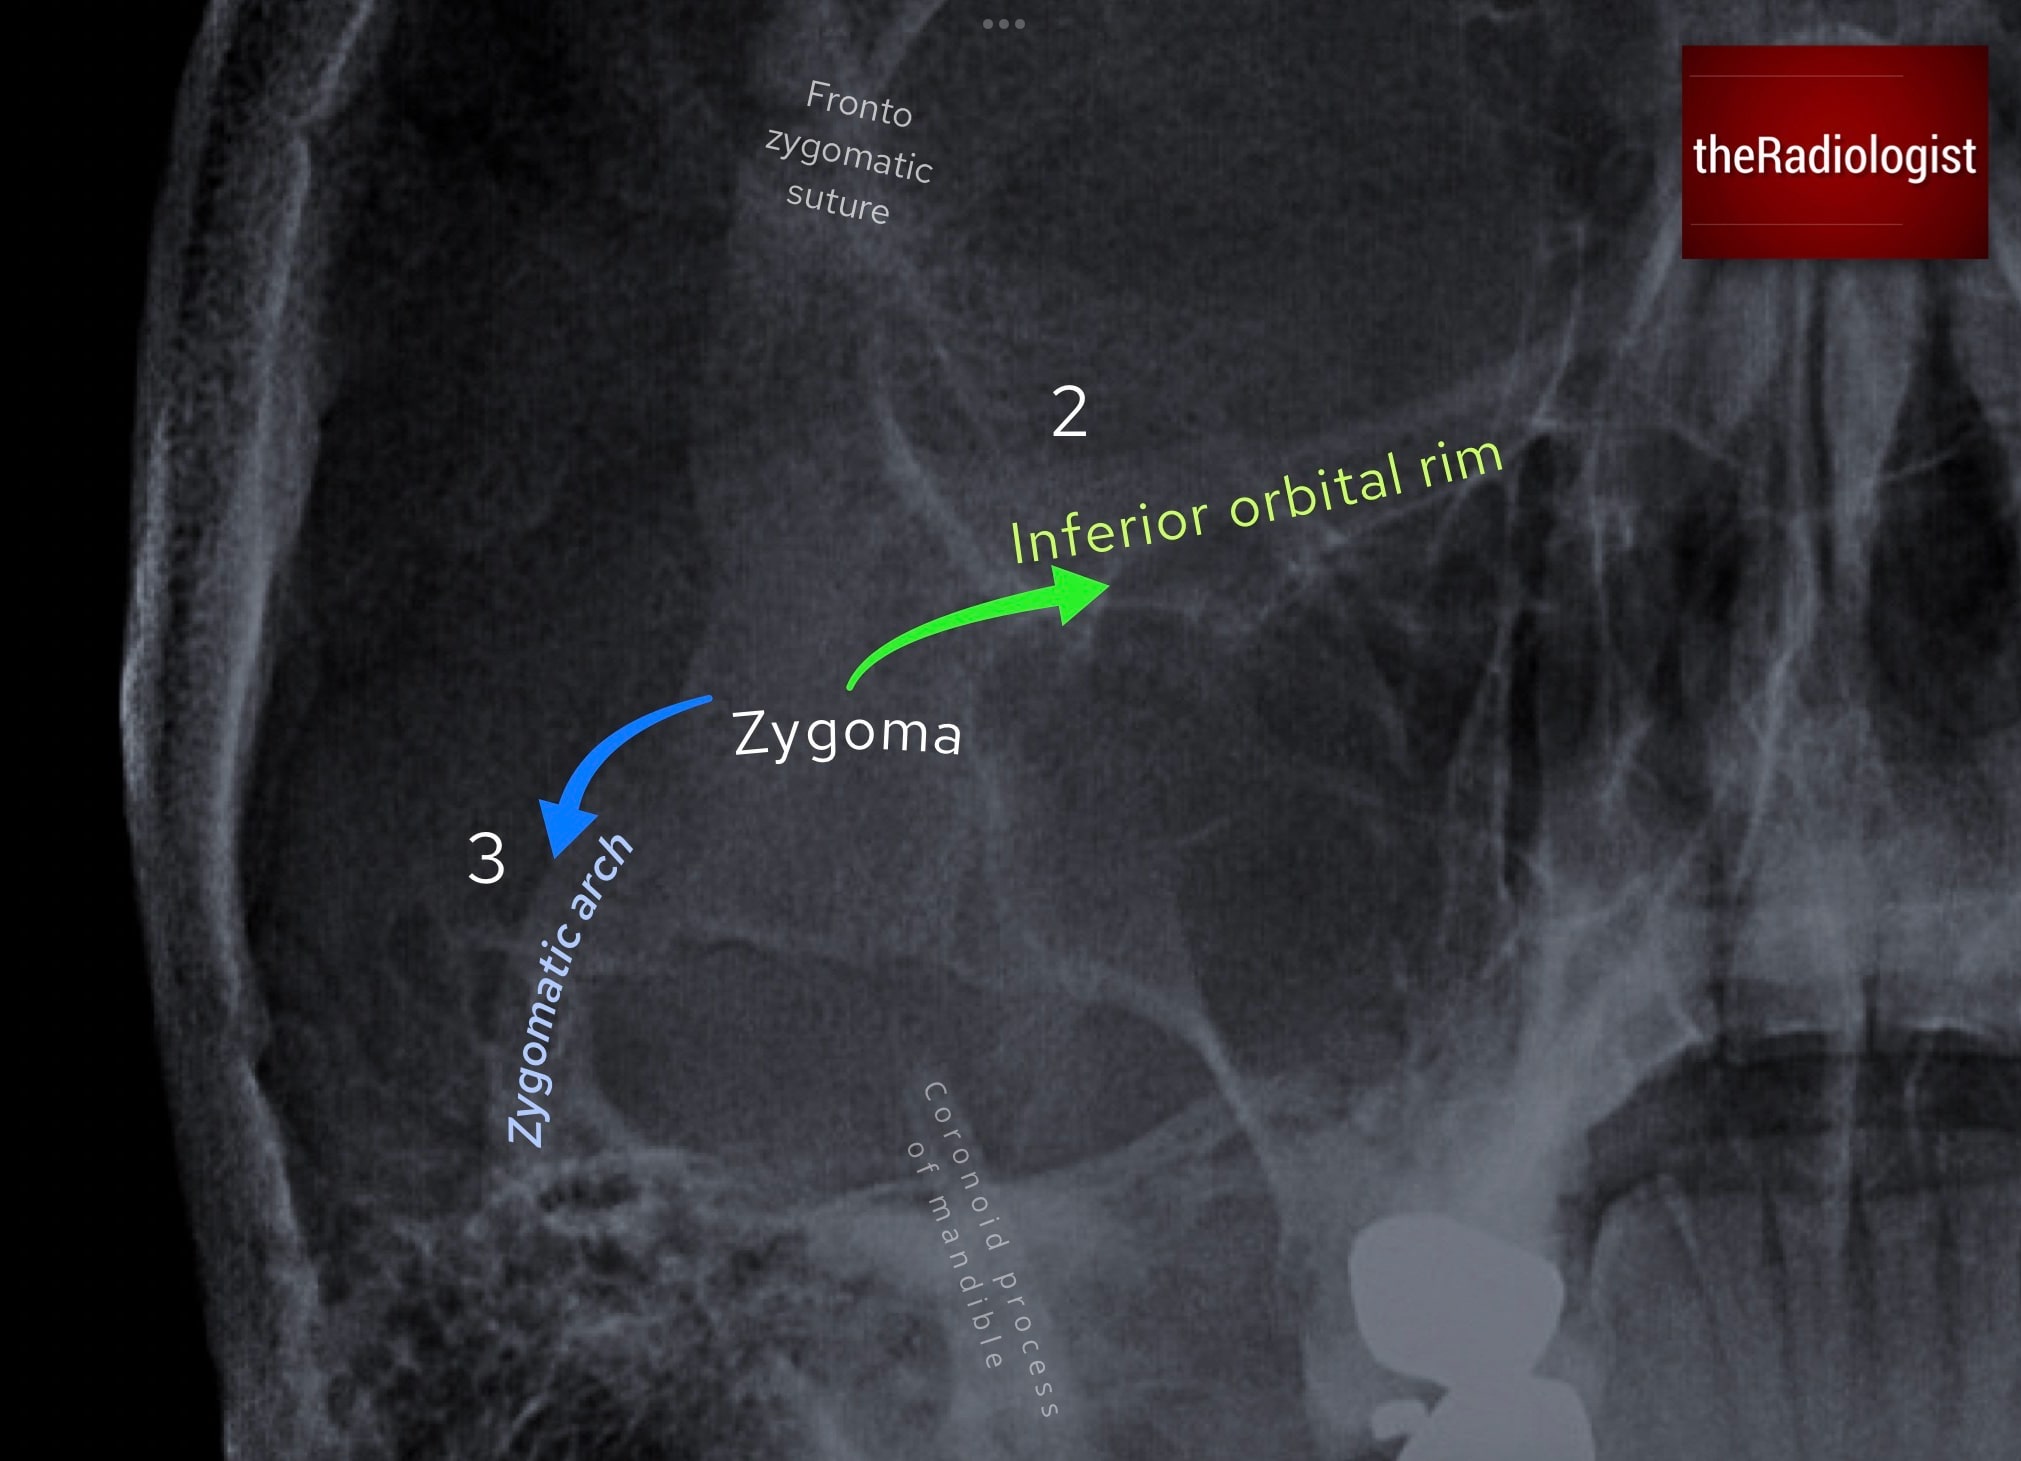
Next fan out along the inferior orbital rim and then the ‘elephant trunk’, ie the zygomatic arch.
Lateral wall of the maxillary antrum
Finally, trace the lateral wall of the maxillary sinus, another frequent fracture site. Loss of the crisp cortical margin or a step-off in this region is a red flag.
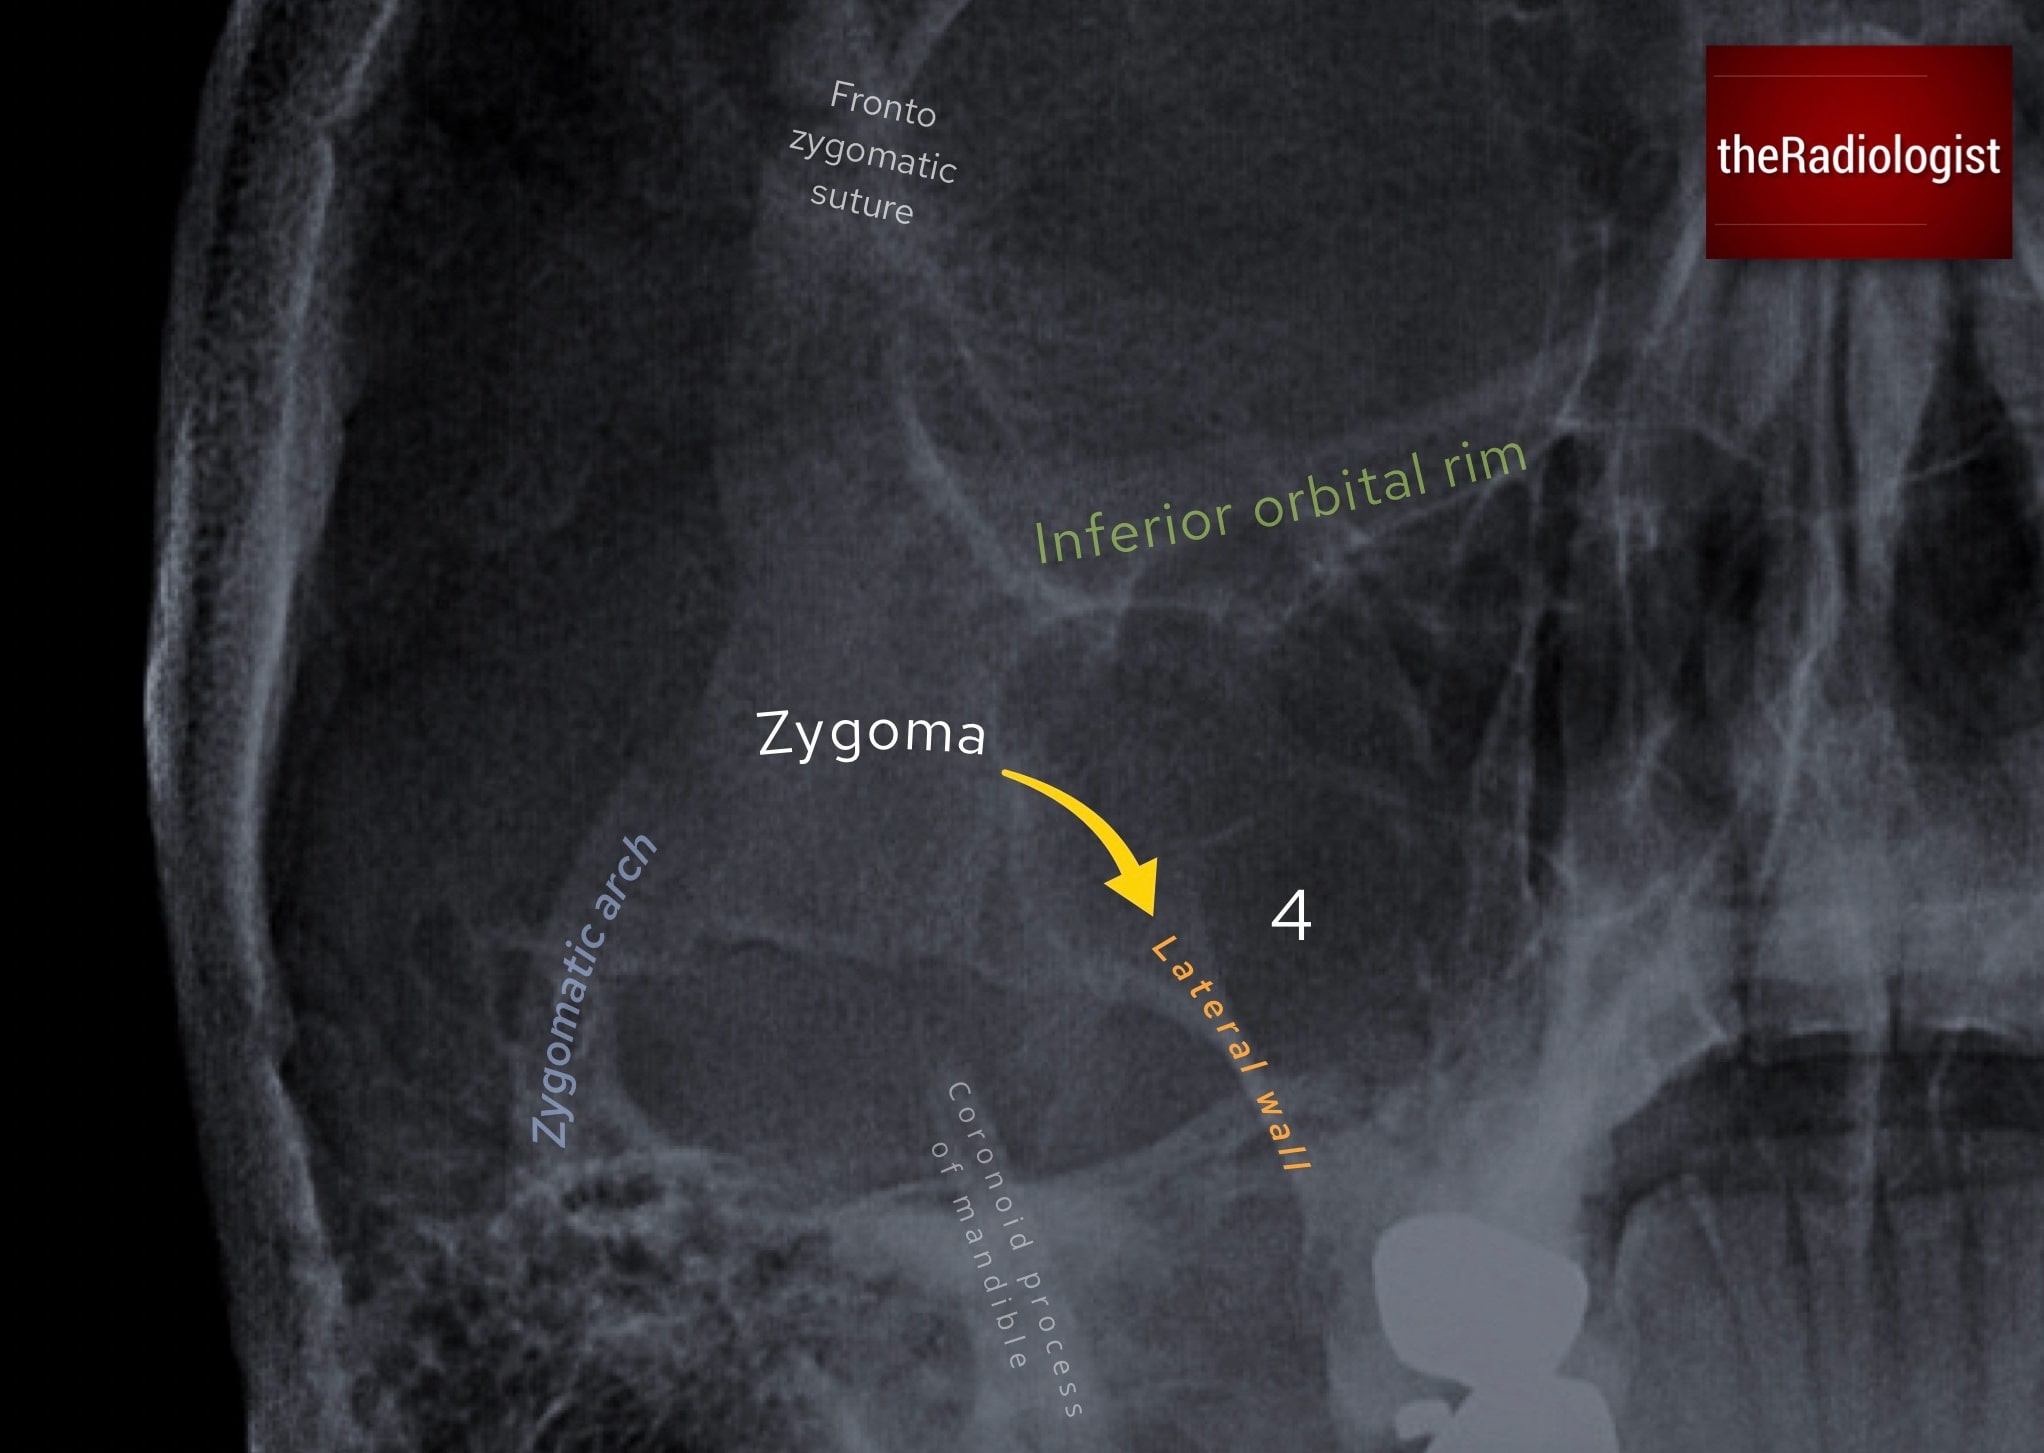
Lastly follow the lateral wall of the maxillary antrum.
2. Assess the orbits and maxillary antra
The next priority is to evaluate the orbits and maxillary sinuses, with particular attention to signs of an orbital blow-out fracture. These typically occur following blunt trauma with an object larger than the orbital aperture: a classic mechanism being a punch to the eye.
Black eyebrow sign
Look for a lucent rim at the superior margin of the orbit, sometimes called the black eyebrow sign. This represents intra-orbital gas and is a subtle but important secondary sign of orbital fracture.

Look for a lucent rim at the superior margin of the orbit.
Teardrop sign
Then examine the inferior orbital margin. A soft tissue ‘teardrop’ hanging below the rim suggests herniation of orbital fat or the inferior rectus muscle into the maxillary sinus.
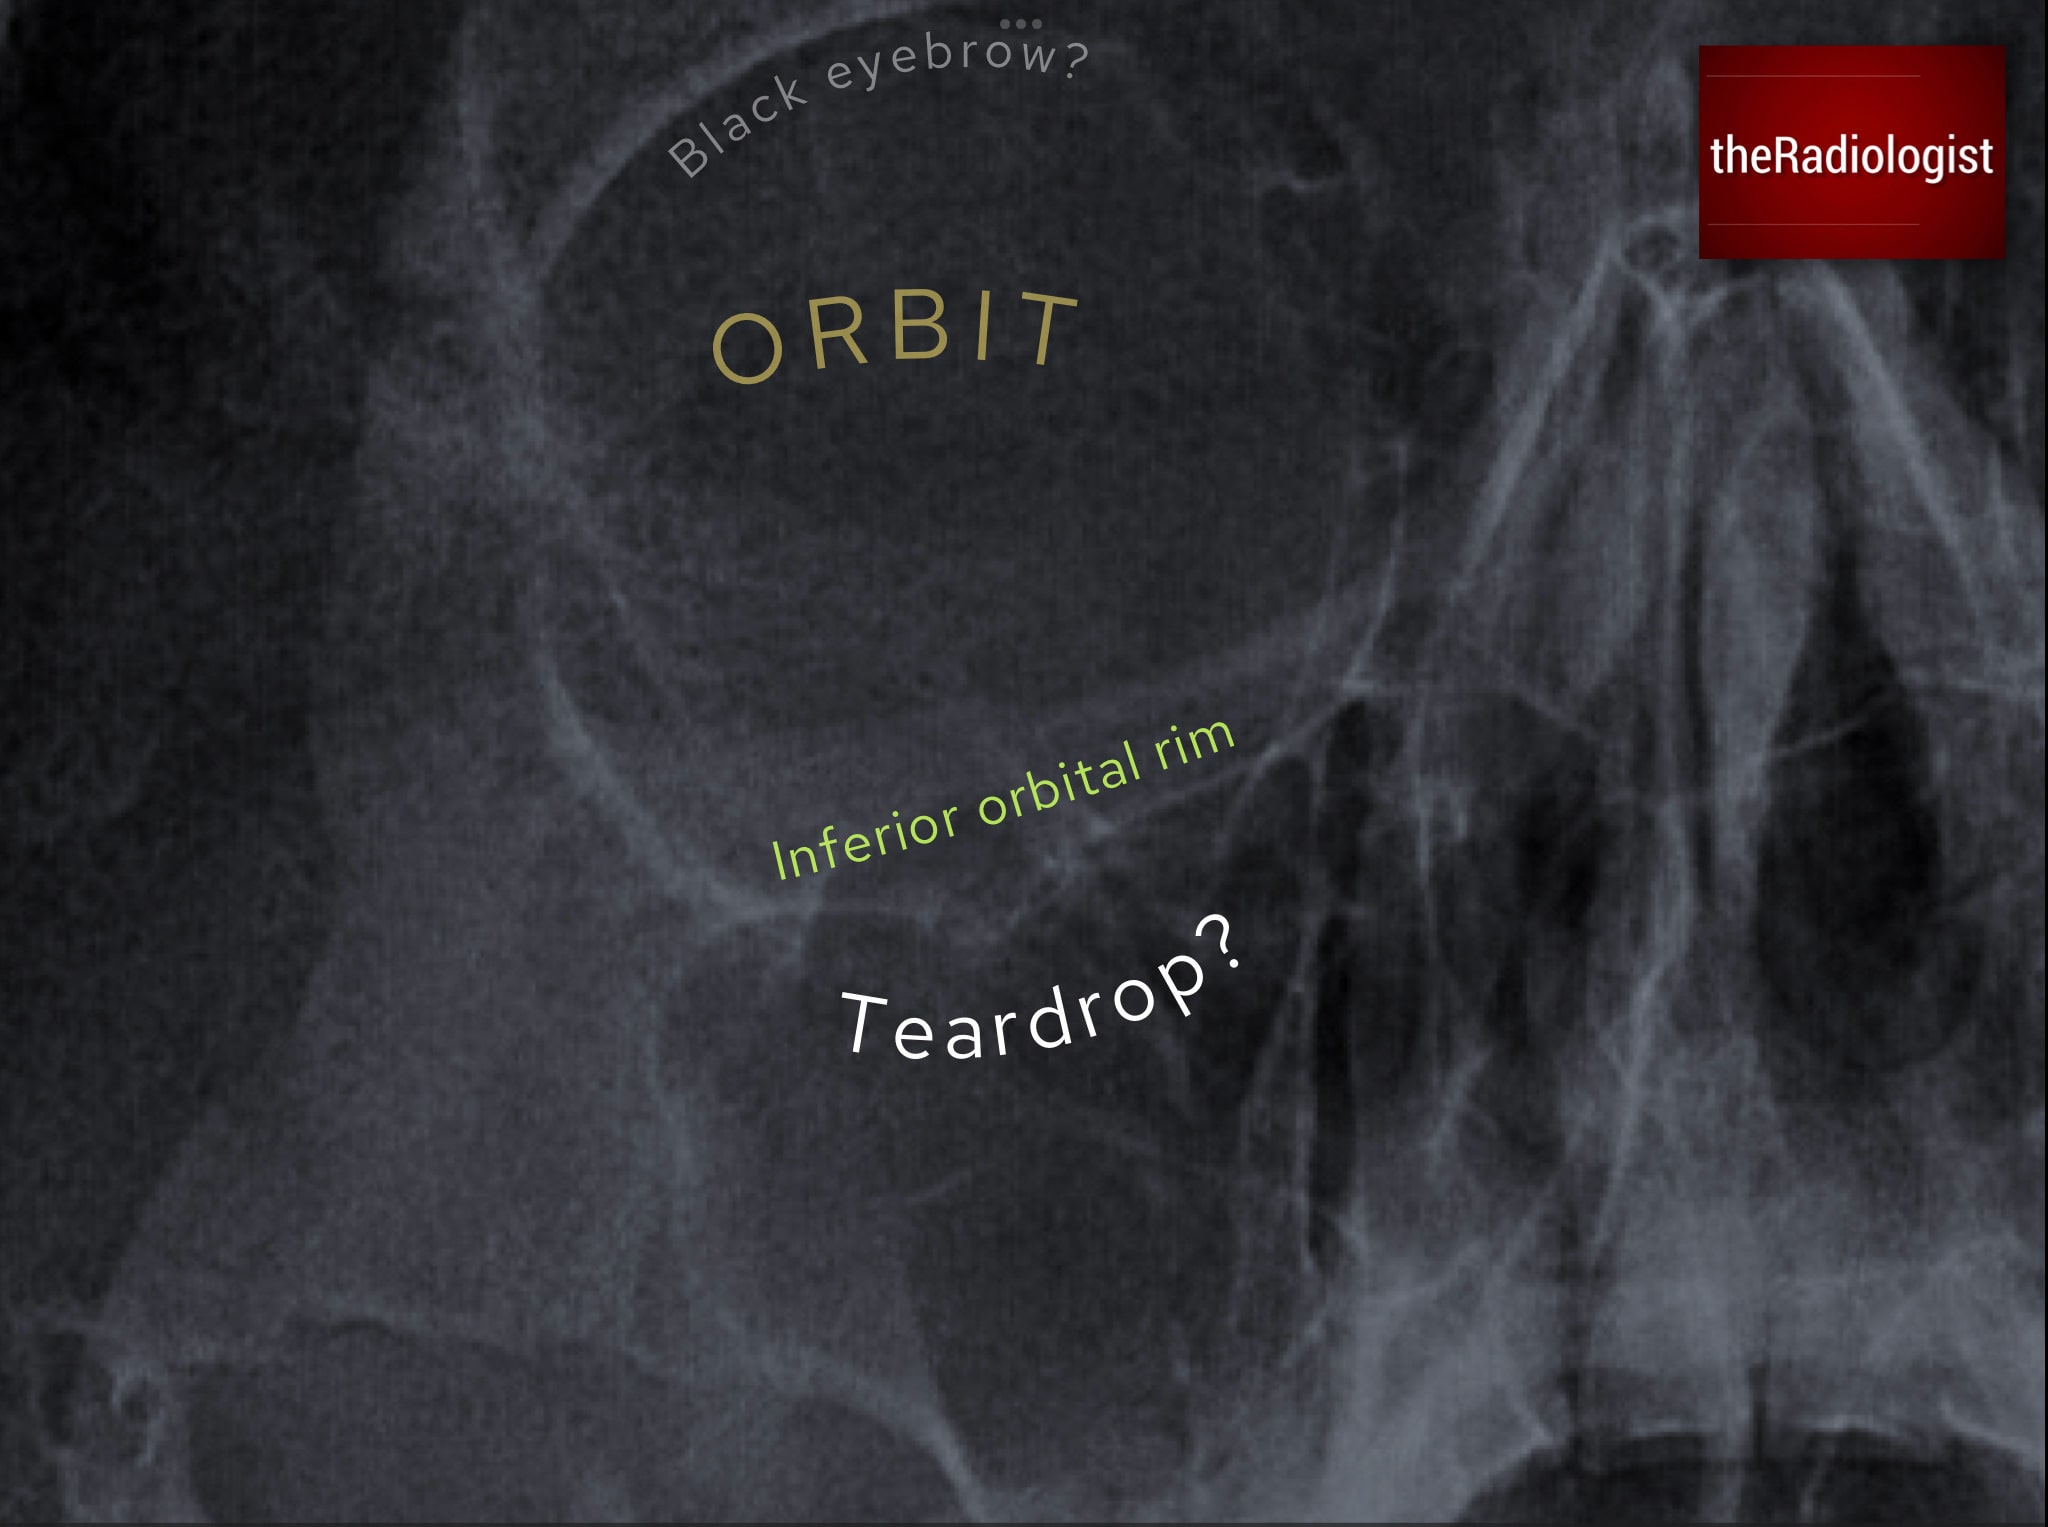
Look for soft tissue extending below the inferior orbital rim: a so-called ‘teardrop’.
Fluid level and walls of maxillary antra/orbit
Now screen all the walls of the orbit and maxillary antra before looking for a fluid level within the maxillary antrum. Beware however sinusitis can also cause an opacity here so the finding is not always acute.
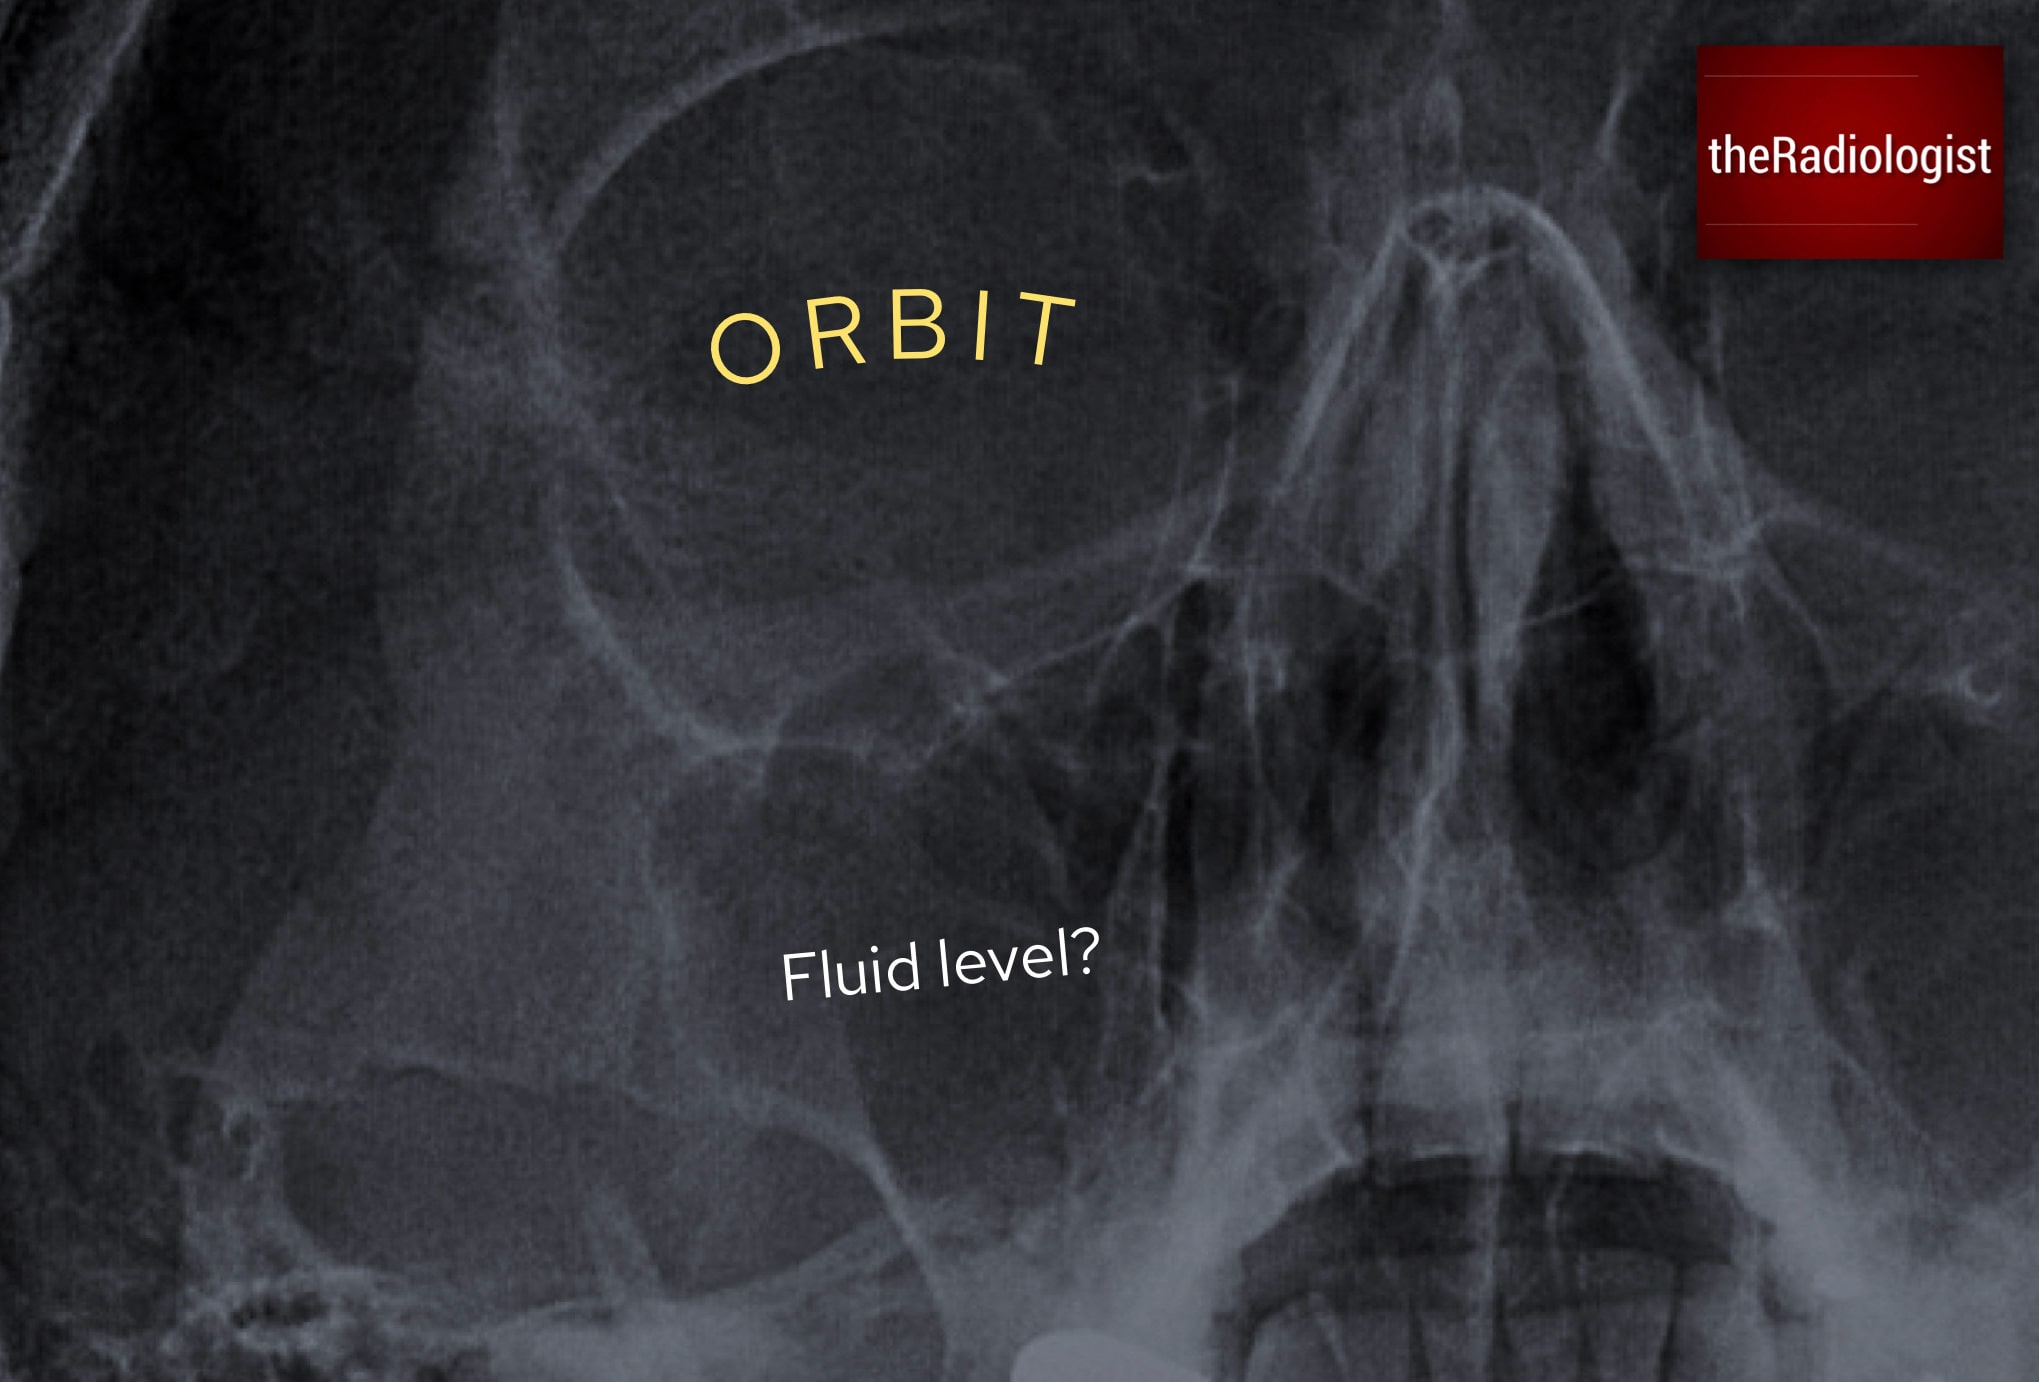
Now look for a fluid level within the maxillary antrum, being cautious not to overcall sinusitis as an acute finding.
KEY POINT
A black eyebrow sign and teardrop sign are both signs of an acute orbital blow-out fracture.
3. Assess the lower half
The last step is to sweep across the lower half of the film, tracing the mandible looking for a fracture. Think of the mandible as a ring structure: if there is one fracture, there is a high chance that there is another.
As you review the mandible, also cast an eye over the odontoid peg of C2, which often projects into the occipito-mental view: don’t miss an incidental peg fracture!
Review area checklist
Let’s summarise the above: below you’ll find a checklist to help you when you next review a facial bone X-Ray.
| Review area | Notes |
|---|---|
| Look for a zygomaticomaxillary complex fracture | Find the zygoma and then fan out in four directions looking for a fracture: frontozygomatic suture, inferior orbital rim, zygomatic arch and lateral wall of the maxillary antrum. |
| Assess the orbits and maxillary antra | Screen the walls of the orbits and maxillary antra then look for a ‘black eyebrow sign’, ‘teardrop sign’ and a fluid level within the maxillary antrum. |
| Screen the lower half | Screen the lower half of the facial bones particularly the mandible and visualised odontoid peg. |
Free guide: 20 Chest X-Ray signs you need to recognise
Downloaded by 10,000+ healthcare professionals.
Get 20 annotated chest X-ray signs with clear teaching points and explanations. Written by a Consultant Radiologist, this free guide is designed to help you recognise important findings more confidently when reviewing chest X-Rays.

More to explore
You’ve got the framework now let’s put it to work. Dive into a related case to see these findings on real images, or explore another guide to build out your systematic approach. That’s where it really starts to stick.
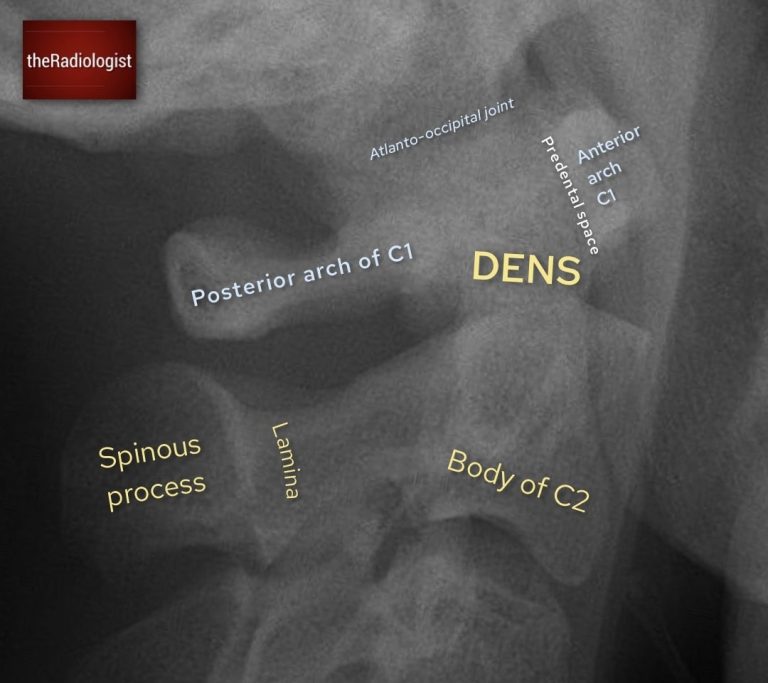
HOW TO READ A CERVICAL SPINE X-RAY
Learn about C-spine anatomy, alignment and peg view interpretation
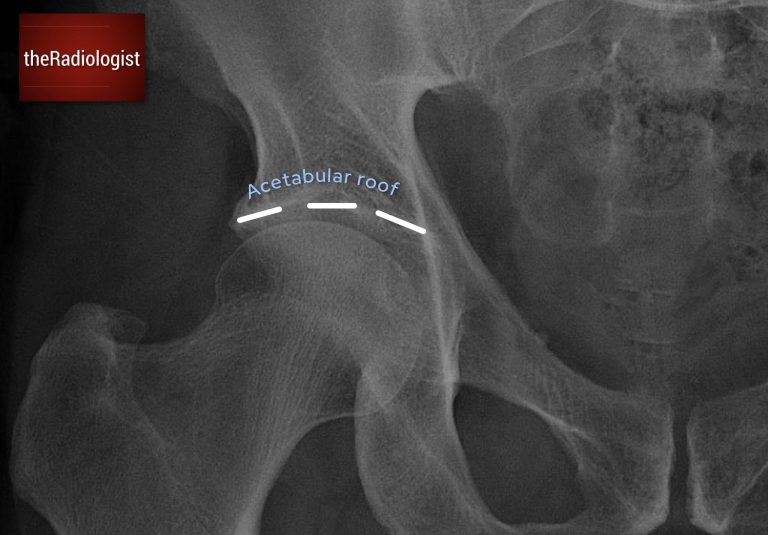
HOW TO READ A PELVIS X-RAY
Pelvis X-Ray anatomy, alignment and fracture review areas
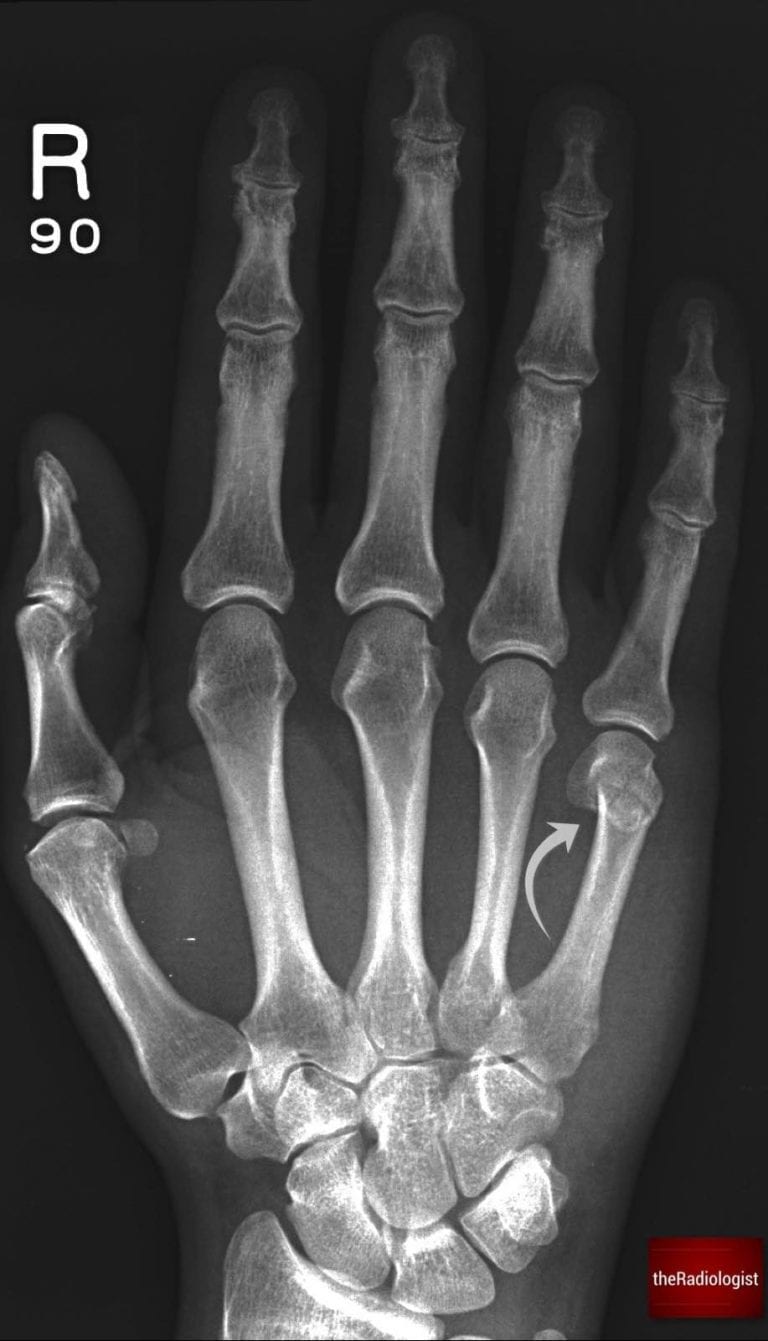
HOW TO READ A HAND X-RAY
Hand and wrist X-Ray anatomy, views and key review areas