
How to read a lumbar spine X-Ray
Lumbar spine X-Ray anatomy, AP and lateral views and alignment checks
Introduction
The lumbar spine carries the greatest load of the vertebral column and is a common site of pain, injury, and degenerative change. X-Rays remain a useful first-line investigation for assessing alignment, fractures, and disc spaces, even though CT and MRI provide far greater detail. A structured approach helps ensure important findings are not overlooked.
General lumbar anatomy
The lumbar spine, situated between the thoracic region and sacrum, comprises five robust vertebrae (L1–L5) designed for weight-bearing, stability, and a broad range of movement. These vertebrae are notably larger than cervical and thoracic ones, reflecting their crucial role in supporting the upper body.
Vertebrae
Each lumbar vertebra features a large vertebral body and a triangular vertebral foramen. Between them lie the intervertebral discs acting as shock absorbers, composed of an outer annulus fibrosus and an internal gel‑like nucleus pulposus. On MRI, these discs appear bright on T2-weighted images whilst decreased signal intensity reflects degeneration.
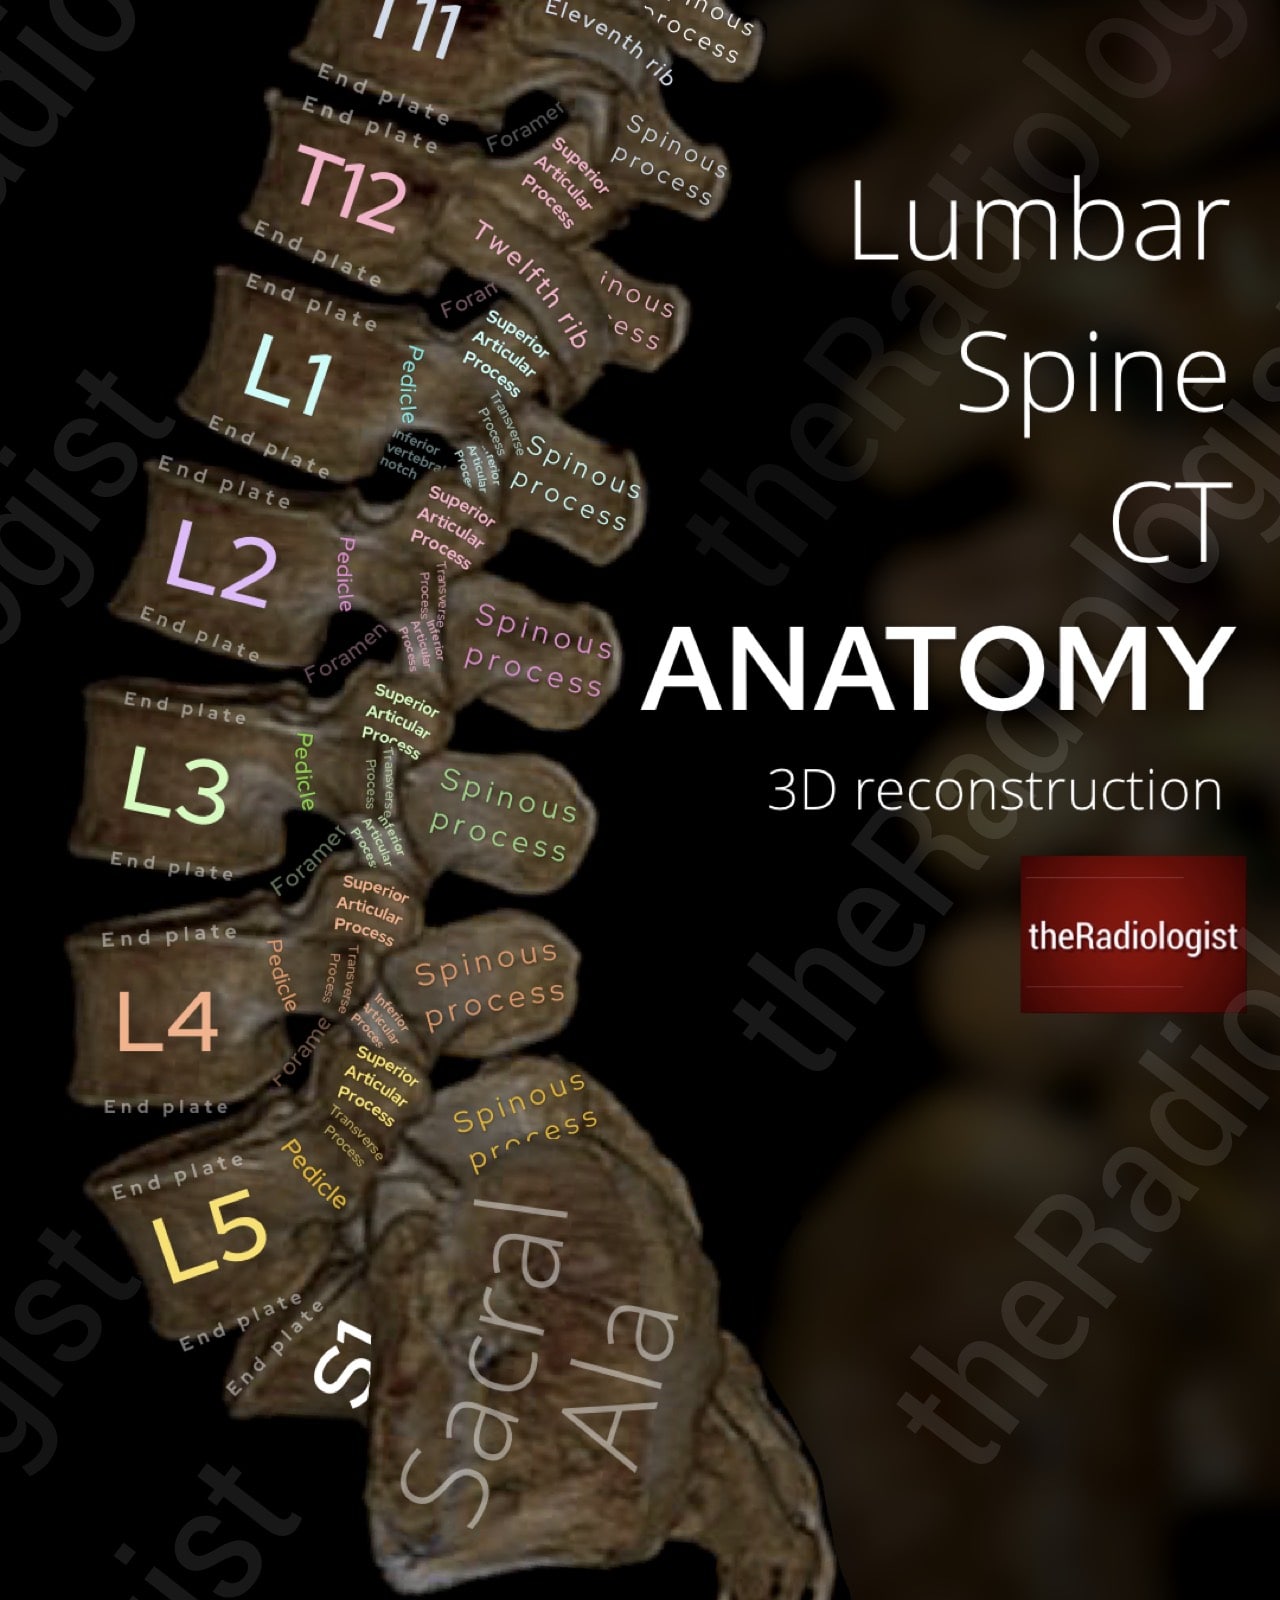
3D reconstruction of a lumbar spine CT showing the bony anatomy of the lumbar vertebrae and posterior elements.
Articulations and motion
Posteriorly, the lumbar vertebrae articulate through paired facet (zygapophyseal) joints. These joints are oriented primarily in the sagittal plane in the upper lumbar levels, facilitating flexion and extension, but become more coronally oriented at L5–S1, providing resistance against anterior translation. This transition makes L4–L5 and L5–S1 common sites for spondylolisthesis and degenerative change. Overall, the lumbar spine permits considerable flexion and extension, limited lateral flexion, and very little axial rotation.
Ligaments
Several strong ligaments stabilise the lumbar spine. The anterior longitudinal ligament runs along the anterior vertebral bodies, resisting hyperextension, while the posterior longitudinal ligament lies within the canal, limiting flexion but is narrower in the lumbar region, contributing to the tendency for posterior-lateral disc herniations. The ligamentum flavum connects the laminae of adjacent vertebrae; it is highly elastic, but with age it can thicken and buckle inward, contributing to central canal stenosis. Additional stabilisation is provided by the interspinous and supraspinous ligaments posteriorly.
Neurological structures
The spinal cord typically terminates around the L1–L2 level, giving rise to the cauda equina: a collection of descending lumbar and sacral nerve roots. These roots exit the spinal canal via the intervertebral foramina, named according to the vertebra above. For example, the L4 nerve roots exit at the L4–L5 level. Because of this arrangement, a disc herniation at L4–L5 most commonly compresses the L5 nerve root. This anatomical relationship is crucial when interpreting both axial MRI and cross-sectional imaging. corresponding vertebrae.
Alignment and curvature
In normal posture, the cervical spine demonstrates a gentle lordotic curve. Loss or reversal of this curve may be associated with muscle spasm, degenerative change, or trauma. Alignment is assessed using the anterior vertebral, posterior vertebral, and spinolaminar lines on lateral radiographs and sagittal MRI.
Vascular and muscular relationships
The lumbar spine is supplied segmentally by branches of the abdominal aorta. These vessels give rise to spinal branches that pass through the intervertebral foramina to supply the vertebral bodies, dura, and nerve roots.
Surrounding the lumbar spine are powerful muscular groups: anteriorly the psoas major and iliacus, and posteriorly the erector spinae and multifidus muscles. These provide dynamic stability and play a major role in posture and movement. On MRI, changes in muscle bulk or signal intensity can suggest chronic denervation or biomechanical imbalance.
Lateral lumbar spine X-Ray review areas
Now let’s go through a system for reviewing a lumbar spine X-Ray starting with the lateral view.
The lateral lumbar spine X-ray is often the first step when assessing back pain or injury. It’s quick, inexpensive, and gives a good overview of vertebral alignment, body height, and disc spaces. The downside is that it can miss things: subtle fractures are better seen on CT, and MRI is far superior for discs, nerves, and the spinal canal. They also mean a dose of radiation unlike MRI. Even so, X-rays are still widely used, and a clear, step-by-step approach to reviewing them helps make sure nothing important is overlooked.
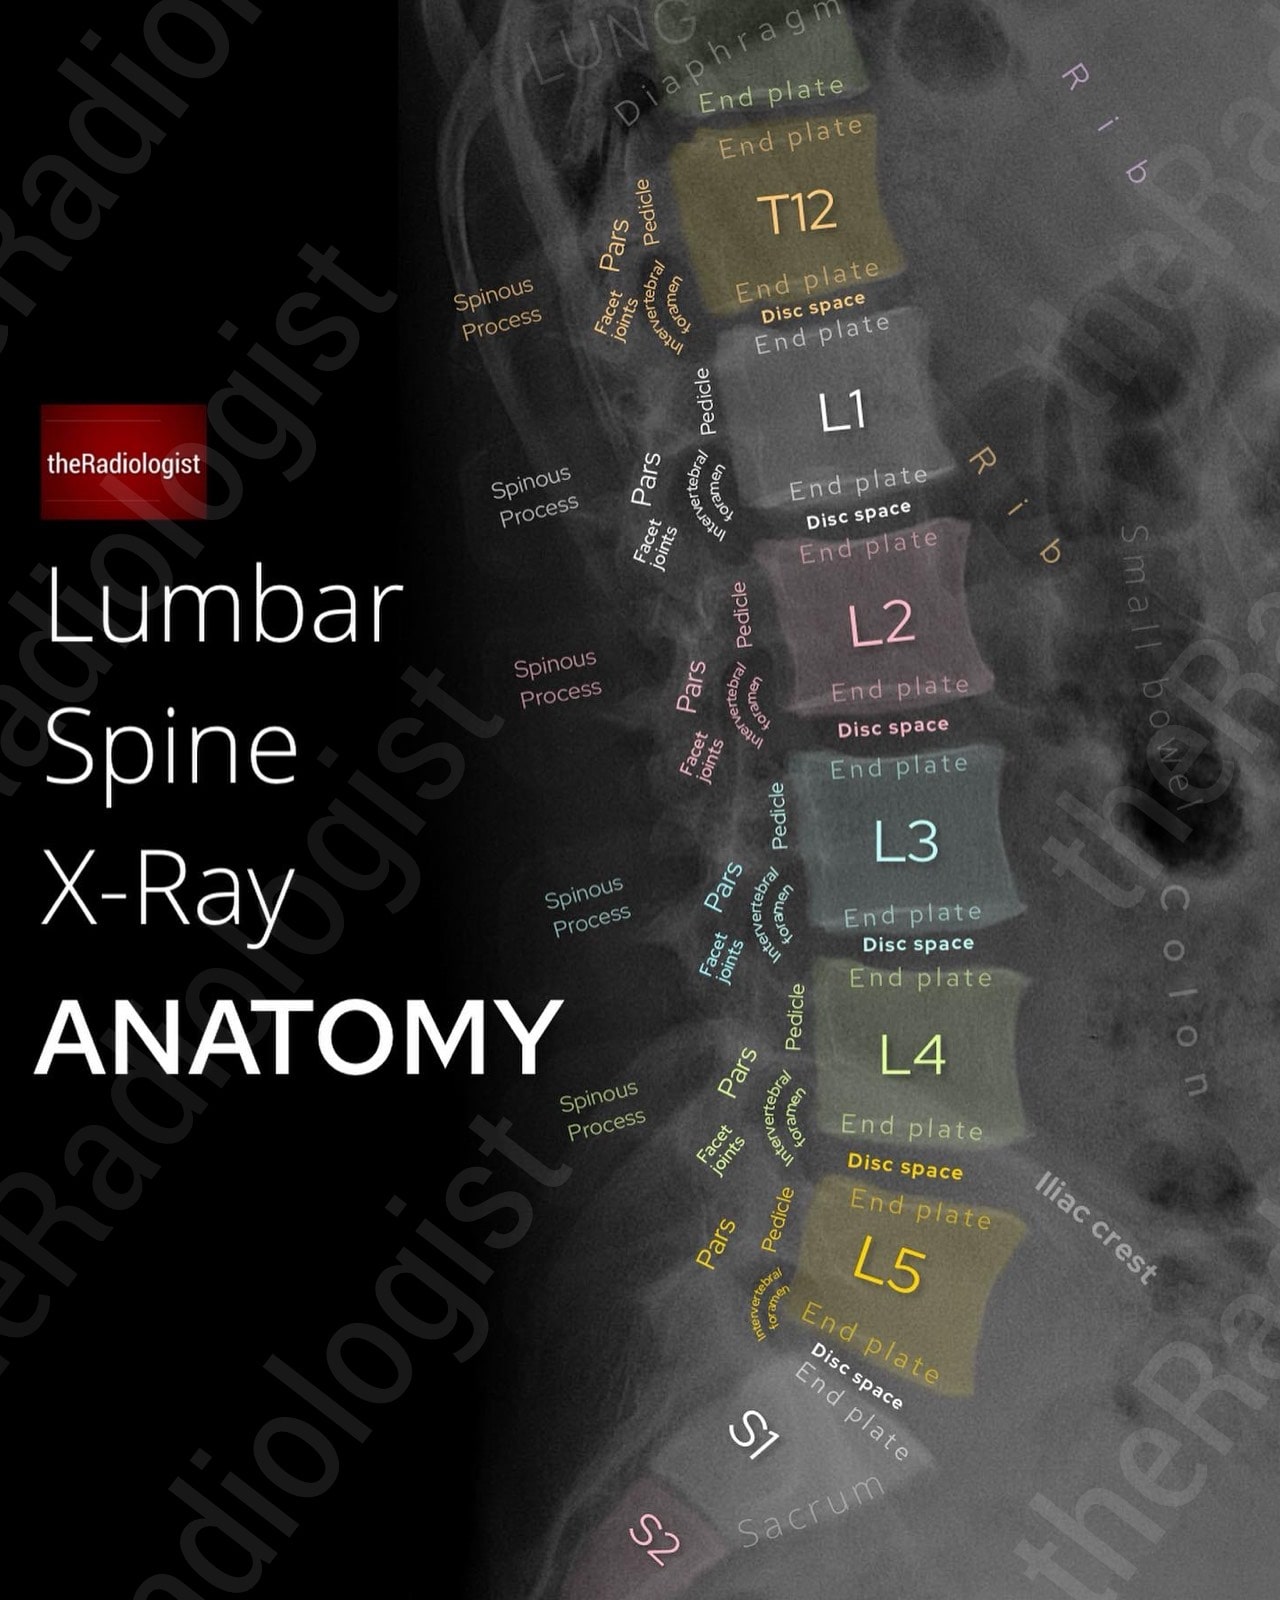
Annotated view of a lateral lumbar spine X-Ray
1. Alignment
Begin by checking the overall alignment of the lumbar spine. The vertebral bodies should form a smooth lordotic curve without any step or offset. Pay particular attention to anterior and posterior vertebral body margins, looking for translation. Anterior or posterior displacement of one vertebra on another indicates spondylolisthesis. This most commonly occurs at L4-5 and L5-S1 and may result from a defect in the pars interarticularis, degenerative changes in the discs and facet joints, trauma, or congenital abnormalities.
2. Outline the vertebral bodies
Trace each vertebral body. Confirm that height is preserved and that there are no wedge deformities, which may indicate a compression fracture. Loss of anterior height only suggests a flexion injury, while multiple biconcave or ‘fish-shaped’ vertebrae points towards osteoporotic vertebral collapse. Endplate irregularity can simply relate to degenerative disease but can also be seen in trauma, infection, or tumour, so be careful when assessing the endplates.
3. Disc spaces
The intervertebral disc spaces should be uniform and maintain expected height relative to adjacent levels. Narrowing most often reflects degenerative disc disease, but the clinical context is important. In suspected infection (spondylodiscitis), look for both loss of disc space and erosion of the adjacent vertebral endplates: though MRI remains more sensitive and specific in this setting. Conversely, isolated disc space narrowing with intact endplates is more likely degenerative. The clinical context is important here, so correlate clinically (!).
4. Posterior elements
Although more difficult to evaluate on lateral radiographs due to overlap, the posterior elements are a crucial review area. The pedicles appear just posterior to the vertebral bodies, and following these back leads to the pars interarticularis. Defects here can contribute to a spondylolisthesis. The facet joints, formed by the superior and inferior articular processes, are often difficult to assess on lateral films as you are seeing both sides superimposed. Still, you may detect gross degenerative changes such as hypertrophy or malalignment.
5. Sacrum and coccyx
Trace the sacrum carefully, ensuring continuity of its cortical outline. Sacral fractures are easily missed, especially in osteoporotic or trauma patients, as they may be subtle. If the coccyx is visible, include it in your review. Though less clinically relevant, coccygeal fractures or angulations can occasionally explain focal pain.
6. Remaining structures
Once the spine has been fully assessed, do not forget the surrounding soft tissues. The lung bases, diaphragm, and visible bowel loops should all be checked. Sometimes incidental pathology such as bowel obstruction, renal calculi, or lung lesions will be first seen on spinal radiographs.
KEY POINT
Don’t neglect the AP view: it highlights some areas not readily visible on the lateral view.
AP lumbar spine X-Ray review areas
I consider the lateral view as the ‘primary’ view for picking up most pathology but there are certain things that lend themselves to being better picked up on the AP view. Let’s go through a review system for the AP view.
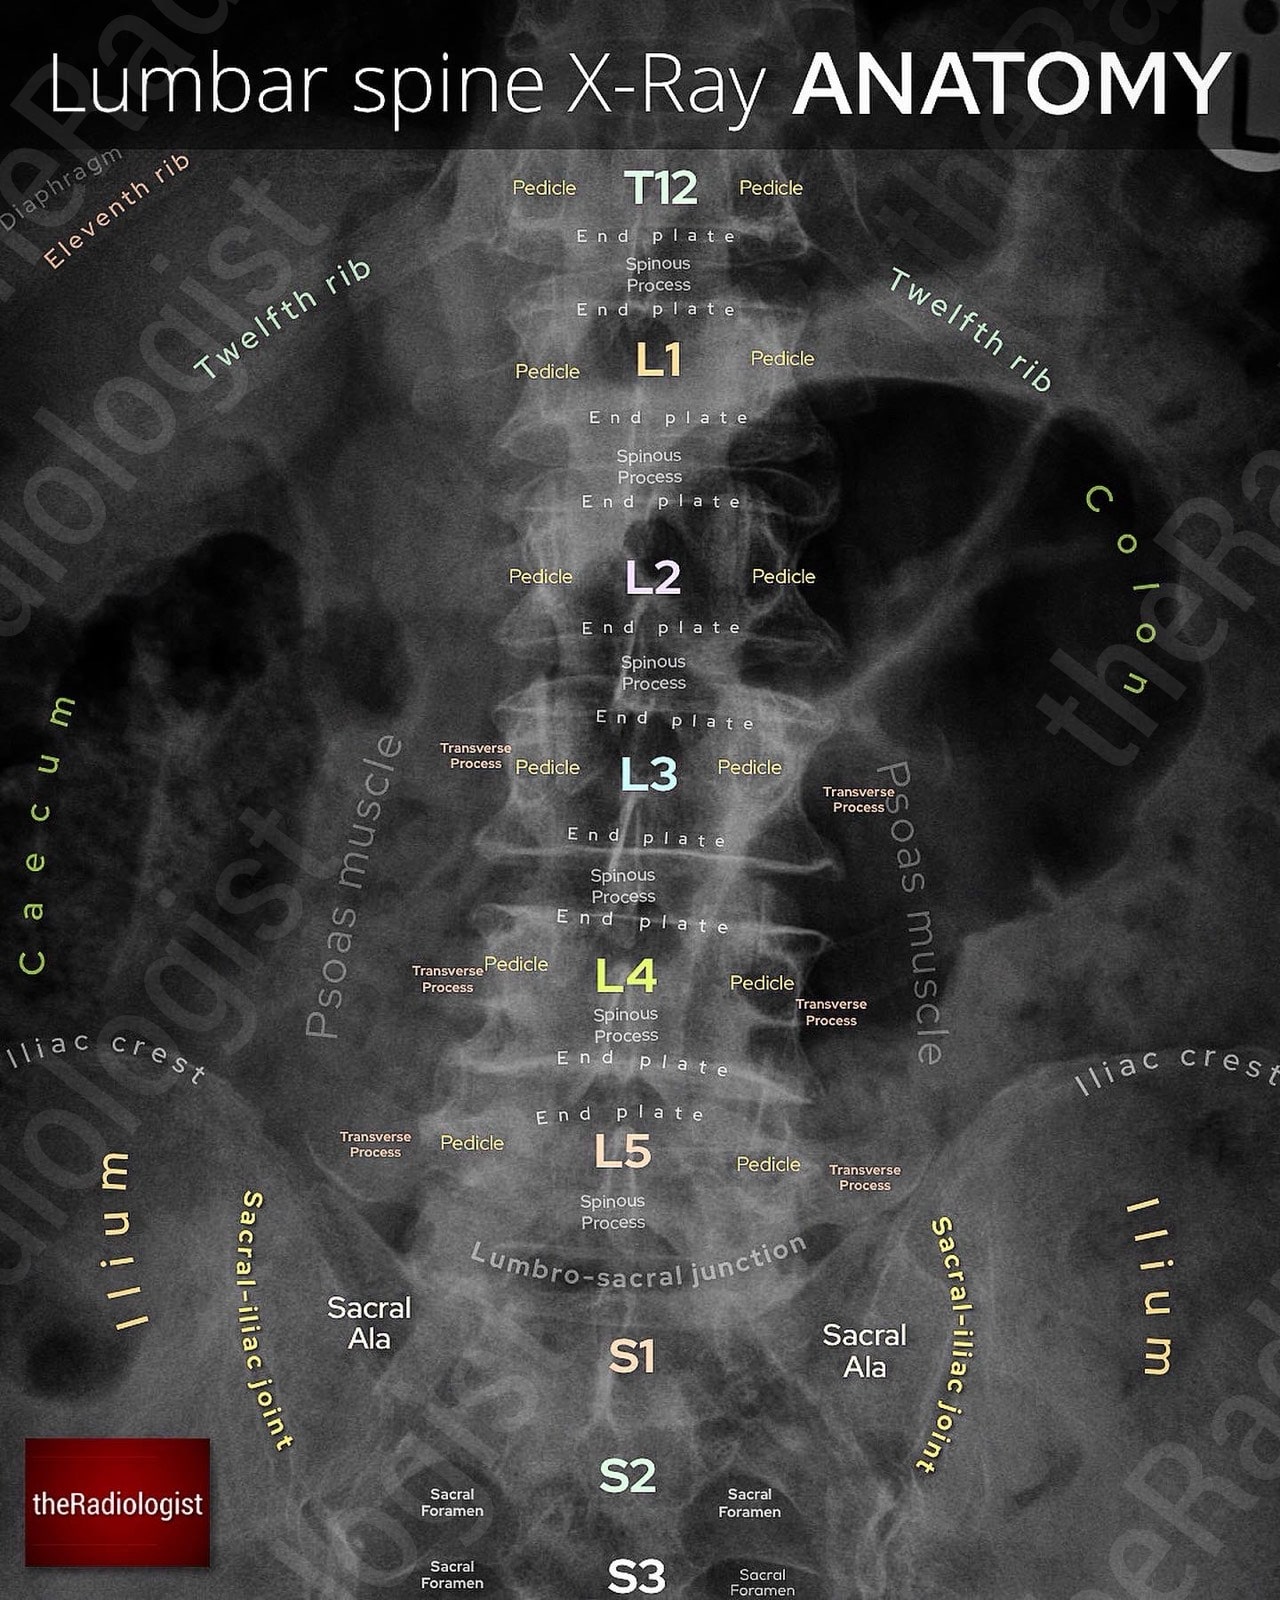
Annotated view of an AP lumbar spine X-Ray
1. Alignment
Start by checking overall alignment. The AP view is the best place to assess scoliosis because you can see any curvature much more clearly than on the lateral film. The spinous processes should form a straight vertical line in the midline. If they deviate to one side, think about scoliosis or rotation.
2. Pedicles
The pedicles should be visible as paired, symmetric ‘owl’s eyes’ at each vertebral level. If one appears absent, eroded, or asymmetric, this can mean a ‘winking owl sign’ and you need to consider an aggressive lesion such as metastasis or myeloma. This can be really subtle and the only abnormality on the film so make sure you look for each and every pedicle. Note though rotation or overlying bowel gas can mimic a missing pedicle however the absence of a pedicle usually calls for cross-sectional imaging.
3. Outline the vertebrae
Carefully trace the margins of each vertebral body, paying attention to vertebral body height, whether the cortex is maintained and the status of the endplates. Loss of height, step-offs, or erosion may point to fracture, infection, or degenerative change. Correlating with the lateral film can help you decide whether collapse is anterior, posterior, or uniform.
4. Transverse processes
Although they can be difficult to see, it is worth trying to identify the transverse processes. Fractures here are important, as they are often markers of high-energy trauma and can be associated with retroperitoneal injury. Focal lesions in the transverse processes may also suggest aggressive disease.
5. Psoas muscles
If the image quality allows, try to follow the lateral borders of the psoas muscles. These shadows may be displaced or obscured by haematoma, abscess, or retroperitoneal masses. In some cases, gas outlining the psoas margin can point to retroperitoneal perforation.
6. Ribs
If the lower ribs are included on the film, check them carefully for fractures. Rib fractures can be overlooked on a lumbar study, but identifying them may provide an explanation for localised pain or trauma.
7. Lung bases
Finally, if the lung bases are visible at the top of the film, take a moment to inspect them. Consolidation, pleural effusion, or even a mass can sometimes be seen incidentally. These findings are clinically significant and may be missed if your review is focused solely on the spine.
Review area checklist
Let’s summarise the above: below you’ll find achecklist to help you when you next review a lumbar spine X-Ray.
| Projection | Review area | Notes |
|---|---|---|
| Lateral | Alignment | Should be lordosis. Check there is no translation. Most common at L4-5 and L5-S1. |
| Outline vertebral bodies | Check vertebral body heights and vertebral endplates. | |
| Disc spaces | Check for narrowing/irregular endplates. | |
| Posterior elements | Look for facet joint hypertrophy and pars defects if visible. | |
| Sacrum and coccyx | Assess outline looking for fractures. | |
| Remaining structures | Check the lung bases, diaphragm and visible bowel loops. | |
| AP | Alignment | Check for scoliosis. |
| Pedicles | Ensure can see all pedicles – a missing pedicle could mean an aggressive lesion (‘winking owl sign’). | |
| Outline the vertebrae | Check vertebral body height and vertebral endplates. | |
| Transverse processes | Ensure no fracture or erosion. | |
| Psoas muscles | Look for expansion or displacement by retroperitoneal haematoma or mass. | |
| Ribs | Look for fractures or erosion. | |
| Lung bases | Ensure no consolidation, pleural effusion or lung mass. |
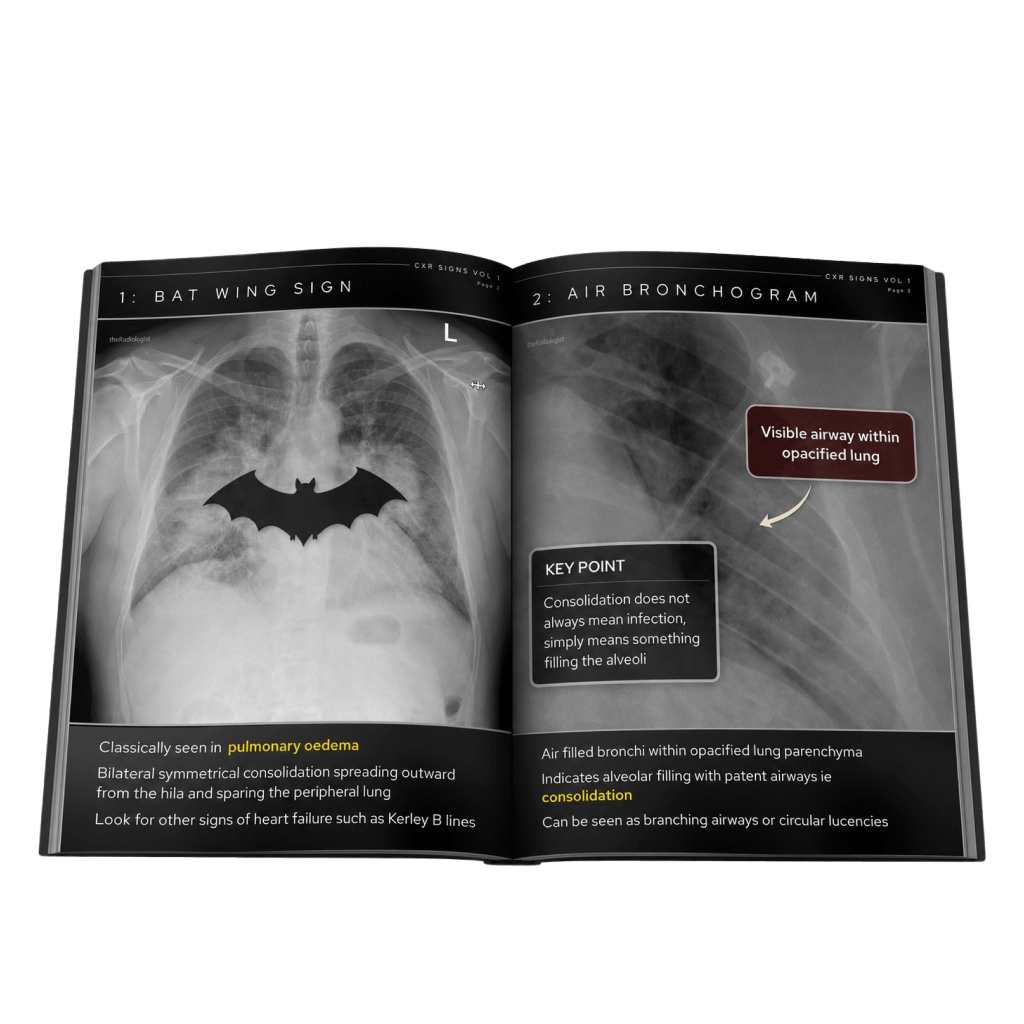
Free guide: 20 Chest X-Ray signs you need to recognise
Downloaded by 10,000+ healthcare professionals.
Get 20 annotated chest X-ray signs with clear teaching points and explanations. Written by a Consultant Radiologist, this free guide is designed to help you recognise important findings more confidently when reviewing chest X-Rays.


More to explore
You’ve got the framework now let’s put it to work. Dive into a related case to see these findings on real images, or explore another guide to build out your systematic approach. That’s where it really starts to stick.
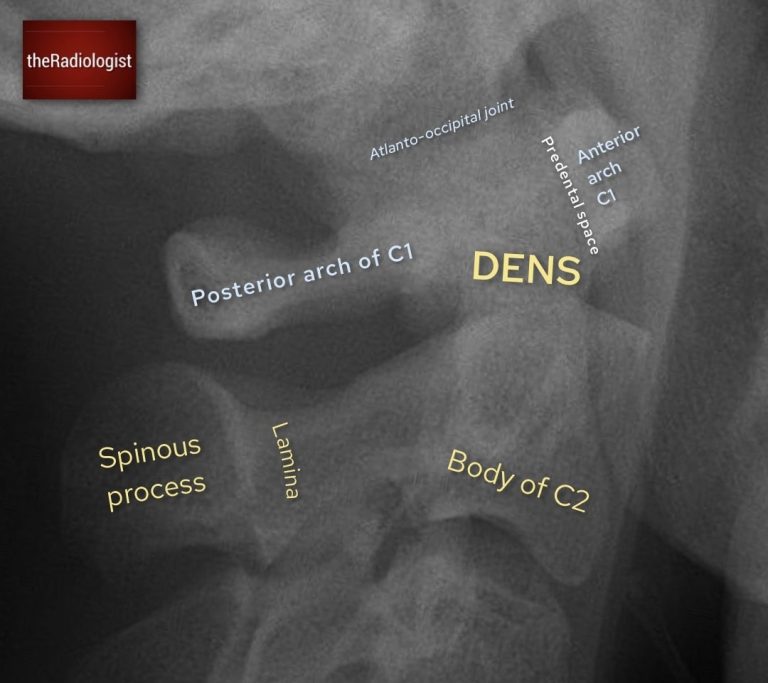
HOW TO READ A CERVICAL SPINE X-RAY
Learn about C-spine anatomy, alignment and peg view interpretation
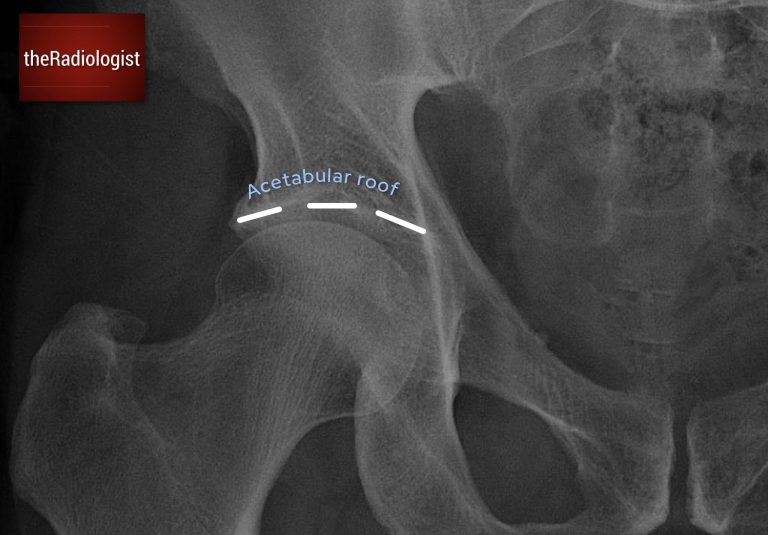
HOW TO READ A PELVIS X-RAY
Pelvis X-Ray anatomy, alignment and fracture review areas
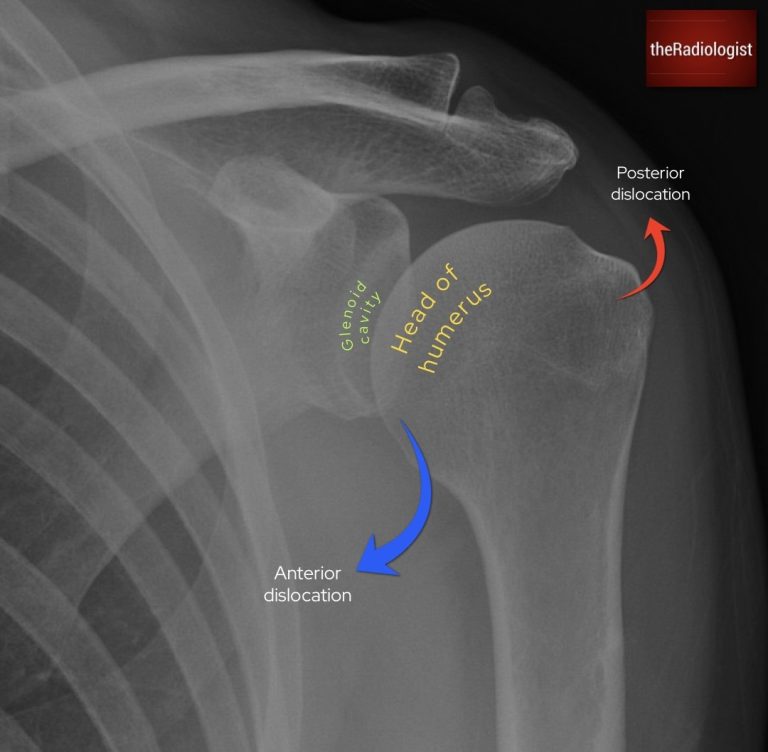
HOW TO READ A SHOULDER X-RAY
Shoulder X-ray anatomy, views and key alignment checks