
How to read a shoulder X-Ray
Shoulder X-ray anatomy, views and key alignment checks
Introduction
Shoulder X-Rays can be tricky. This guide walks you through everything step by step from essential anatomy and alignment tips to how to confidently spot dislocations, ACJ injuries, and hidden fractures. By the end you’ll have a solid approach and avoid the most common pitfalls.
General shoulder anatomy
The shoulder, or glenohumeral joint, is the most mobile joint in the human body, and because of that, it’s also one of the least stable. It’s a synovial ball and socket joint that connects the upper limb to the trunk, formed where the head of the humerus meets the shallow glenoid fossa of the scapula.
This setup allows a wide range of movement: flexion, extension, abduction, adduction, internal and external rotation, and full circumduction (ie moving your arm in a circular manner). What makes this possible is the mismatch in size between the two surfaces. The glenoid is small and shallow compared to the large, rounded head of the humerus, which means the bones themselves don’t provide much stability. Instead, the joint relies on surrounding soft tissues to keep everything in place.
A fibrocartilaginous rim called the glenoid labrum helps deepen the socket slightly and improve congruency. But the real stability comes from the joint capsule, ligaments, and muscles around the joint. The capsule itself is loose to allow movement, but it’s reinforced in several key places:
- The superior, middle, and inferior glenohumeral ligaments strengthen the front of the joint and help prevent anterior dislocation.
- The coracohumeral ligament runs from the coracoid process to the humerus and supports the joint from above.
- The transverse humeral ligament holds the tendon of the long head of biceps brachii in place within the bicipital groove.
The shoulder is also surrounded by a group of four muscles known as the rotator cuff: supraspinatus, infraspinatus, teres minor, and subscapularis (mnemonic: SITS). These muscles work together to stabilize the humeral head in the glenoid during movement. They blend into the joint capsule, forming a sleeve around it, and are essential for both stability and control.
To reduce friction and help smooth motion between structures, several bursae are found around the shoulder. The most clinically relevant are the subacromial, subdeltoid, and subcoracoid bursae. These fluid-filled sacs can become inflamed with overuse, particularly in people doing repetitive overhead activities.
With this much motion and relatively little bony support, it’s no surprise the shoulder is prone to problems. Dislocations, rotator cuff tears, impingement, labral injuries, and degenerative changes are all common, and often, a plain X-ray is the first step in figuring out what’s going on.
X-Ray anatomy and technique
Now let’s get to the important bit, how this all looks on an X-Ray as well as a bit on how we get the images. We will go through the AP as well as the Y and axial views.
AP view
The AP view is usually done with the patient standing upright, with their back flat against the X-ray plate. The shoulder you’re scanning should be in the centre of the image, and the arm just resting naturally by the side in a neutral position. To get the scapula in the right spot, the patient is usually turned just slightly (about 5 to 10 degrees) toward the side being X-rayed.
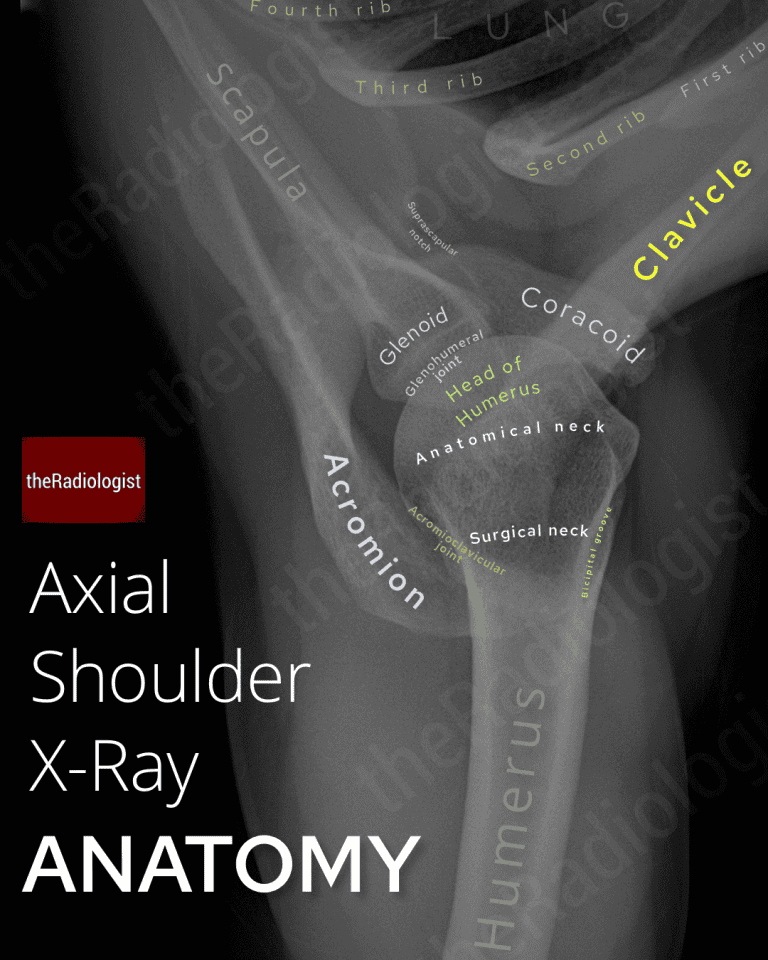
When looking at the anatomy on X-Ray, take note of the humeral head: it isn’t a perfect ball. On a standard AP view the humerus is slightly externally rotated making the humeral head look more like the head of a walking stick. You should see a smooth contour and alignment with the glenoid.
Note the difference between the surgical and anatomical neck of the proximal humerus:
The anatomical neck of the humerus is the groove just below the humeral head, separating it from the tubercles. It’s where the joint capsule attaches and is rarely fractured.
The surgical neck sits below the tubercles where the bone narrows into the shaft. It’s a common fracture site, especially in older adults, and often requires surgical treatment, hence the name.
Take a look at the acromioclavicular joint or ACJ. The undersides of the acromion and clavicle should line up. The space between them should be just less than 8 mm. Anything between 8 and 10 mm is borderline and might suggest early separation or degeneration whilst >10 mm is usually abnormal and usually suggests an ACJ injury. Also note you can get arthritis in this region with loss of joint space, subchondral sclerosis and osteophytosis.
The coracoid process is the hook-shaped bone near the front. The gap between it and the clavicle (coracoclavicular distance) should be no more than 13 mm. A wider gap could mean coracoclavicular ligament injury, especially after trauma.
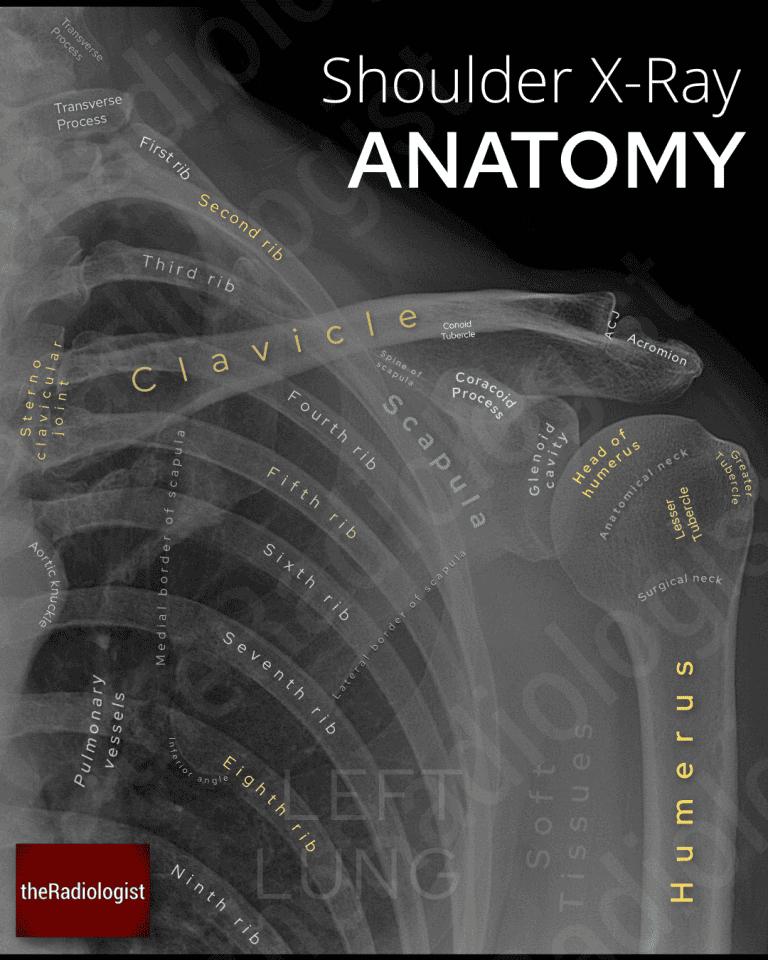
Annotated view of an AP shoulder X-Ray
Y view (lateral scapular view)
The Y view is done with the patient standing or sitting, facing the upright detector. They’re turned into an anterior oblique position, so the front of the shoulder touches the plate. The Y view is a great choice in patients who have limited mobility when compared with an axial view although it can miss small bone fragments and avulsion fractures.
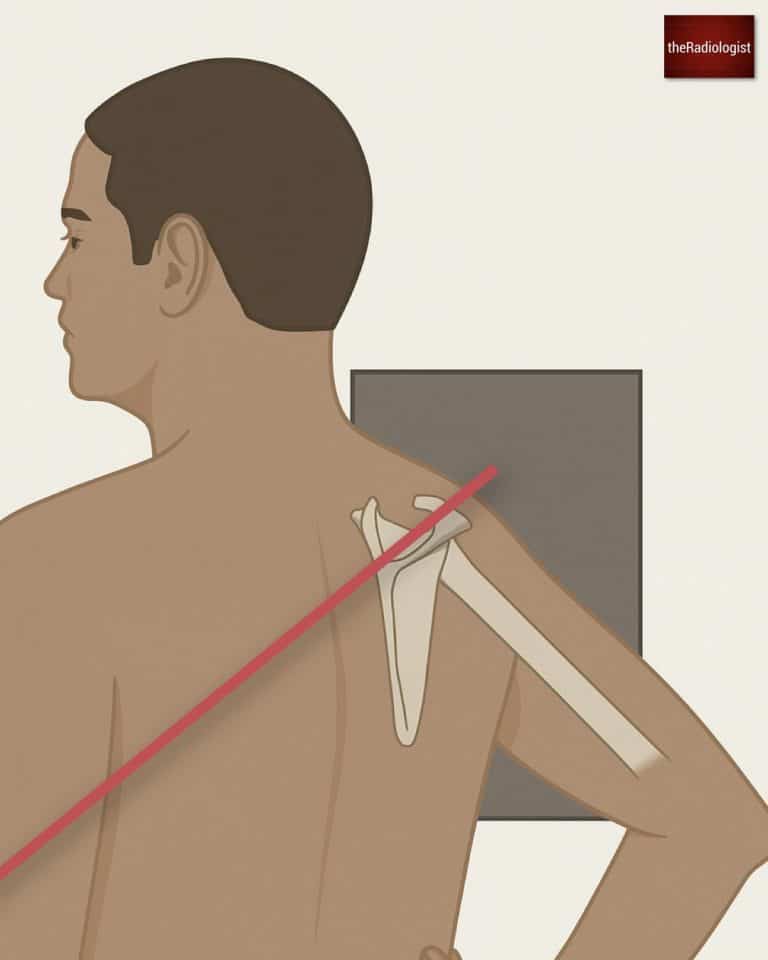
Acquiring a Y view X-Ray can be more straight forward in the context of pain than an axial view
With a Y view you’re looking to see if the humerus overlies the glenoid which is in the centre of the Y. If it doesn’t then you could have a dislocation.
Orientate yourself by finding the acromion which articulates with the clavicle. That’s one limb of the Y, making the other the coracoid process. The blade of the scapula courses inferiorly from the glenoid.
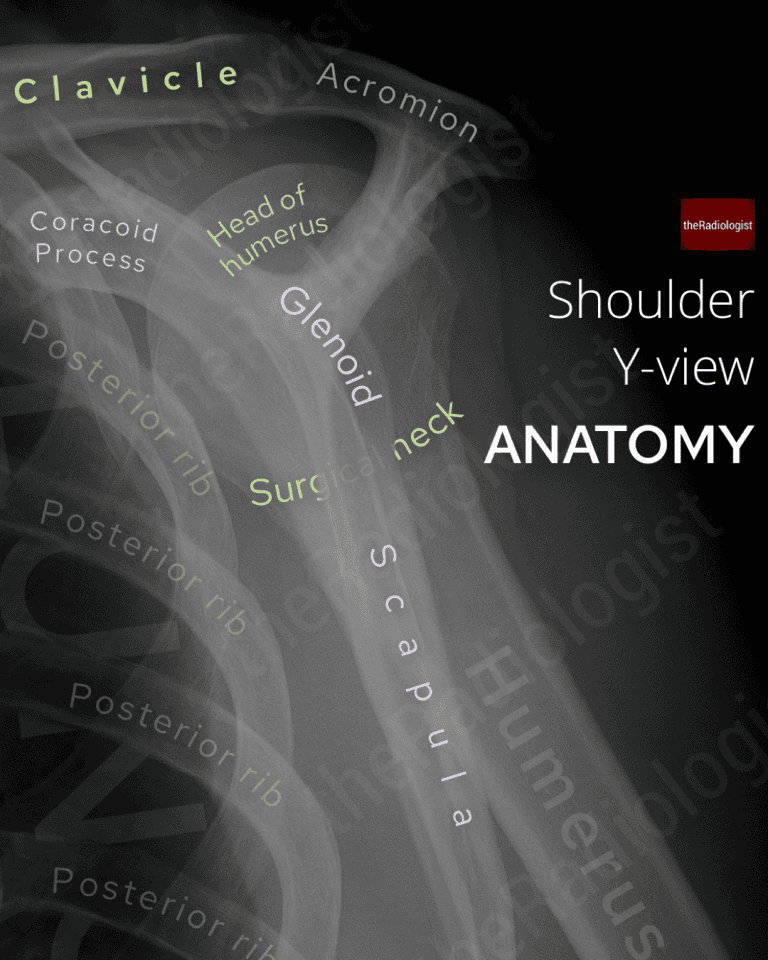
Annotated view of a ‘Y-view’ shoulder X-Ray
Axial view (axillary view)
An axial view is great for looking for subtle glenohumeral dislocation but requires the patient to abduct their arm – difficult when the patient is in pain.
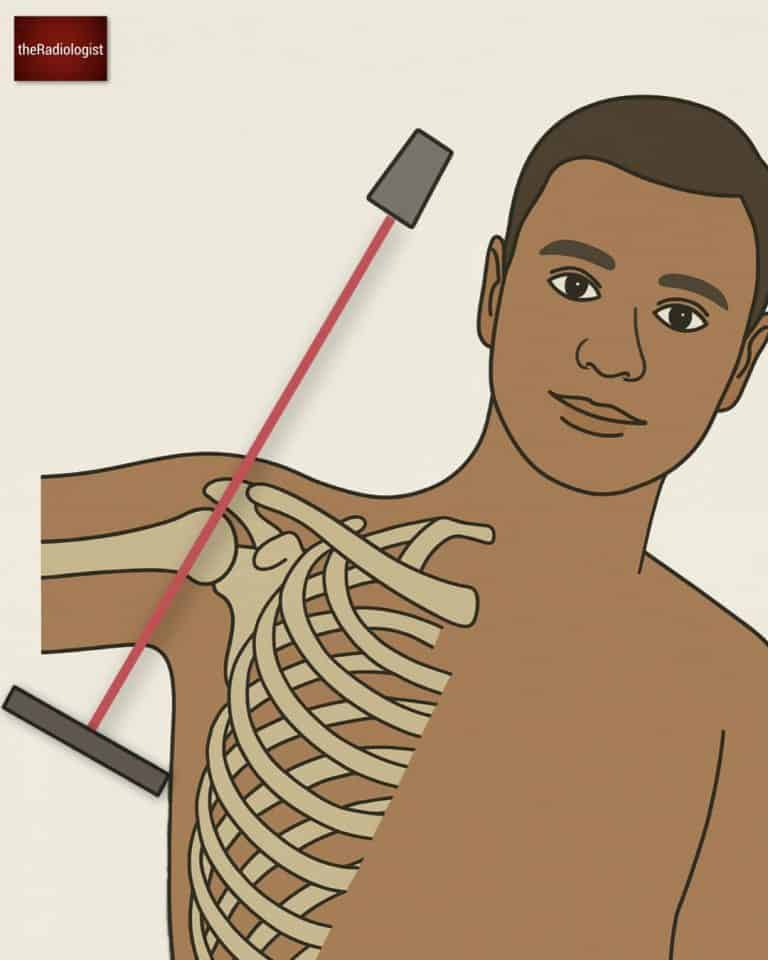
Axial views are great for assessing glenohumeral dislocation but can be difficult to acquire in the context of pain
In terms of understanding the anatomy, first try and orientate yourself. How do we identify the acromion and coracoid? Well the acromion should be articulating with the clavicle leaving the other process to be the coracoid. One other method is to imagine your index finger and thumb making a C shape with your index finger the acromion and your thumb the coracoid.
Annotated axial shoulder X-Ray
KEY POINT
An AP view is the ‘core’ shoulder view supplemented by another view to help assess glenohumeral alignment. A Y view can be easier to acquire than an axial view when the patient is in pain.
Shoulder X-Ray review areas
Let’s go through a step by step guide on how to assess an adult shoulder X-Ray in cases of trauma.
In terms of general principles it is important to check soft tissues, alignment and then sweep through the bones looking for any cortical defect that could be a fracture. Don’t be afraid of zooming up. I usually like to go through the core AP view first and then go through any supplementary views.
1. Look at the soft tissues
Look to see if there is any soft tissue swelling. Look for foci of calcification around the proximal humerus that may represent a calcific tendonitis.
2. Assess for dislocation
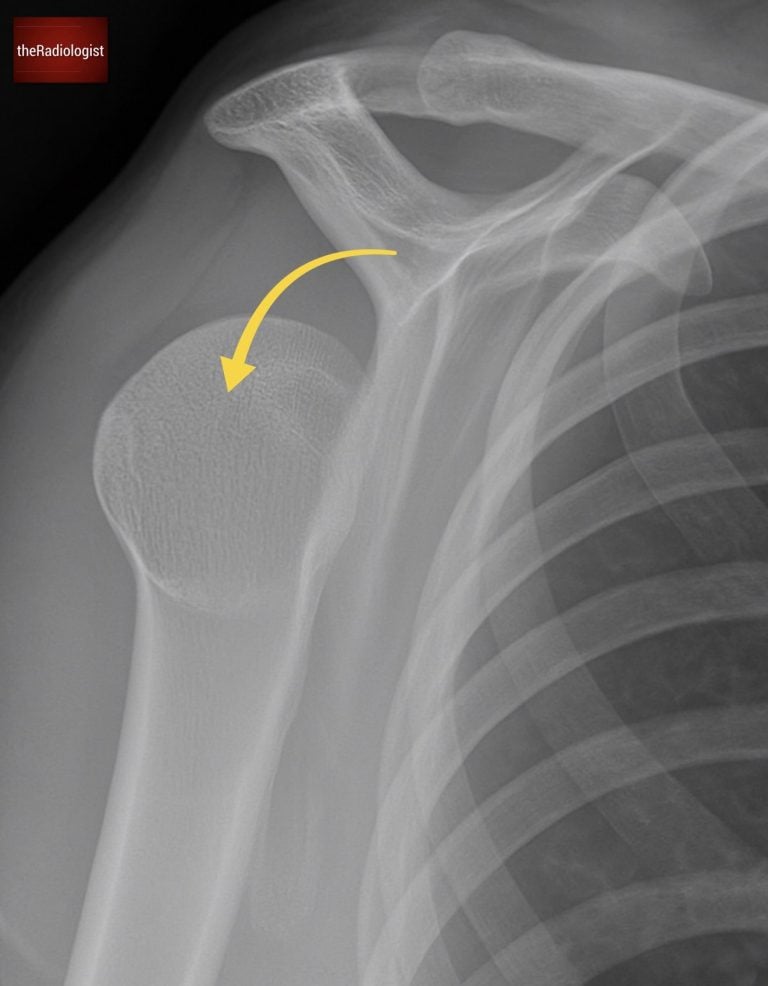
Check that the humeral head lines up with the glenoid cavity. In cases of anterior dislocation, the humeral head moves medially towards the thorax. Posterior dislocations can be tricky to assess and on an AP view the humeral head will show a ‘light bulb’ appearance. However, caution – if the humerus head is internally rotated the humeral head can have a light bulb appearance without being dislocated!
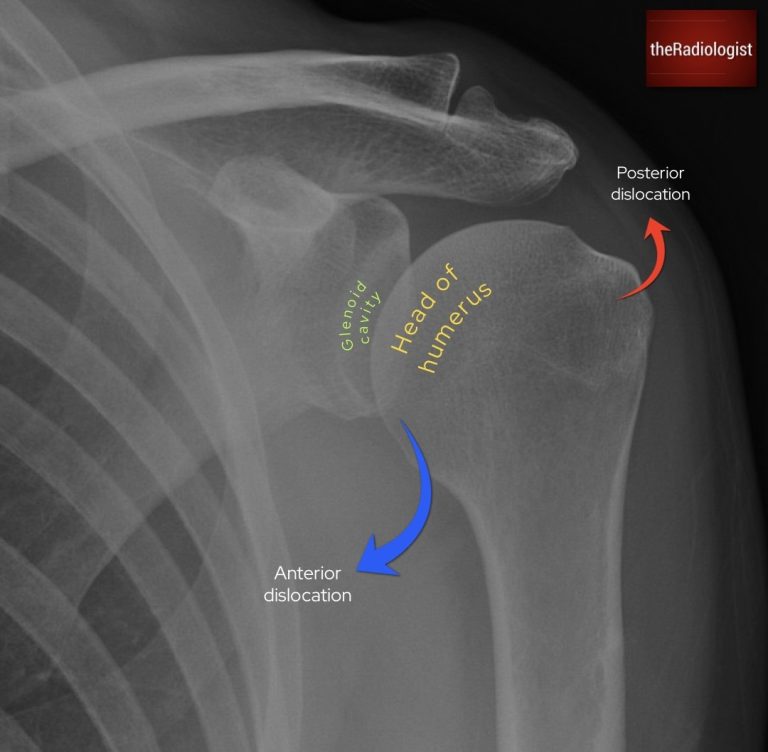
Check the humeral head lines up with the glenoid cavity. In anterior dislocation the humeral head moves towards the thorax.
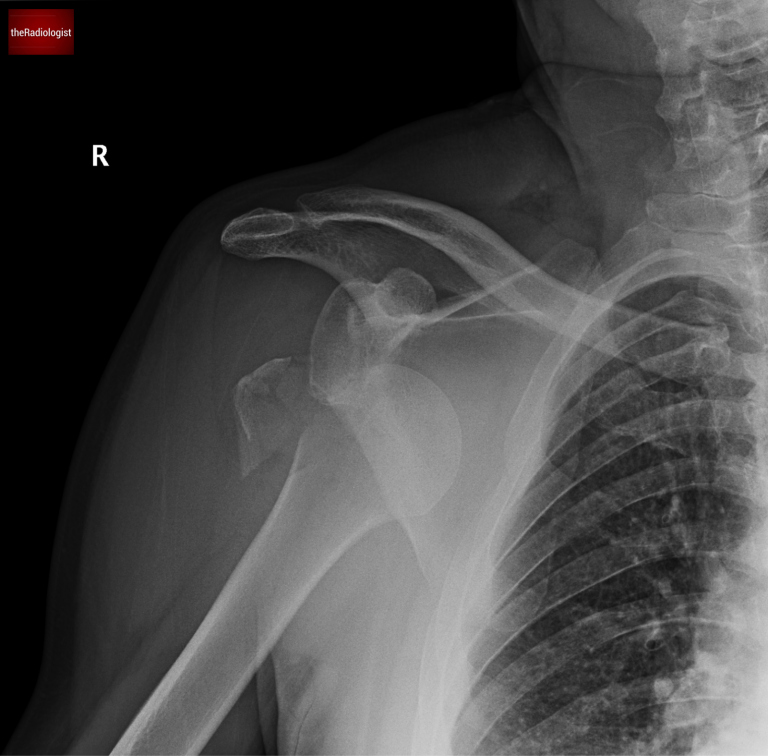
A case of an anterior dislocation and fracture. Note how the humeral head moves towards the thorax.
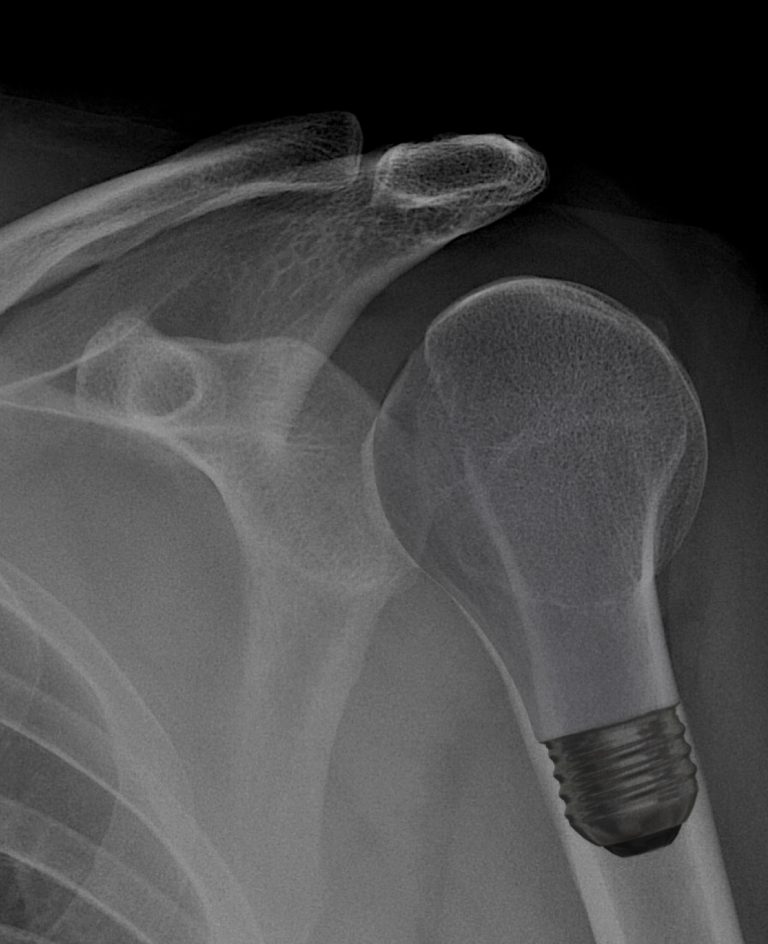
In a posterior dislocation the humeral head develops a light bulb appearance. But note this can happen without dislocation if the humerus is internally rotated at the time of the X-Ray.
Now assess your second view to confirm adequate glenohumeral alignment. On a Y view you are looking to see your humeral head lies in the centre of the Y, overlying the glenoid.
In a Y view look to see the humeral head overlies the glenoid. Here it has moved further away from the thorax: this is a posterior dislocation.
On an axial view you are looking to see if the golf ball (humerus) sits on a tee (glenoid). If it has moved off the tee there is likely to be a dislocation.
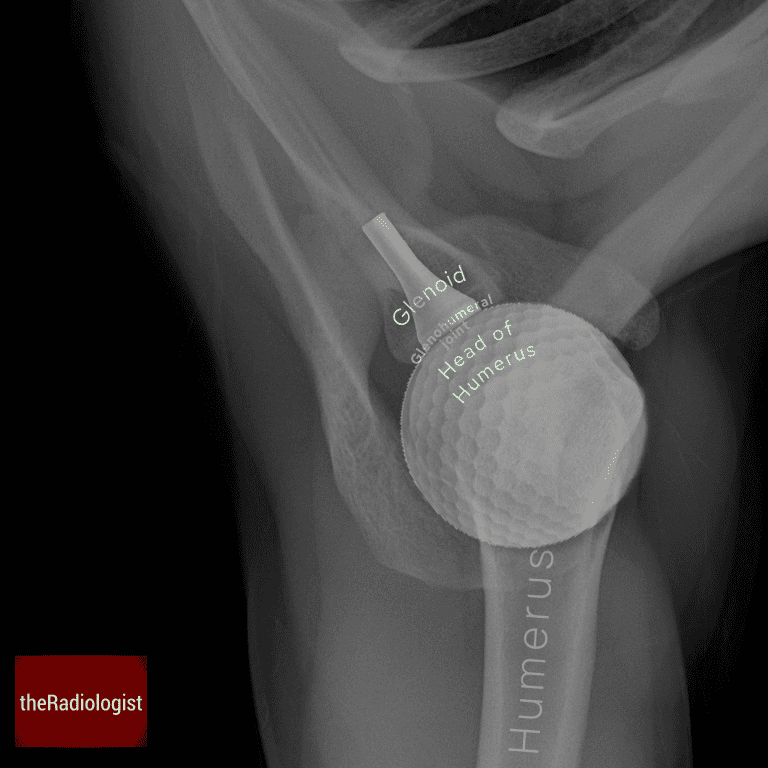
The golf ball (humeral head) sits on the tee (glenoid) on this axial view. There is no dislocation.
KEY POINT
In a posterior dislocation the humeral head can develop a ‘light bulb’ appearance on an AP view. However note this can happen if the humerus is simply internally rotated. A supplementary view such as a Y view or axial view can help differentiate.
3. Check the proximal humerus
Now take care in outlining the proximal humerus, making special care to outline the surgical neck which is more commonly fractured than the anatomical neck.
A depression in the posterolateral cortex of the proximal humerus can represent a Hills Sachs deformity which can be associated with anterior dislocation.
Make sure the proximal humerus isn’t inferiorly displaced which can present a shoulder effusion.
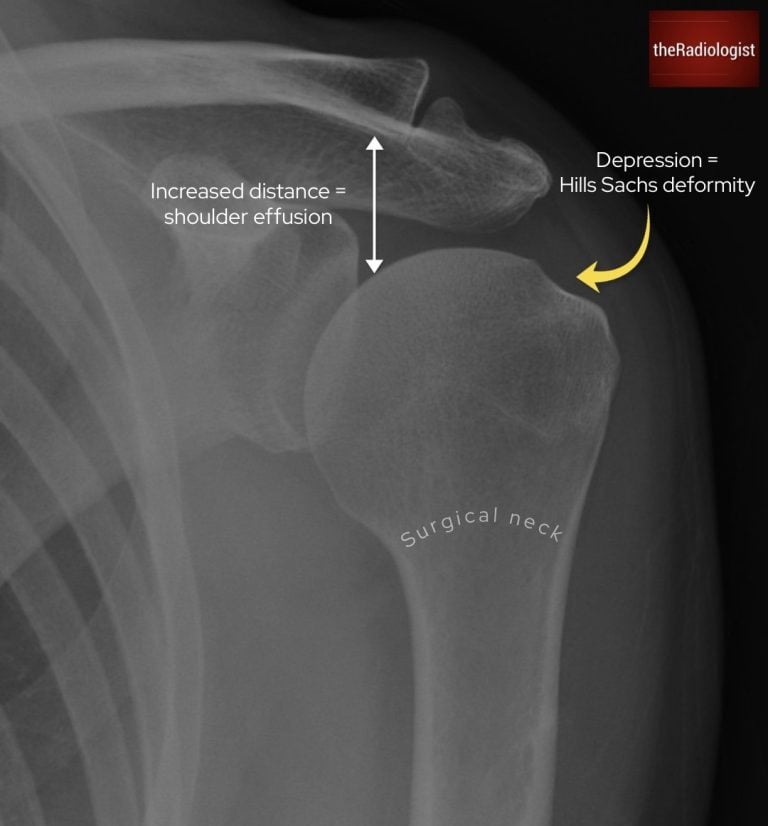
Interrogate the proximal humerus. Check the surgical neck, look for a posterolateral deformity and ensure the humeral head is not inferiorly displaced (shoulder effusion).
4. Assess the acromioclavicular joint and coracoclavicular distance
Check the distance between the acromion and clavicle – anything under 8 mm on an AP view is within normal limits with regards to an acute injury, 8-10 mm is borderline whilst over 10 mm suggests an ACJ injury. Then look at the positions relative to each other. The undersides of the acromion and clavicle should line up, if there is ligament injury the inferior border of the clavicle becomes superiorly displaced.
In even more significant injuries, the coracoclavicular ligament can be injured and the coracoclavicular distance becomes more than 13 mm so make sure you check this.
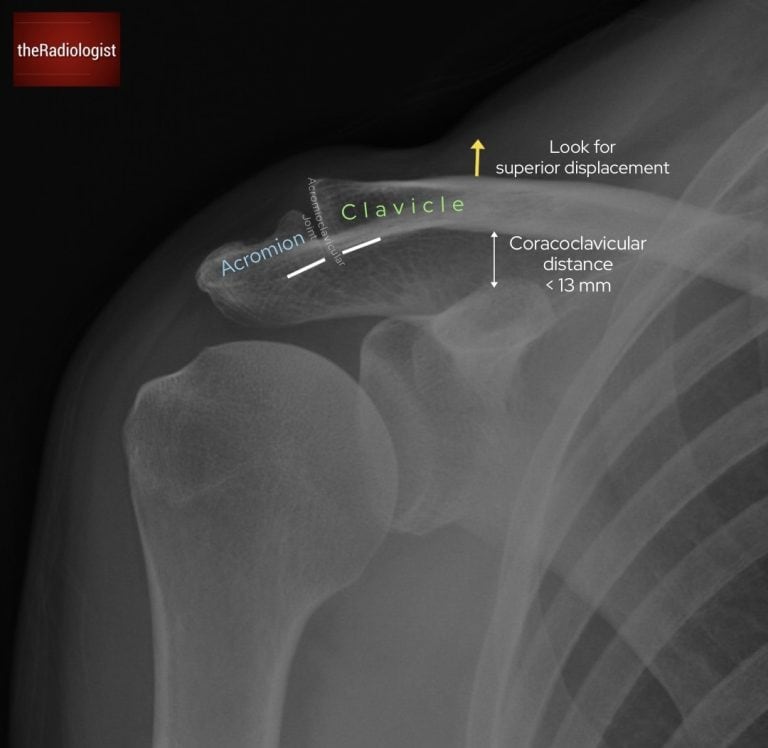
Assessing for ACJ injury: make sure the clavicle does not become superiorly displaced
5. Check the clavicle
Outline the entirety of the clavicle, assessing its alignment at the ACJ laterally and the sternoclavicular joint medially. Outline the cortex looking for a fracture which may be more difficult to see within the medial third in particular.
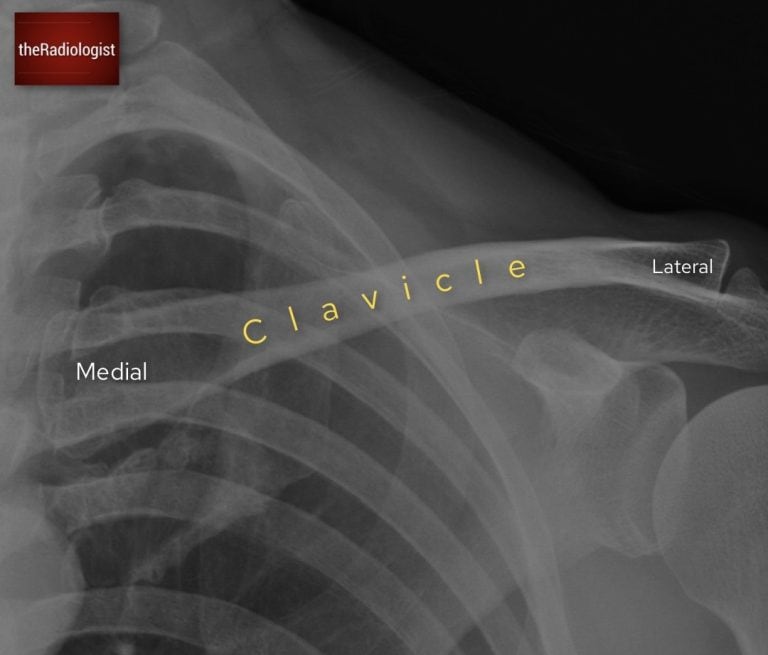
Check the alignment of the clavicle and make sure there isn’t a fracture.
6. Outline the scapula
Ensure you outline the whole scapula, including the medial border and inferior angle which are partially obscured by the lung. Also include the glenoid where fractures may be difficult to see without zooming in. Look for a fragment adjacent to the glenoid which could represent a bony Bankart lesion, a sign of recurrent dislocation.
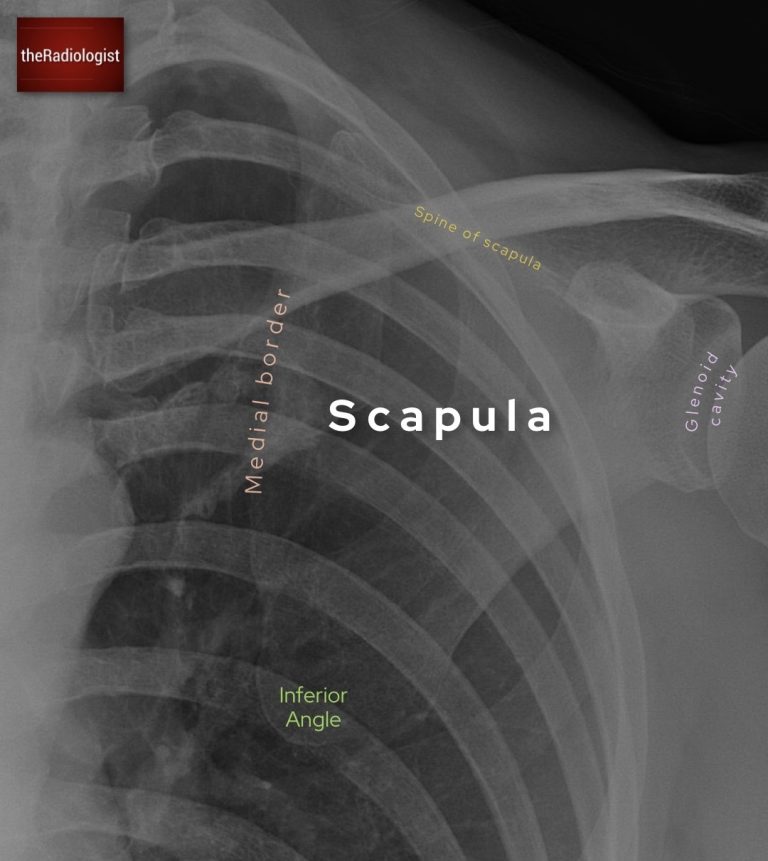
Ensure you outline the whole of the scapula including the inferior angle and medial border where fractures can get missed.
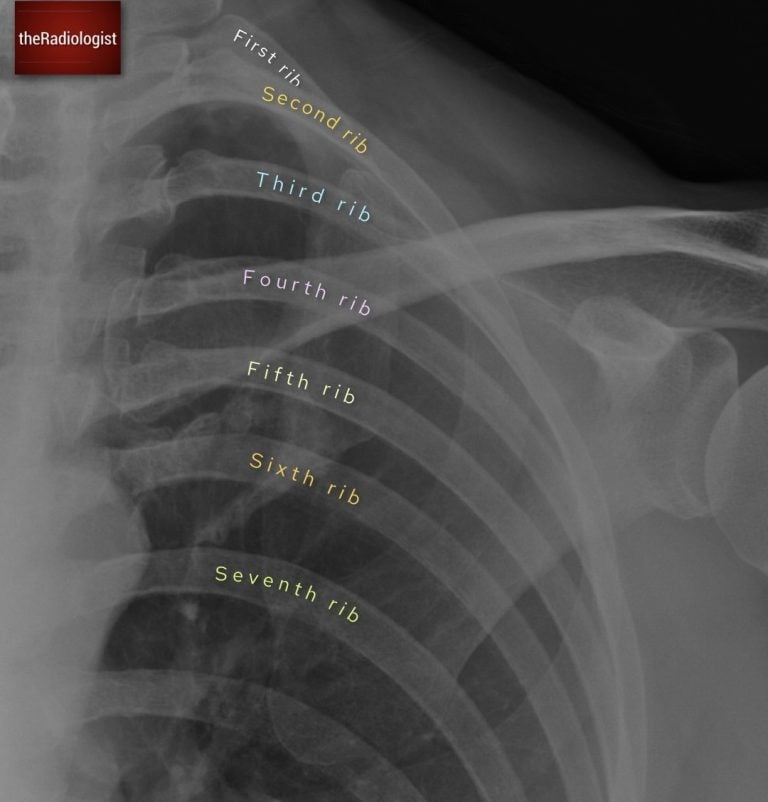
7. Assess the ribs
An AP shoulder X-Ray can give you a good view of the ribs, take the opportunity to assess for fracture or an aggressive rib lesion.
Ensure you outline the whole of the scapula including the inferior angle and medial border where fractures can get missed.
8. Assess the lung
Bear in mind that shoulder pain can be a presenting complaint of an apical lung cancer so review the visualised lung. I have seen lung cancer first picked up on a shoulder X-Ray many times over the years! Also make sure you are not dealing with a pneumothorax in the context of trauma.
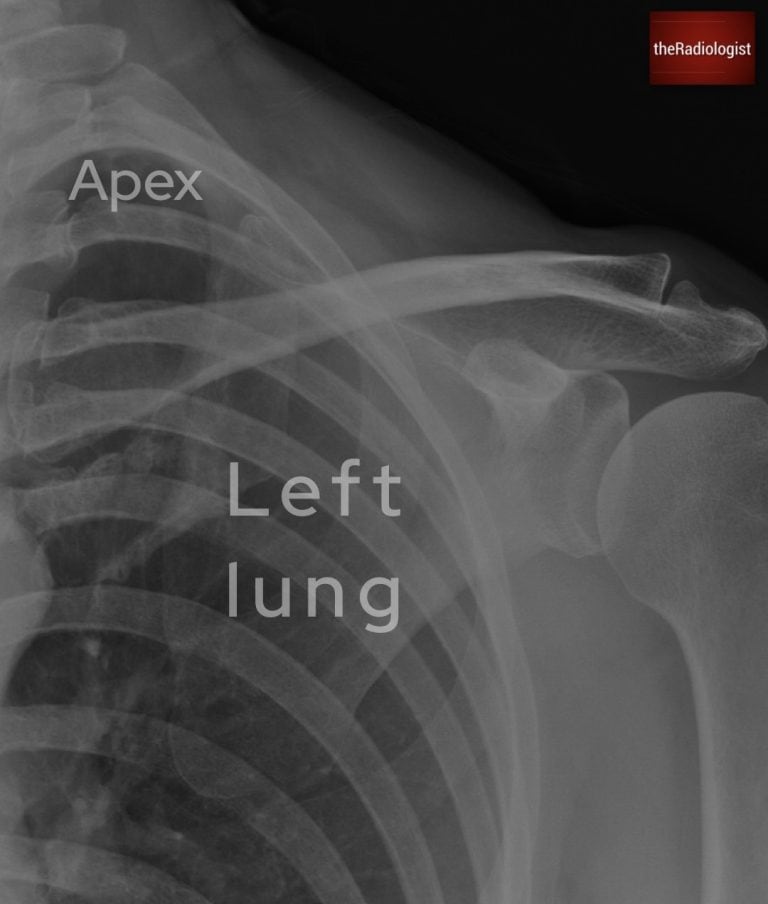
Review the lung making sure you don’t miss an apical lung lesion or pneumothorax in particular.
9. Outline any remaining bones
Go through all your available views, zoom up and outline all remaining cortices for a subtle fracture.
Review area checklist
Let’s summarise the above: below you’ll find a shoulder X-Ray checklist to help you when you next review a shoulder X-Ray.
| Review area | Notes |
|---|---|
| Soft tissues | Assess for soft tissue swelling. Look for calcification that may represent a calcific tendonitis. |
| Dislocation | Check the humeral head lines up with the glenoid on AP and supplementary views. |
| Proximal humerus | Assess for fracture especially at surgical neck. Check for Hill Sachs (depression in posterolateral cortex). Check for effusion: proximal humerus would be inferiorly displaced. |
| Acromioclavicular joint and coracoclavicular distance | Assess ACJ distance <8 mm. Assess undersides of acromion and clavicle - if clavicle raised suspect ACJ injury. Coracoclavicular distance should be <13 mm. |
| Clavicle | Ensure no fracture, interrogate the medial third as more difficult to assess. |
| Scapula | Outline the medial border and inferior angle in particular. Assess glenoid, ensure no bony Bankart lesion. |
| Ribs | Ensure no rib fracture or aggressive rib lesion. |
| Lung | Ensure no apical lung lesion or pneumothorax. |
| Remaining bones | Zoom up on rest of remaining bones on all views looking for a fracture. |
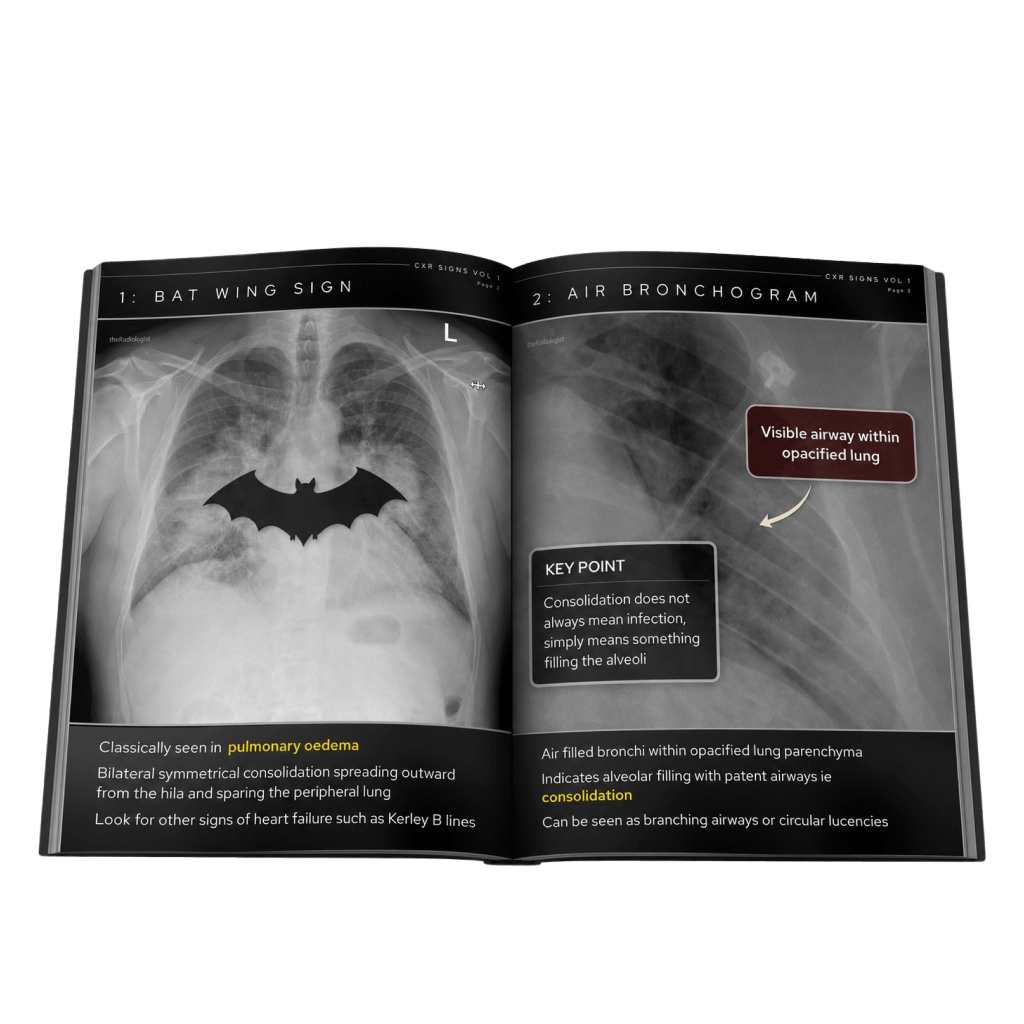
Free guide: 20 Chest X-Ray signs you need to recognise
Downloaded by 10,000+ healthcare professionals.
Get 20 annotated chest X-ray signs with clear teaching points and explanations. Written by a Consultant Radiologist, this free guide is designed to help you recognise important findings more confidently when reviewing chest X-Rays.


More to explore
You’ve got the framework now let’s put it to work. Dive into a related case to see these findings on real images, or explore another guide to build out your systematic approach. That’s where it really starts to stick.
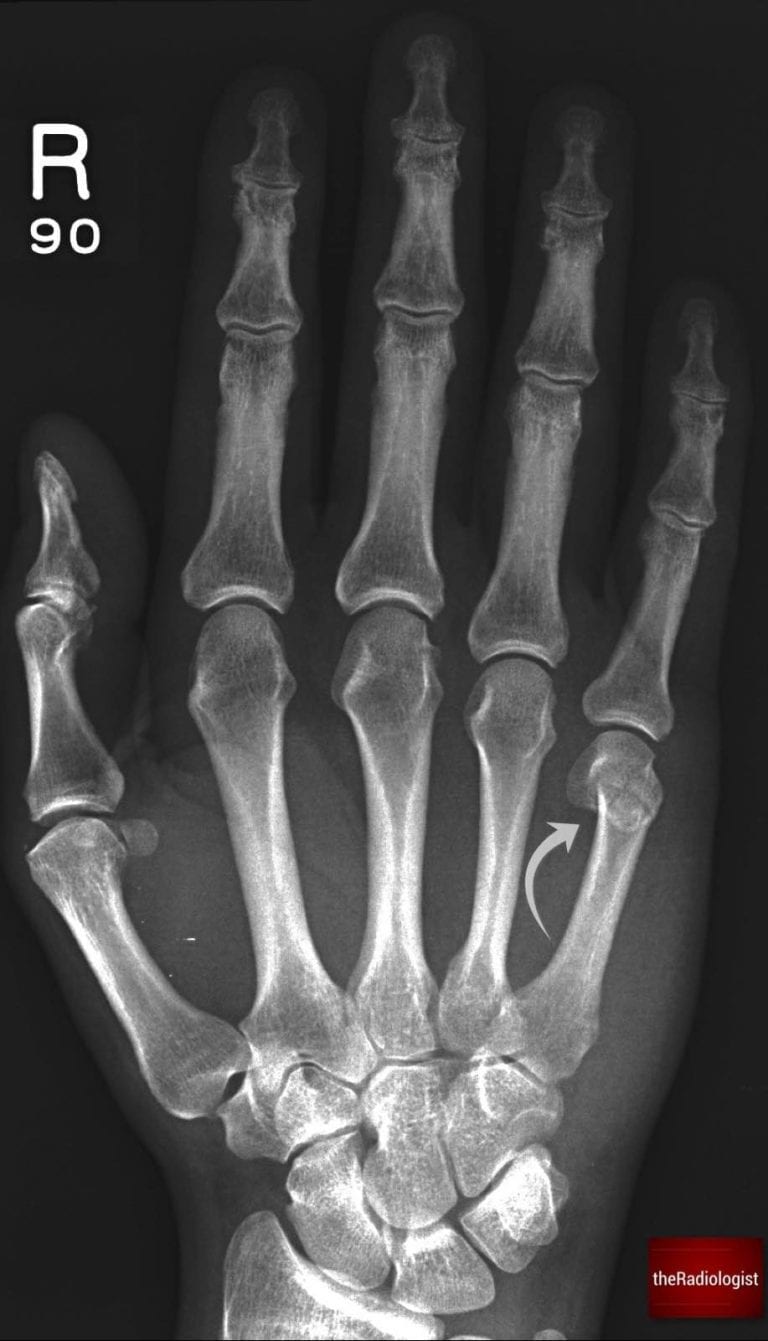
HOW TO READ A HAND X-RAY
Hand and wrist X-Ray anatomy, views and key review areas
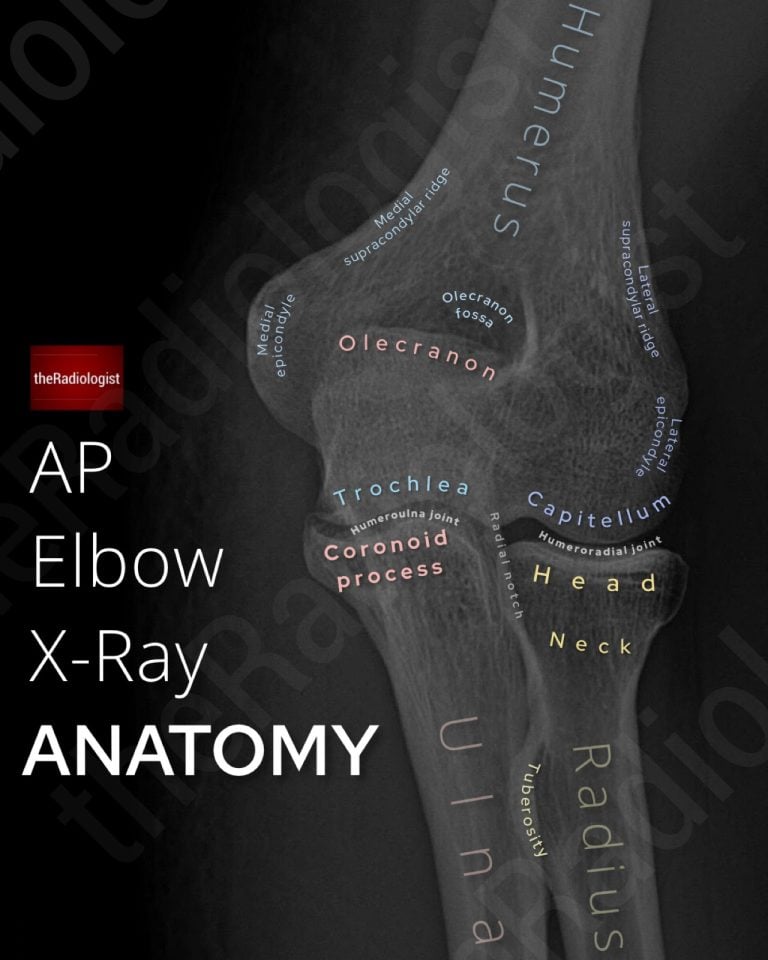
HOW TO READ AN ELBOW X-RAY
AP, lateral and labelled anatomy for interpretation
ASSESSING SHOULDER DISLOCATION
Anterior dislocation signs, key views and associated fractures